android开发中按键震动按键声音实现原理机制
如果我们的android应用程序在按键的时候想调用系统的震动服务,我们得先再AndroidMainfest.xml里面加上相应的权限
<uses-permission android:name="android.permission.VIBRATE" />
然后就是
Vibrator vibrator = (Vibrator) getSystemService(VIBRATOR_SERVICE);
// vibrator.vibrate(3000);
// 设置Vibrate的震动周期
vibrator.vibrate(new long[]{1000,2000,3000,4000}, 0);
这里再网上找了个写好的震动的方法类
package com.lxb.switchdemo;

import android.app.Activity;
import android.app.Service;
import android.os.Vibrator;
import android.widget.LinearLayout;

/**
 * 手机震动工具类
 *
 * @author Administrator
 *
 */
public class VibratorUtil {

    /**
     * final Activity activity :调用该方法的Activity实例 long milliseconds :震动的时长,单位是毫秒
     * long[] pattern :自定义震动模式 。数组中数字的含义依次是[静止时长,震动时长,静止时长,震动时长。。。]时长的单位是毫秒
     * boolean isRepeat : 是否反复震动,如果是true,反复震动,如果是false,只震动一次
     */

    public static void Vibrate(final Activity activity, long milliseconds) {
        Vibrator vib = (Vibrator) activity
                .getSystemService(Service.VIBRATOR_SERVICE);
        vib.vibrate(milliseconds);
    }

    public static void Vibrate(final Activity activity, long[] pattern,
            boolean isRepeat) {
        Vibrator vib = (Vibrator) activity
                .getSystemService(Service.VIBRATOR_SERVICE);
        vib.vibrate(pattern, isRepeat ? 1 : -1);
    }
}
当然在你的activity里面调用的时候只需要在onclick下加上
VibratorUtil.Vibrate(Switch_demoActivity.this, 100);
即可实现简单的震动机制
下来总结下按键声音的机制实现,
public class MainActivity extends Activity {
    private Button mButton01;
    private SoundPool sp;//声明一个SoundPool
    private int music;//定义一个整型用load();来设置suondID

    @Override
    public void onCreate(Bundle savedInstanceState) {

        super.onCreate(savedInstanceState);
        setContentView(R.layout.activity_main);
        mButton01=(Button)findViewById(R.id.mButton01);
        sp= new SoundPool(10, AudioManager.STREAM_SYSTEM, 5);//第一个参数为同时播放数据流的最大个数,第二数据流类型,第三为声音质量
        music = sp.load(this, R.raw.start, 1); //把你的声音素材放到res/raw里,第2个参数即为资源文件,第3个为音乐的优先级

        mButton01.setOnClickListener(new OnClickListener(){
            @Override
           public void onClick(View v) {
             sp.play(music, 1, 1, 0, 0, 1);
       }
    }
  }
}
raw是在res下面新建文件夹,里面都是不需要编译的可以直接用的资源文件,当然为了避免在有的机器里面不能识别按键声音的问日,最好把需要加载的音频格式转换成ogg格式。
Android客户端利用Socket连接服务器的大概思路如下:
客户端首次连接服务器:
socket = new Socket();
    SocketAddress address = new InetSocketAddress(svrHost, svrPort);
    socket.connect(address, TIME_OUT);
    socket.setSoTimeout(TIME_OUT);
    in = new BufferedReader(new InputStreamReader(
            socket.getInputStream()));

    out = new PrintWriter(new BufferedWriter(
            new OutputStreamWriter(socket.getOutputStream())), true);
连接服务器之后,调用注册或者登录,获取连接的token。 以后每次的连接获取信息都要带上约定的token。
连接建立以后,socket不必关闭,毕竟每次connect也浪费资源,可以一直挂住等待服务端的推送或者心跳等消息。
while (!exitSocket) {
    try {
        if (!socket.isClosed() && socket.isConnected()
                && !socket.isInputShutdown()) {
            char[] lenBuffer = new char[13];
            int len = 0;
            try  {
                len = in.read(lenBuffer);
            } catch (Exception e) {
                Utils.debug("SocketSvr socket read timeout");
                stopSocketByException(true);
            }
每次的请求,server端返回的数据都包含在lenBuffer中,一般是约定好的json或者是其他格式的信息。
整体思路是和TCP是一样的,更多的问题出现在细节处理上和socket的生命周期的维护上。
比如如果断网或者出现异常导致socket出现exception,这时可能需要把当前的socket关闭(timeoutException应该不需要重启),然后重新启动新的socket,但是对于终端用户来说,应当避免的是让用户感觉到有界面的异动,需要立即重新连接server。
Android客户端通过socket与服务器通信实例
由于Android里面可以完全使用java.io.*包和java.net.*包,那么,实际上,逻辑部分与J2SE没有区别。只是UI代码不一样。
Android客户端通过socket与服务器通信分为下面5步:
(1)通过IP地址和端口实例化Socket,请求连接服务器;
socket = new Socket("10.14.114.127",54321); //IP:10.14.114.127,端口54321
(2)获取Socket流以进行读写,并把流包装进BufferWriter或者PrintWriter
PrintWriter out = new PrintWriter( new BufferedWriter( new OutputStreamWriter(socket.getOutputStream())),true);
这里涉及了三个类:socket.getOutputStream得到socket的输出字节流,OutputStreamWriter是字节流向字符流转换的桥梁,BufferWriter是字符流,然后再包装进PrintWriter。
(3)对Socket进行读写
out.println(message);
(4)关闭打开的流
out.close();
完整工程代码如下:
package com.yarin.android.Examples_08_04;

import java.io.BufferedReader;
import java.io.BufferedWriter;
import java.io.InputStreamReader;
import java.io.OutputStreamWriter;
import java.io.PrintWriter;
import java.net.Socket;

import android.app.Activity;
import android.os.Bundle;
import android.util.Log;
import android.view.View;
import android.view.View.OnClickListener;
import android.widget.Button;
import android.widget.EditText;
import android.widget.TextView;

public class Activity01 extends Activity
{
    private final String        DEBUG_TAG   = "Activity01";

    private TextView    mTextView = null;
    private EditText    mEditText = null;
    private Button      mButton = null;
    /** Called when the activity is first created. */
    @Override
    public void onCreate(Bundle savedInstanceState)
    {
        super.onCreate(savedInstanceState);
        setContentView(R.layout.main);

        mButton = (Button)findViewById(R.id.Button01);
        mTextView = (TextView)findViewById(R.id.TextView01);
        mEditText = (EditText)findViewById(R.id.EditText01);

        //登陆
        mButton.setOnClickListener(new OnClickListener()
        {
            public void onClick(View v)
            {
                Socket socket = null;
                String message = mEditText.getText().toString() + "/r/n";
                try
                {
                    //创建Socket
//                  socket = new Socket("192.168.1.110",54321);
                    socket = new Socket("10.14.114.127",54321); //IP:10.14.114.127,端口54321
                    //向服务器发送消息
                    PrintWriter out = new PrintWriter( new BufferedWriter( new OutputStreamWriter(socket.getOutputStream())),true);
                    out.println(message);

                    //接收来自服务器的消息
                    BufferedReader br = new BufferedReader(new InputStreamReader(socket.getInputStream()));
                    String msg = br.readLine();

                    if ( msg != null )
                    {
                        mTextView.setText(msg);
                    }
                    else
                    {
                        mTextView.setText("数据错误!");
                    }
                    //关闭流
                    out.close();
                    br.close();
                    //关闭Socket
                    socket.close();
                }
                catch (Exception e)
                {
                    // TODO: handle exception
                    Log.e(DEBUG_TAG, e.toString());
                }
            }
        });
    }
}
布局文件main.xml
<?xml version="1.0" encoding="utf-8"?>
<LinearLayout xmlns:android="http://schemas.android.com/apk/res/android"
    android:orientation="vertical"
    android:layout_width="fill_parent"
    android:layout_height="fill_parent"
    >
    <TextView
    android:id="@+id/TextView01"
    android:layout_width="fill_parent"
    android:layout_height="wrap_content"
    android:text="这里显示接收到服务器发来的信息"
    />
    <EditText
    android:id="@+id/EditText01"
    android:text="输入要发送的内容"
    android:layout_width="fill_parent"
    android:layout_height="wrap_content">
    </EditText>
    <Button
    android:id="@+id/Button01"
    android:layout_width="fill_parent"
    android:layout_height="wrap_content"
    android:text="发送"
    />
</LinearLayout>
AndroidManifest.xml文件如下
<?xml version="1.0" encoding="utf-8"?>
<manifest xmlns:android="http://schemas.android.com/apk/res/android"
      package="com.yarin.android.Examples_08_04"
      android:versionCode="1"
      android:versionName="1.0">
    <application android:icon="@drawable/icon" android:label="@string/app_name">
        <activity android:name=".Activity01"
                  android:label="@string/app_name">
            <intent-filter>
                <action android:name="android.intent.action.MAIN" />
                <category android:name="android.intent.category.LAUNCHER" />
            </intent-filter>
        </activity>
    </application>
    <uses-permission android:name="android.permission.INTERNET"></uses-permission>
    <uses-sdk android:minSdkVersion="5" />
</manifest>
当然,还有服务器端得代码
package com.yarin.android.Examples_08_04;

import java.io.BufferedReader;
import java.io.BufferedWriter;
import java.io.InputStreamReader;
import java.io.OutputStreamWriter;
import java.io.PrintWriter;
import java.net.ServerSocket;
import java.net.Socket;

public class Server implements Runnable
{
    public void run()
    {
        try
        {
            //创建ServerSocket
            ServerSocket serverSocket = new ServerSocket(54321);
            while (true)
            {
                //接受客户端请求
                Socket client = serverSocket.accept();
                System.out.println("accept");
                try
                {
                    //接收客户端消息
                    BufferedReader in = new BufferedReader(new InputStreamReader(client.getInputStream()));
                    String str = in.readLine();
                    System.out.println("read:" + str);
                    //向服务器发送消息
                    PrintWriter out = new PrintWriter( new BufferedWriter( new OutputStreamWriter(client.getOutputStream())),true);
                    out.println("server message");
                    //关闭流
                    out.close();
                    in.close();
                }
                catch (Exception e)
                {
                    System.out.println(e.getMessage());
                    e.printStackTrace();
                }
                finally
                {
                    //关闭
                    client.close();
                    System.out.println("close");
                }
            }
        }
        catch (Exception e)
        {
            System.out.println(e.getMessage());
        }
    }
    //main函数,开启服务器
    public static void main(String a[])
    {
        Thread desktopServerThread = new Thread(new Server());
        desktopServerThread.start();
    }
}
先开启服务器代码,
java Server即可
然后启动android模拟器。运行结果
这是Android客户端。输入12345,点击发送:
这是服务器端收到的消息

android获取wifi外网ip的方法
// 获取外网IP
public static String GetNetIp() {
    URL infoUrl = null;
    InputStream inStream = null;
    try {
        // http://iframe.ip138.com/ic.asp
        // infoUrl = new URL("http://city.ip138.com/city0.asp");
        infoUrl = new URL("http://ip38.com");
        URLConnection connection = infoUrl.openConnection();
        HttpURLConnection httpConnection = (HttpURLConnection) connection;
        int responseCode = httpConnection.getResponseCode();
        if (responseCode == HttpURLConnection.HTTP_OK) {
            inStream = httpConnection.getInputStream();
            BufferedReader reader = new BufferedReader(
                    new InputStreamReader(inStream, "utf-8"));
            StringBuilder strber = new StringBuilder();
            String line = null;
            while ((line = reader.readLine()) != null)
                strber.append(line + "\n");
            inStream.close();
            // 从反馈的结果中提取出IP地址
            // int start = strber.indexOf("[");
            // Log.d("zph", "" + start);
            // int end = strber.indexOf("]", start + 1);
            // Log.d("zph", "" + end);
            line = strber.substring(378, 395);
            line.replaceAll(" ", "");
            return line;
        }
    } catch (MalformedURLException e) {
        e.printStackTrace();
    } catch (IOException e) {
        e.printStackTrace();
    }
    return null;
}
另有一个获取外网IP的高端方法
public static String GetNetIp()
{
String IP = "";
try
{
String address = "http://ip.taobao.com/service/getIpInfo2.php?ip=myip";
URL url = new URL(address);
HttpURLConnection connection = (HttpURLConnection) url
.openConnection();
connection.setUseCaches(false);

if (connection.getResponseCode() == HttpURLConnection.HTTP_OK)
{
InputStream in = connection.getInputStream();

// 将流转化为字符串
BufferedReader reader = new BufferedReader(
new InputStreamReader(in));

String tmpString = "";
StringBuilder retJSON = new StringBuilder();
while ((tmpString = reader.readLine()) != null)
{
retJSON.append(tmpString + "\n");
}

JSONObject jsonObject = new JSONObject(retJSON.toString());
String code = jsonObject.getString("code");
if (code.equals("0"))
{
JSONObject data = jsonObject.getJSONObject("data");
IP = data.getString("ip") + "(" + data.getString("country")
+ data.getString("area") + "区"
+ data.getString("region") + data.getString("city")
+ data.getString("isp") + ")";

Log.e("提示", "您的IP地址是:" + IP);
}
else
{
IP = "";
Log.e("提示", "IP接口异常,无法获取IP地址!");
}
}
else
{
IP = "";
Log.e("提示", "网络连接异常,无法获取IP地址!");
}
}
catch (Exception e)
{
IP = "";
Log.e("提示", "获取IP地址时出现异常,异常信息是:" + e.toString());
}
return IP;
}
Android 获取wifi的IP地址
WifiManager wifimanage=(WifiManager)context.getSystemService(Context.WIFI_SERVICE);//获取WifiManager

//检查wifi是否开启

if(!wifimanage.isWifiEnabled())  {

  wifimanage.setWifiEnabled(true);

}

WifiInfo wifiinfo= wifimanage.getConnectionInfo();

String ip=intToIp(wifiinfo.getIpAddress());

//将获取的int转为真正的ip地址,参考的网上的,修改了下

private String intToIp(int i)  {
  return (i & 0xFF)+ "." + ((i >> 8 ) & 0xFF)? + "." + ((i >> 16 ) & 0xFF) +"."+((i >> 24 ) & 0xFF );
}
OK,这样就好了吗?呵呵,别忘记加上权限
<uses -permission="" android:name="android.permission.ACCESS_WIFI_STATE"></uses>
<uses -permission="" android:name="adnroid.permission.CHANGE_WIFI_STATE"></use
android开发 获取WIFI和有线的IP地址
首先设置权限:
<uses-permission android:name="android.permission.ACCESS_WIFI_STATE"></uses-permission>
<uses-permission android:name="android.permission.CHANGE_WIFI_STATE"></uses-permission>
<uses-permission android:name="android.permission.WAKE_LOCK"></uses-permission>
/**
* if (intf.getName().toLowerCase().equals("eth0") || intf.getName().toLowerCase().equals("wlan0"))
* 表示:仅过滤无线和有线的ip. networkInterface是有很多的名称的
* 比如sim0,remt1.....等等.我不需要用到就直接过滤了
*
* if (!ipaddress.contains("::"))
* 表示: 过滤掉ipv6的地址.不管无线还是有线 都有这个地址,
* 我这边显示地址大体是:fe80::288:88ff:fe00:1%eth0 fe80::ee17:2fff:fece:c0b4%wlan0
* 一般都是出现在第一次循环.第二次循环就是真正的ipv4的地址.
*
* @return
* @throws SocketException
*/
public String GetIpAddress() throws SocketException {
String ipaddress = "";
Enumeration<NetworkInterface> netInterfaces = null;
try {
netInterfaces = NetworkInterface.getNetworkInterfaces();
while (netInterfaces.hasMoreElements()) {
NetworkInterface intf = netInterfaces.nextElement();
if (intf.getName().toLowerCase().equals("eth0") | | intf.getName().toLowerCase().equals("wlan0")) {
for (Enumeration<InetAddress> enumIpAddr = intf.getInetAddresses(); enumIpAddr.hasMoreElements();) {
InetAddress inetAddress = enumIpAddr.nextElement();
if (!inetAddress.isLoopbackAddress()) {
ipaddress = inetAddress.getHostAddress().toString();
if (!ipaddress.contains("::")) {// ipV6的地址
ipaddress = ipaddress;
}
}
}
} else {
continue;
}
}
} catch (Exception e) {
e.printStackTrace();
}
// final ContentResolver mContentResolver = getContentResolver();
// Settings.System.putInt( mContentResolver,
// Settings.System.WIFI_USE_STATIC_IP, 1);
// Settings.System.putString( mContentResolver,
// Settings.System.WIFI_STATIC_IP, "你的ip地址");

return ipaddress;
}


public String getAddress() {
WifiManager wifiManager = (WifiManager) getActivity().getSystemService(Context.WIFI_SERVICE);
// 判断wifi是否开启
if (!wifiManager.isWifiEnabled()) {
wifiManager.setWifiEnabled(true);
}
WifiInfo wifiInfo = wifiManager.getConnectionInfo();
DhcpInfo info = wifiManager.getDhcpInfo();
int ipAddress = wifiInfo.getIpAddress();
int ii = info.ipAddress;
// return intToIp(ipAddress);
return ipAddress + "    dhcp: " + ii;

}


private String intToIp(int i) {
return (i & 0xFF) + "." +
((i >> 8) & 0xFF) + "." +
((i >> 16) & 0xFF) + "." +
(i >> 24 & 0xFF);
}
}先介绍drawable属性的区别,这个算是比较简单的,但是还是有一点点的小细节需要进行说明,drawable有五个文件夹,分别为hdpi,ldpi,mdpi,xdpi,xxdpi,这五个文件夹想必大家都知道,其实就是为了适应不同分辨率,由于手机分辨率的不同,因此我们的图片需要适应不同手机的分辨率...hdpi:480x800 mdpi:480x320 ldpi:320x240xdpi:1280x720 xxdpi 1920x1280其实这个数字并不是非常精确的,只是说明每一个阶段都有一个分辨率范围...Android由于和IOS不一样,IOS是不需要考虑分辨率的,但是Android必须要考虑分辨率问题,比如说我们在hdpi中放入的图片在布局中显示是非常正常的,但是在xdpi里,那就会变得非常的小...因此我们在设计app的时候,我们需要考虑不同的手机,因此我们需要在这几个文件夹中分别放入不同大小的图片,这样Andorid系统可以根据手机的分辨率来选择合适的图片资源进行加载,收一下dip到底表示的是什么意思,Android中表示大小的一个单位,dpi指像素/英寸,简单的说一下dpi到底表示的大小值...ldpi指120,mdpi指160,hdpi 指240,xhdpi指320。比如说小米手机是4英寸、854×480的分辨率,那么小米手机的dpi就是854的平方加480的平方和开2次方后除以4,结果大约是245。如果应用安装在小米手机上,那么系统会调用图中drawable-hdpi里面的资源。这样,你只要做4套资源分别放在 drawable-ldpi、drawable-mdpi、drawable-hdpi以及drawable-xdpi下(图标可以按照3:4:6:8的 比例制作图片资源),那么就可以图片在不同分辨率上有可能失真的情况...
Android中LinearLayout布局技巧
上面只是一个小小的介绍一下,下面来说一下最近发现了一种布局的技巧,原本个人认为RelativeLayout是最好用的布局,同时自己也在使用着表格布局,但是发现使用TableLayout已经是很少很少了,没想到还有一种布局方式是LinearLayout,有人会问,LinearLayout有什么稀奇的,其实LinearLayout并不稀奇,而是这里有一个属性是layout_weight,这样是我最近才发现的...虽然很早就有了...总之我觉得这个东西是非常好用的,通过使用0dp+layout_weight来进行布局是非常巧妙的一种方式...其实就是实现了比例布局..这样布局就可以直接适应不同手机的屏幕...从而避免了在不同手机上布局无法同步的问题..举个例子...
<LinearLayout xmlns:android="http://schemas.android.com/apk/res/android"
    xmlns:tools="http://schemas.android.com/tools"
    android:layout_width="match_parent"
    android:layout_height="match_parent"
    android:orientation="horizontal" >
    <TextView
        android:layout_width="wrap_content"
        android:layout_height="wrap_content"
        android:background="#0045f5"
        android:gravity="center"
        android:text="1" />
    <TextView
        android:layout_width="wrap_content"
        android:layout_height="wrap_content"
        android:background="#00ff47"
        android:gravity="center"
        android:text="2"
        android:layout_weight="1"/>
    <TextView
        android:layout_width="wrap_content"
        android:layout_height="wrap_content"
        android:background="#ff5600"
        android:gravity="center"
        android:layout_weight="1"
        android:text="3" />
</LinearLayout>
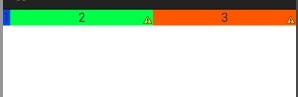
这个就是布局后的样式,我们设置的layout_width=“wrap_content”,按照常理来说,系统应该会为三个TextView分配默认的空间,并且三个空间的大小应该是相同的,但是正是因为我们为后面两个设置了layout_weight属性,这样系统会先为第一个TextView分配默认空间大小,就比如说10dp吧,假设我们的屏幕大小为480x800的分辨率,那么剩下470dp的大小将会按照比例分配给两个TextView...第二个TextView分配到的大小就是(470/2=225dp),第二个也是225dp...
那么我们是否就可以做出一个结论呢?就是设置了layout_weight后的控件,会按指定比例分配剩余控件呢?其实并不是这样的,我们再来看一个布局...
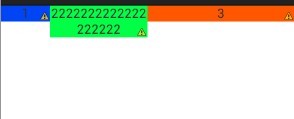
<LinearLayout xmlns:android="http://schemas.android.com/apk/res/android"
    xmlns:tools="http://schemas.android.com/tools"
    android:layout_width="match_parent"
    android:layout_height="match_parent"
    android:orientation="horizontal" >
    <TextView
        android:layout_width="wrap_content"
        android:layout_height="wrap_content"
        android:background="#0045f5"
        android:gravity="center"
        android:text="1" />
    <TextView
        android:layout_width="wrap_content"
        android:layout_height="wrap_content"
        android:background="#00ff47"
        android:gravity="center"
        android:text="2222222222222222222"
        android:layout_weight="1"/>
    <TextView
        android:layout_width="wrap_content"
        android:layout_height="wrap_content"
        android:background="#ff5600"
        android:gravity="center"
        android:layout_weight="1"
        android:text="3" />
</LinearLayout>

这个就是布局的结果,这样就会出现问题了,其实在设置了wrap_content,系统会先看控件到底要占用多少空间,就是先回按照wrap_content对控件分配空间,由于第二个控件的默认空间比较大,因此系统只能使用wrap_content对其分配空间,不会再按照layout_weight属性按照比例分配空间了...因此这里我们设置layout_width的时候不能设置为wrap_content,我们需要设置成0dp....再看下面的例子....
<LinearLayout xmlns:android="http://schemas.android.com/apk/res/android"
    xmlns:tools="http://schemas.android.com/tools"
    android:layout_width="match_parent"
    android:layout_height="match_parent"
    android:orientation="horizontal" >
    <TextView
        android:layout_width="0dip"
        android:layout_height="wrap_content"
        android:background="#0045f5"
        android:gravity="center"
        android:layout_weight="1"
        android:text="1" />
    <TextView
        android:layout_width="0dip"
        android:layout_height="wrap_content"
        android:background="#00ff47"
        android:gravity="center"
        android:text="2222222222222222222"
        android:layout_weight="2"/>
    <TextView
        android:layout_width="0dip"
        android:layout_height="wrap_content"
        android:background="#ff5600"
        android:gravity="center"
        android:layout_weight="3"
        android:text="3" />
</LinearLayout>
这里我们把layout_width=“0dp”,然后配合layout_weight属性,实现了空间宽度的1:2:3的进行分配,而长度由于我们没有进行规定,因此使用了wrap_content属性...这样0dp配合着layout_weight属性实现了布局的比例分配...那么如果我们想要把高度也按照比例分配的话,那么就把layout_height=“0dp”...然后配合weight属性就可以同样实现了布局中高度按照比例进行分配...这里我们一定要使用0dp...解释一下Android如何会按照比例布局呢?我们仍然假设我们的屏幕大小是480,那么由于我们设置的三个TextView大小都为0dp,那么系统会先按照我们设置的大小进行计算,480-3*0=480,那么剩余的空间大小仍然为480dp,最后剩余的空间按照比例来进行分配...这样就实现了宽度的1:2:3的大小进行分配...如果我们使用了“fill_parent”属性,那么就会出现不相同的效果...在看下面的布局...
<LinearLayout xmlns:android="http://schemas.android.com/apk/res/android"
    xmlns:tools="http://schemas.android.com/tools"
    android:layout_width="match_parent"
    android:layout_height="match_parent"
    android:orientation="horizontal" >
    <TextView
        android:layout_width="fill_parent"
        android:layout_height="wrap_content"
        android:background="#0045f5"
        android:gravity="center"
        android:layout_weight="1"
        android:text="1" />
    <TextView
        android:layout_width="fill_parent"
        android:layout_height="wrap_content"
        android:background="#00ff47"
        android:gravity="center"
        android:text="2"
        android:layout_weight="2"/>
    <TextView
        android:layout_width="fill_parent"
        android:layout_height="wrap_content"
        android:background="#ff5600"
        android:gravity="center"
        android:layout_weight="2"
        android:text="3" />
</LinearLayout>
这就是我们使用了fill_parent的后果,并没有按照我们想要的比例出现结果...这里导致的问题就是,由于我们设置的空间大小都为fill_parent属性,因此剩余空间大小就是480-3*480=-960dp,然后按照比例进行分配大小 480+(-960*(1/5))=228dp 480*(-960*(2/5))=96dp 第三个也是96dp...这样反而导致成了3:1:1的情况出现...这就是使用了fill_parent属性出现的问题...使用fill_parent这个属性配合layout_weight属性,分配的比例是需要我们人为进行计算...看到这里,是不是已经清晰了呢?
Android:LinearLayout布局中Layout_weight的深刻理解
首先看一下LinearLayout布局中Layout_weight属性的作用:它是用来分配属于空间的一个属性,你可以设置他的权重。很多人不知道剩余空间是个什么概念,下面我先来说说剩余空间。
看下面代码:
<?xml version="1.0" encoding="utf-8"?>
<LinearLayout xmlns:android="http://schemas.android.com/apk/res/android"
    android:orientation="vertical"
    android:layout_width="fill_parent"
    android:layout_height="fill_parent"
    >
<EditText
    android:layout_width="fill_parent"
    android:layout_height="wrap_content"
    android:gravity="left"
    android:text="one"/>
<EditText
    android:layout_width="fill_parent"
    android:layout_height="wrap_content"
    android:gravity="center"
    android:layout_weight="1.0"
    android:text="two"/>
    <EditText
    android:layout_width="fill_parent"
    android:layout_height="wrap_content"
    android:gravity="right"
    android:text="three"/>
</LinearLayout>
运行结果是:
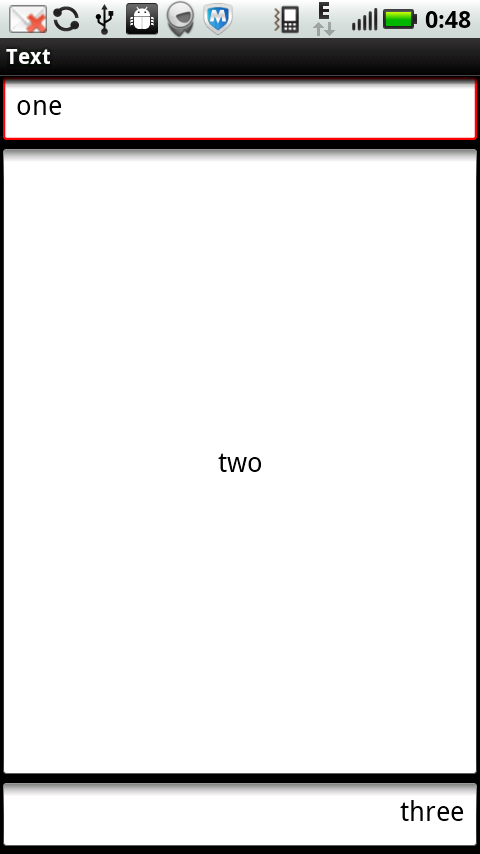
看上面代码:只有Button2使用了Layout_weight属性,并赋值为了1,而Button1和Button3没有设置Layout_weight这个属性,根据API,可知,他们默认是0
下面我就来讲,Layout_weight这个属性的真正的意思:Android系统先按照你设置的3个Button高度Layout_height值wrap_content,给你分配好他们3个的高度,
然后会把剩下来的屏幕空间全部赋给Button2,因为只有他的权重值是1,这也是为什么Button2占了那么大的一块空间。
有了以上的理解我们就可以对网上关于Layout_weight这个属性更让人费解的效果有一个清晰的认识了。
我们来看这段代码:
<?xml version="1.0" encoding="UTF-8"?>
<LinearLayout xmlns:android="http://schemas.android.com/apk/res/android"
    android:layout_width="fill_parent"
    android:layout_height="wrap_content"
    android:orientation="horizontal" >
    <TextView
        android:background="#ff0000"
        android:layout_width="**"
        android:layout_height="wrap_content"
        android:text="1"
        android:textColor="@android:color/white"
        android:layout_weight="1"/>
    <TextView
        android:background="#cccccc"
        android:layout_width="**"
        android:layout_height="wrap_content"
        android:text="2"
        android:textColor="@android:color/black"
        android:layout_weight="2" />
     <TextView
        android:background="#ddaacc"
        android:layout_width="**"
        android:layout_height="wrap_content"
        android:text="3"
        android:textColor="@android:color/black"
        android:layout_weight="3" />
</LinearLayout>
三个文本框的都是 layout_width=“wrap_content ”时,会得到以下效果
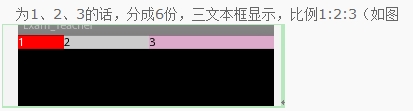
按照上面的理解,系统先给3个TextView分配他们的宽度值wrap_content(宽度足以包含他们的内容1,2,3即可),然后会把剩下来的屏幕空间按照1:2:3的比列分配给3个textview,所以就出现了上面的图像。
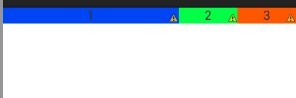
而当layout_width=“fill_parent”时,如果分别给三个TextView设置他们的Layout_weight为1、2、2的话,就会出现下面的效果:

你会发现1的权重小,反而分的多了,这是为什么呢???网上很多人说是当layout_width=“fill_parent”时,weighth值越小权重越大,优先级越高,就好像在背口诀
一样,其实他们并没有真正理解这个问题,真正的原因是Layout_width="fill_parent"的原因造成的。依照上面理解我们来分析:
系统先给3个textview分配他们所要的宽度fill_parent,也就是说每一都是填满他的父控件,这里就死屏幕的宽度
那么这时候的剩余空间=1个parent_width-3个parent_width=-2个parent_width (parent_width指的是屏幕宽度 )
那么第一个TextView的实际所占宽度应该=fill_parent的宽度,即parent_width + 他所占剩余空间的权重比列1/5 * 剩余空间大小(-2 parent_width)=3/5parent_width
同理第二个TextView的实际所占宽度=parent_width + 2/5*(-2parent_width)=1/5parent_width;
第三个TextView的实际所占宽度=parent_width + 2/5*(-2parent_width)=1/5parent_width;所以就是3:1:1的比列显示了。
这样你也就会明白为什么当你把三个Layout_weight设置为1、2、3的话,会出现下面的效果了:

第三个直接不显示了,为什么呢?一起来按上面方法算一下吧:
系统先给3个textview分配他们所要的宽度fill_parent,也就是说每一都是填满他的父控件,这里就死屏幕的宽度
那么这时候的剩余空间=1个parent_width-3个parent_width=-2个parent_width (parent_width指的是屏幕宽度 )
那么第一个TextView的实际所占宽度应该=fill_parent的宽度,即parent_width + 他所占剩余空间的权重比列1/6 * 剩余空间大小(-2 parent_width)=2/3parent_width
同理第二个TextView的实际所占宽度=parent_width + 2/6*(-2parent_width)=1/3parent_width;
第三个TextView的实际所占宽度=parent_width + 3/6*(-2parent_width)=0parent_width;所以就是2:1:0的比列显示了。第三个就直接没有空间了。
实现方法一代码
1、准备AIDL文件
挂断电话的AIDL文件都是Android自带的文件,我们可以从Android的源代码中找到这两个文件,它们分别是NeighboringCellInfo.aidl和ITelephony.aidl
我把NeighboringCellInfo.aidl放在项目的android.telephony包下,将ITelephony.aidl放在com.android.internal.telephony包下
NeighboringCellInfo.aid具体内容如下:
/* //device/java/android/android/content/Intent.aidl
**
** Copyright 2007, The Android Open Source Project
**
** Licensed under the Apache License, Version 2.0 (the "License");
** you may not use this file except in compliance with the License.
** You may obtain a copy of the License at
**
**     http://www.apache.org/licenses/LICENSE-2.0
**
** Unless required by applicable law or agreed to in writing, software
** distributed under the License is distributed on an "AS IS" BASIS,
** WITHOUT WARRANTIES OR CONDITIONS OF ANY KIND, either express or implied.
** See the License for the specific language governing permissions and
** limitations under the License.
*/

package android.telephony;

parcelable NeighboringCellInfo;
ITelephony.aidl具体内容如下:
/*
 * Copyright (C) 2007 The Android Open Source Project
 *
 * Licensed under the Apache License, Version 2.0 (the "License");
 * you may not use this file except in compliance with the License.
 * You may obtain a copy of the License at
 *
 *      http://www.apache.org/licenses/LICENSE-2.0
 *
 * Unless required by applicable law or agreed to in writing, software
 * distributed under the License is distributed on an "AS IS" BASIS,
 * WITHOUT WARRANTIES OR CONDITIONS OF ANY KIND, either express or implied.
 * See the License for the specific language governing permissions and
 * limitations under the License.
 */

package com.android.internal.telephony;

import android.os.Bundle;
import java.util.List;
import android.telephony.NeighboringCellInfo;

/**
 * Interface used to interact with the phone.  Mostly this is used by the
 * TelephonyManager class.  A few places are still using this directly.
 * Please clean them up if possible and use TelephonyManager insteadl.
 *
 * {@hide}
 */
interface ITelephony {

    /**
     * Dial a number. This doesn't place the call. It displays
     * the Dialer screen.
     * @param number the number to be dialed. If null, this
     * would display the Dialer screen with no number pre-filled.
     */
    void dial(String number);

    /**
     * Place a call to the specified number.
     * @param number the number to be called.
     */
    void call(String number);

    /**
     * If there is currently a call in progress, show the call screen.
     * The DTMF dialpad may or may not be visible initially, depending on
     * whether it was up when the user last exited the InCallScreen.
     *
     * @return true if the call screen was shown.
     */
    boolean showCallScreen();

    /**
     * Variation of showCallScreen() that also specifies whether the
     * DTMF dialpad should be initially visible when the InCallScreen
     * comes up.
     *
     * @param showDialpad if true, make the dialpad visible initially,
     *                    otherwise hide the dialpad initially.
     * @return true if the call screen was shown.
     *
     * @see showCallScreen
     */
    boolean showCallScreenWithDialpad(boolean showDialpad);

    /**
     * End call or go to the Home screen
     *
     * @return whether it hung up
     */
    boolean endCall();

    /**
     * Answer the currently-ringing call.
     *
     * If there's already a current active call, that call will be
     * automatically put on hold.  If both lines are currently in use, the
     * current active call will be ended.
     *
     * TODO: provide a flag to let the caller specify what policy to use
     * if both lines are in use.  (The current behavior is hardwired to
     * "answer incoming, end ongoing", which is how the CALL button
     * is specced to behave.)
     *
     * TODO: this should be a oneway call (especially since it's called
     * directly from the key queue thread).
     */
    void answerRingingCall();

    /**
     * Silence the ringer if an incoming call is currently ringing.
     * (If vibrating, stop the vibrator also.)
     *
     * It's safe to call this if the ringer has already been silenced, or
     * even if there's no incoming call.  (If so, this method will do nothing.)
     *
     * TODO: this should be a oneway call too (see above).
     *       (Actually *all* the methods here that return void can
     *       probably be oneway.)
     */
    void silenceRinger();

    /**
     * Check if we are in either an active or holding call
     * @return true if the phone state is OFFHOOK.
     */
    boolean isOffhook();

    /**
     * Check if an incoming phone call is ringing or call waiting.
     * @return true if the phone state is RINGING.
     */
    boolean isRinging();

    /**
     * Check if the phone is idle.
     * @return true if the phone state is IDLE.
     */
    boolean isIdle();

    /**
     * Check to see if the radio is on or not.
     * @return returns true if the radio is on.
     */
    boolean isRadioOn();

    /**
     * Check if the SIM pin lock is enabled.
     * @return true if the SIM pin lock is enabled.
     */
    boolean isSimPinEnabled();

    /**
     * Cancels the missed calls notification.
     */
    void cancelMissedCallsNotification();

    /**
     * Supply a pin to unlock the SIM.  Blocks until a result is determined.
     * @param pin The pin to check.
     * @return whether the operation was a success.
     */
    boolean supplyPin(String pin);

    /**
     * Handles PIN MMI commands (PIN/PIN2/PUK/PUK2), which are initiated
     * without SEND (so <code>dial</code> is not appropriate).
     *
     * @param dialString the MMI command to be executed.
     * @return true if MMI command is executed.
     */
    boolean handlePinMmi(String dialString);

    /**
     * Toggles the radio on or off.
     */
    void toggleRadioOnOff();

    /**
     * Set the radio to on or off
     */
    boolean setRadio(boolean turnOn);

    /**
     * Request to update location information in service state
     */
    void updateServiceLocation();

    /**
     * Enable location update notifications.
     */
    void enableLocationUpdates();

    /**
     * Disable location update notifications.
     */
    void disableLocationUpdates();

    /**
     * Enable a specific APN type.
     */
    int enableApnType(String type);

    /**
     * Disable a specific APN type.
     */
    int disableApnType(String type);

    /**
     * Allow mobile data connections.
     */
    boolean enableDataConnectivity();

    /**
     * Disallow mobile data connections.
     */
    boolean disableDataConnectivity();

    /**
     * Report whether data connectivity is possible.
     */
    boolean isDataConnectivityPossible();

    Bundle getCellLocation();

    /**
     * Returns the neighboring cell information of the device.
     */
    List<NeighboringCellInfo> getNeighboringCellInfo();

     int getCallState();
     int getDataActivity();
     int getDataState();

    /**
     * Returns the current active phone type as integer.
     * Returns TelephonyManager.PHONE_TYPE_CDMA if RILConstants.CDMA_PHONE
     * and TelephonyManager.PHONE_TYPE_GSM if RILConstants.GSM_PHONE
     */
    int getActivePhoneType();

    /**
     * Returns the CDMA ERI icon index to display
     */
    int getCdmaEriIconIndex();

    /**
     * Returns the CDMA ERI icon mode,
     * 0 - ON
     * 1 - FLASHING
     */
    int getCdmaEriIconMode();

    /**
     * Returns the CDMA ERI text,
     */
    String getCdmaEriText();

    /**
     * Returns true if CDMA provisioning needs to run.
     */
    boolean getCdmaNeedsProvisioning();

    /**
      * Returns the unread count of voicemails
      */
    int getVoiceMessageCount();

    /**
      * Returns the network type
      */
    int getNetworkType();

    /**
     * Return true if an ICC card is present
     */
    boolean hasIccCard();
}
准备好文件后,会在项目的gen目录下自动生成与两个文件所在包一样的包,同时会自动生成ITelephony.java文件
如下图:

2、新建PhoneUtils类,并写一个方法endCall()
这个方法就是挂断电话的方法,具体实现如下
//挂断电话
public void endCall(String incomingNumber){
    try {
            Class<?> clazz = Class.forName("android.os.ServiceManager");
            Method method = clazz.getMethod("getService", String.class);
            IBinder ibinder = (IBinder) method.invoke(null, Context.TELEPHONY_SERVICE);
            ITelephony iTelephony = ITelephony.Stub.asInterface(ibinder);
            iTelephony.endCall();
        }catch(Exception e){
            e.printStrackTrace();
        }
}
3、注册权限
最后别忘了在AndroidManifest.xml文件中注册权限
具体实现如下:
<uses-permission android:name="android.permission.CALL_PHONE"/>
实现方法二代码
Android自动挂断电话
android的新版本已经把Phone类给隐藏起来了,想要用代码实现挂断电话,就必须通过AIDL才行,
第一步:在程序中新建一个包,包名必须为:com.android.internal.telephony,因为要使用aidl,
第二步:在这个包里面新建一个名为ITelephony.aidl的文件,然后在文件里面写入代码:
package com.android.internal.telephony;
interface ITelephony{
boolean endCall();
void answerRingingCall();
}
然后保存,eclipse会自动在gen文件夹下生成一个ITelephony.java的类。
主程序的代码如下:
package ling.Phonemanager;
import java.lang.reflect.Method;
import android.app.Activity;
import android.os.Bundle;
import android.os.RemoteException;
import android.telephony.PhoneStateListener;
import android.telephony.TelephonyManager;
import com.android.internal.telephony.ITelephony;
public class Phonemanager extends Activity {
    /** Called when the activity is first created. */
    private ITelephony  iTelephony;
    private TelephonyManager manager;
    public void onCreate(Bundle savedInstanceState) {
        super.onCreate(savedInstanceState);
        setContentView(R.layout.main);
        phoner();
        manager.listen(new PhoneStateListener(){
   @Override
   public void onCallStateChanged(int state, String incomingNumber) {
    // TODO Auto-generated method stub
    super.onCallStateChanged(state, incomingNumber);
    switch(state){
    //判断是否有电话接入
    case 1:
     try {
      //当电话接入时,自动挂断。
      iTelephony.endCall();
      System.out.println("uncall");
     } catch (RemoteException e) {
      // TODO Auto-generated catch block
      e.printStackTrace();
     }
    }
   }

        }, PhoneStateListener.LISTEN_CALL_STATE);
    }
    public void phoner(){
     manager = (TelephonyManager)getSystemService(TELEPHONY_SERVICE);
        Class <TelephonyManager> c = TelephonyManager.class;
         Method getITelephonyMethod = null;
         try {
                getITelephonyMethod = c.getDeclaredMethod("getITelephony", (Class[])null);
                getITelephonyMethod.setAccessible(true);
          iTelephony = (ITelephony) getITelephonyMethod.invoke(manager, (Object[])null);
         } catch (IllegalArgumentException e) {
               e.printStackTrace();
         } catch (Exception e) {
              e.printStackTrace();
         }
    }
}
只要在电话接入时,再加上一个判断电话号码是否是黑名单的功能,就可以做成一个黑名单的程序了,获取电话号码的函数是:getLine1Number();
相关文章
- php语言实现redis的客户端与服务端有一些区别了因为前面介绍过服务端了这里我们来介绍客户端吧,希望文章对各位有帮助。 为了更好的了解redis协议,我们用php来实现...2016-11-25
- 有时我们在页面上需要选择数值范围,如购物时选取价格区间,购买主机时自主选取CPU,内存大小配置等,使用直观的滑块条直接选取想要的数值大小即可,无需手动输入数值,操作简单又方便。HTML首先载入jQuery库文件以及jRange相关...2015-03-15
- 下面我们来看一篇关于Android子控件超出父控件的范围显示出来方法,希望这篇文章能够帮助到各位朋友,有碰到此问题的朋友可以进来看看哦。 <RelativeLayout xmlns:an...2016-10-02
- 本文实例讲述了JS实现的简洁纵向滑动菜单(滑动门)效果。分享给大家供大家参考,具体如下:这是一款纵向布局的CSS+JavaScript滑动门代码,相当简洁的手法来实现,如果对颜色不满意,你可以试着自己修改CSS代码,这个滑动门将每一...2015-10-21
Android开发中findViewById()函数用法与简化
findViewById方法在android开发中是获取页面控件的值了,有没有发现我们一个页面控件多了会反复研究写findViewById呢,下面我们一起来看它的简化方法。 Android中Fin...2016-09-20- 如果我们的项目需要做来电及短信的功能,那么我们就得在Android模拟器开发这些功能,本来就来告诉我们如何在Android模拟器上模拟来电及来短信的功能。 在Android模拟...2016-09-20
- 夜神android模拟器如何设置代理呢?对于这个问题其实操作起来是非常的简单,下面小编来为各位详细介绍夜神android模拟器设置代理的方法,希望例子能够帮助到各位。 app...2016-09-20
- 为了增强android应用的用户体验,我们可以在一些Button按钮上自定义动态的设置一些样式,比如交互时改变字体、颜色、背景图等。 今天来看一个通过重写Button来动态实...2016-09-20
jQuery+slidereveal实现的面板滑动侧边展出效果
我们借助一款jQuery插件:slidereveal.js,可以使用它控制面板左右侧滑出与隐藏等效果,项目地址:https://github.com/nnattawat/slideReveal。如何使用首先在页面中加载jquery库文件和slidereveal.js插件。复制代码 代码如...2015-03-15- 如果我们要在Android应用APP中加载html5页面,我们可以使用WebView,本文我们分享两个WebView加载html5页面实例应用。 实例一:WebView加载html5实现炫酷引导页面大多...2016-09-20
- 翻板抽奖的实现流程:前端页面提供6个方块,用数字1-6依次表示6个不同的方块,当抽奖者点击6个方块中的某一块时,方块翻转到背面,显示抽奖中奖信息。看似简单的一个操作过程,却包含着WEB技术的很多知识面,所以本文的读者应该熟...2015-10-21
- 深入理解Android中View和ViewGroup从组成架构上看,似乎ViewGroup在View之上,View需要继承ViewGroup,但实际上不是这样的。View是基类,ViewGroup是它的子类。本教程我们深...2016-09-20
- 下面我们来看一篇关于Android自定义WebView网络视频播放控件开发例子,这个文章写得非常的不错下面给各位共享一下吧。 因为业务需要,以下代码均以Youtube网站在线视...2016-10-02
- java开发的Android应用,性能一直是一个大问题,,或许是Java语言本身比较消耗内存。本文我们来谈谈Android 性能优化之MemoryFile文件读写。 Android匿名共享内存对外A...2016-09-20
SQLMAP结合Meterpreter实现注入渗透返回shell
sqlmap 是一个自动SQL 射入工具。它是可胜任执行一个广泛的数据库管理系统后端指印, 检索遥远的DBMS 数据库等,下面我们来看一个学习例子。 自己搭建一个PHP+MYSQ...2016-11-25- TextView默认是横着显示了,今天我们一起来看看Android设置TextView竖着显示如何来实现吧,今天我们就一起来看看操作细节,具体的如下所示。 在开发Android程序的时候,...2016-10-02
android.os.BinderProxy cannot be cast to com解决办法
本文章来给大家介绍关于android.os.BinderProxy cannot be cast to com解决办法,希望此文章对各位有帮助呀。 Android在绑定服务的时候出现java.lang.ClassCastExc...2016-09-20- 复制代码 代码如下: // 第一种写法 $da = date("w"); if( $da == "1" ){ echo "今天是星期一"; }else if( $da == "2" ){ echo "今天是星期二"; }else if( $da == "3" ){ echo "今天是星期三"; }else if( $da == "4"...2013-10-04
- 这篇文章主要介绍了Android 实现钉钉自动打卡功能的步骤,帮助大家更好的理解和学习使用Android,感兴趣的朋友可以了解下...2021-03-15
- 下面我们来看一篇关于Android 开发之布局细节对比:RTL模式 ,希望这篇文章对各位同学会带来帮助,具体的细节如下介绍。 前言 讲真,好久没写博客了,2016都过了一半了,赶紧...2016-10-02