Android消息推送实现程序
1.消息推送机制
服务器器端需要变被动为主动,通知客户一些开发商认为重要的信息,无论应用程序是否正在运行或者关闭。
我想到了一句话:don't call me,i will call you!
qq今天在右下角弹出了一个对话框:"奥巴马宣布本拉登挂了…",正是如此。
自作聪明,就会带点小聪明,有人喜欢就有人讨厌。
2.独立进程
无论程序是否正在运行,我们都要能通知到客户,我们需要一个独立进程的后台服务。
我们需要一个独立进程的后台服务。
在androidmanifest.xml中注册service时,有一个android:process属性,如果这个属性以"."开头,则为此服务开启一个
全局的独立进程,如果以":"开头则为此服务开启一个为此应用私有的独立进程。举个具体的例子吧,我们新建了一个
application,创建了主进程com.cnblogs.tianxia,那么:
代码如下:
<!–下面会创建一个全局的com.cnblogs.tianxia.message的独立进程–>
<service android:name=".service.messageservice" android:label="消息推送" android:process=".message" />
<!–或者–>
<!–下面会创建一个应用私有的com.cnblogs.tianxia:message的独立进程–>
<service android:name=".service.messageservice" android:label="消息推送" android:process=":message" />
我们没必要建立一个全局的,本文选择第二种方案,创建一个当前应用私有的独立进程。
3.通知用户和点击查看
public class messageservice extends service {
//获取消息线程
private messagethread messagethread = null;
//点击查看
private intent messageintent = null;
private pendingintent messagependingintent = null;
//通知栏消息
private int messagenotificationid = 1000;
private notification messagenotification = null;
private notificationmanager messagenotificatiomanager = null;
public ibinder onbind(intent intent) {
return null;
}
@override
public int onstartcommand(intent intent, int flags, int startid) {
//初始化
messagenotification = new notification();
messagenotification.icon = r.drawable.icon;
messagenotification.tickertext = "新消息";
messagenotification.defaults = notification.default_sound;
messagenotificatiomanager = (notificationmanager)getsystemservice(context.notification_service);
messageintent = new intent(this, messageactivity.class);
messagependingintent = pendingintent.getactivity(this,0,messageintent,0);
//开启线程
messagethread = new messagethread();
messagethread.isrunning = true;
messagethread.start();
return super.onstartcommand(intent, flags, startid);
}
/**
* 从服务器端获取消息
*
*/
class messagethread extends thread{
//运行状态,www.3ppt.com下一步骤有大用
public boolean isrunning = true;
public void run() {
while(isrunning){
try {
//休息10分钟
thread.sleep(600000);
//获取服务器消息
string servermessage = getservermessage();
if(servermessage!=null&&!"".equals(servermessage)){
//更新通知栏
messagenotification.setlatesteventinfo(messageservice.this,"新消息","奥巴马宣布,本拉
登兄弟挂了!"+servermessage,messagependingintent);
messagenotificatiomanager.notify(messagenotificationid, messagenotification);
//每次通知完,通知id递增一下,避免消息覆盖掉
messagenotificationid++;
}
} catch (interruptedexception e) {
e.printstacktrace();
}
}
}
}
/**
* 这里以此方法为服务器demo,仅作示例
* @return 返回服务器要推送的消息,否则如果为空的话,不推送
*/
public string getservermessage(){
return "yes!";
}
}
其中messageactivity是点击跳转的activity,负责处理查看详细信息。
我们在其他activity中调用一下:
代码如下:
boolean ismessagepush = true;//不开启就设置为false;
…
if(ismessagepush){
startservice(new intent(this, messageservice.class))
};
运行一下:
4.停止服务
1 stopservice(new intent(myactivity.this,messageservice.class));
2 setmessagepush(false);//设置配置文件或数据库中flag为false
运行一下,停止服务后,却出乎意料的并没有停下来,怎么回事?是不是代码写错了?
代码没有错,错在我们停止了服务,却没有停止进程,退出线程。
5.退出线程
实践证明,thread的stop()方法并不可靠。但是我们有其他的办法。
在代码面前,程序员就是上帝。
退出线程有两种方法。
第一种方法,强制退出。
//杀死该线程所在的进程,自然就退出了
system.exit(0);
第二种方法,设置isrunning为false。
//前面说到了isrunning这个标志,设置为false后,线程的执行就从while循环中跳出来了,然后自然结束掉了
messagethread.isrunning = false;
综合一下,我们在messageservice中重载ondestroy()方法如下:
代码如下:
@override
public void ondestroy() {
system.exit(0);
//或者,二选一,推荐使用system.exit(0),这样进程退出的更干净
//messagethread.isrunning = false;
super.ondestroy();
}
实例
| 代码如下 | 复制代码 |
|
public String getLocalIpAddress() { public String getLocalMacAddress(Context context) { |
|
安卓4.0系统的手机,按上面的方法默认会先获取到ipv6的地址,有时候我们只想要ipv4的地址
| 代码如下 | 复制代码 |
| /** * 用来获取手机拨号上网(包括CTWAP和CTNET)时由PDSN分配给手机终端的源IP地址。 * * @return * @author SHANHY */ public static String getPsdnIp() { try { for (Enumeration<NetworkInterface> en = NetworkInterface.getNetworkInterfaces(); en.hasMoreElements();) { NetworkInterface intf = en.nextElement(); for (Enumeration<InetAddress> enumIpAddr = intf.getInetAddresses(); enumIpAddr.hasMoreElements();) { InetAddress inetAddress = enumIpAddr.nextElement(); if (!inetAddress.isLoopbackAddress() && inetAddress instanceof Inet4Address) { //if (!inetAddress.isLoopbackAddress() && inetAddress instanceof Inet6Address) { return inetAddress.getHostAddress().toString(); } } } } catch (Exception e) { } return ""; } |
|
当控件本身layout_width设置为fill_parent的时候,layout_weight数值越小,所占空间越大,但尽可能大是有限度的,即fill_parent.
当控件本身layout_width设置为wrap_content的时候,layout_weight数值越小,所占空间也越小,但这个小是有限度的,即wrap_content.
例子
看了一下源码,虽说不太懂,但了解了下大概意思,按照自己的理解总结一下,直接写一下简化的代码吧(下面的代码是LinearLayout源文件中一部分的精简,变量名称含义可能不准确,为叙述方便暂作此解释):
| 代码如下 | 复制代码 |
|
//Either expand children with weight to take up available space or if (child == null || child.getVisibility() == View.GONE) { float childExtra = lp.weight; |
|
变量含义
widthSize: LinearLayout的宽度
mTotalLength: 所有子View的宽度的和(还没用考虑layout_weight)
totalWeight: 所有子View的layout_weight的和
mWeihtSUm: LinearLayout的android:weightSum属性
过程分析:
首先计算出额外空间(可以为负)如果额外空间不为0并且有子View的layout_weight不为0的话按layout_weight分配额外空间:
| 代码如下 | 复制代码 |
|
int delta = widthSize - mTotalLength; |
|
如果LinearLayout设置了weightSum则覆盖子View的layout_weight的和:
| 代码如下 | 复制代码 |
|
float weightSum = mWeightSum > 0.0f ? mWeightSum : totalWeight; |
|
然后遍历LinearLayout的子元素,如果不为null且Visibility不为GONE的话,取得它的LayoutParams,如果它的layout_weight大于0,根据weightSum与它的weight计算出分配给它的额外空间
| 代码如下 | 复制代码 |
|
if (childExtra > 0) { int childWidth = child.getMeasuredWidth() + share; |
|
例子
| 代码如下 | 复制代码 |
|
|
|
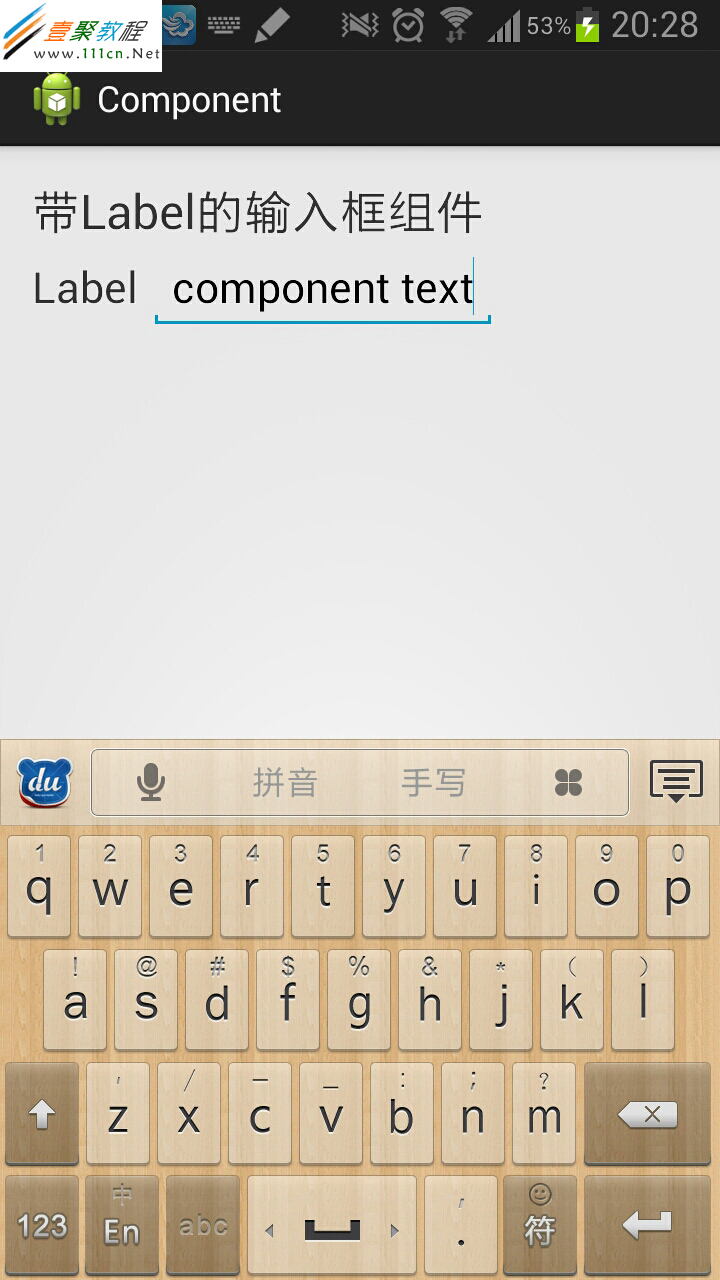
在Android开发中,我们的Activity都不免要用到很多的View部件,而对于每一个View我们都要findViewById,设置监听器,获取用户输入的结果等操作。如果我们细心想想,这些琐碎的操作是不是跟这个Activity的处理逻辑没有很大的关系呢?很多的Activity中都要用到一些常见的View组合,能不能把他们抽象出来形成一种可以复用的复合组件呢?
这篇文章就是基于这种想法,开发了一个简单的组件,对于Android新手来说,可以作为一种参考吧。
EditTextWithLabel组件类定义:(EditTextWithLabel.java)
| 代码如下 | 复制代码 |
|
package com.raysmond.component; import android.content.Context; public class EditTextWithLabel extends LinearLayout{ |
|
EditTextWithLabel组件的布局xml(edit_text_with_label.xml)
| 代码如下 | 复制代码 |
|
<?xml version="1.0" encoding="utf-8"?> <EditText |
|
使用EditTextWithLabel复合组件,主Activity的XML (activity_main.xml)
| 代码如下 | 复制代码 |
|
<RelativeLayout xmlns:android="http://schemas.android.com/apk/res/android" <TextView </RelativeLayout> |
|
使用EditTextWithLabel复合组件,主Activity类(MainActivity.java)
| 代码如下 | 复制代码 |
|
package com.raysmond.activity; import com.raysmond.component.EditTextWithLabel; import android.os.Bundle; public class MainActivity extends Activity { |
|
Demo:
Android系统在运行每一个程序应用的时候,都会创建一个Application对象,用于存储与整个应用相关的公共变量。一个Android应用只会生成一个Application对象,在不用的Activity中获取的Application对象是一样的,所以Application对象是一个单例(SingleTon)。Application对象非常适合用于存储一些与整个应用相关数据,例如应用版本,应用登录账户,数据缓存等。
利用Application对象存储公共数据或数据传递
在android开发中,activity的切换是很频繁的,差不多可以和一个网站中不同网页之间的切换一样。那么不同的activity之间需要存储公共信息(如只有一个当前登录用户)以及数据传递等。下面就是一种利用Application对象存储登录用户信息的方法,可以发现这很方便不同的activity获取登录用户信息。
首先,新建一个java类继承Application类:MyApplication.java
| 代码如下 | 复制代码 |
|
package com.example.applicationtest; import android.app.Application; public class MyApplication extends Application { |
|
在AndroidManifest.xml中指定应用的application对象
| 代码如下 | 复制代码 |
|
<?xml version="1.0" encoding="utf-8"?> <uses-sdk <application <category android:name="android.intent.category.LAUNCHER" /> </manifest> |
|
在activity中使用application对象, 使用Activity的getApplication()方法。
| 代码如下 | 复制代码 |
|
package com.example.applicationtest; import android.os.Bundle; public class MainActivity extends Activity { } |
|
可以发现通过Application对象,在不同的Activity之间可以方便地实现数据共享。这比在每次切换activity时通过Bundle传递数据方便多了。
传统的利用Bundle在activity之前传递数据的方式
假设我们有两个Activity: Activity1和Activity2,Activity1切换到Activity2并传递用户信息。
| 代码如下 | 复制代码 |
|
Activity1.java package com.example.applicationtest; import android.os.Bundle; public class Activity1 extends Activity { @Override } package com.example.applicationtest; import android.os.Bundle; public class Activity2 extends Activity { @Override } |
|
我们可以发现这种传递数据的方式比较繁琐,特别是当Activity众多,切换很频繁的时候。整个应用的的公共数据(如登录信息)在不同的activity之间都一样且都需要用到时,利用Application对象更加简洁和方便
相关文章
- php语言实现redis的客户端与服务端有一些区别了因为前面介绍过服务端了这里我们来介绍客户端吧,希望文章对各位有帮助。 为了更好的了解redis协议,我们用php来实现...2016-11-25
- 有时我们在页面上需要选择数值范围,如购物时选取价格区间,购买主机时自主选取CPU,内存大小配置等,使用直观的滑块条直接选取想要的数值大小即可,无需手动输入数值,操作简单又方便。HTML首先载入jQuery库文件以及jRange相关...2015-03-15
- 下面我们来看一篇关于Android子控件超出父控件的范围显示出来方法,希望这篇文章能够帮助到各位朋友,有碰到此问题的朋友可以进来看看哦。 <RelativeLayout xmlns:an...2016-10-02
- 本文实例讲述了JS实现的简洁纵向滑动菜单(滑动门)效果。分享给大家供大家参考,具体如下:这是一款纵向布局的CSS+JavaScript滑动门代码,相当简洁的手法来实现,如果对颜色不满意,你可以试着自己修改CSS代码,这个滑动门将每一...2015-10-21
Android开发中findViewById()函数用法与简化
findViewById方法在android开发中是获取页面控件的值了,有没有发现我们一个页面控件多了会反复研究写findViewById呢,下面我们一起来看它的简化方法。 Android中Fin...2016-09-20- 如果我们的项目需要做来电及短信的功能,那么我们就得在Android模拟器开发这些功能,本来就来告诉我们如何在Android模拟器上模拟来电及来短信的功能。 在Android模拟...2016-09-20
- 这篇文章主要为大家详细介绍了C#微信开发之发送模板消息的相关资料,具有一定的参考价值,感兴趣的小伙伴们可以参考一下...2020-06-25
- 夜神android模拟器如何设置代理呢?对于这个问题其实操作起来是非常的简单,下面小编来为各位详细介绍夜神android模拟器设置代理的方法,希望例子能够帮助到各位。 app...2016-09-20
- 为了增强android应用的用户体验,我们可以在一些Button按钮上自定义动态的设置一些样式,比如交互时改变字体、颜色、背景图等。 今天来看一个通过重写Button来动态实...2016-09-20
jQuery+slidereveal实现的面板滑动侧边展出效果
我们借助一款jQuery插件:slidereveal.js,可以使用它控制面板左右侧滑出与隐藏等效果,项目地址:https://github.com/nnattawat/slideReveal。如何使用首先在页面中加载jquery库文件和slidereveal.js插件。复制代码 代码如...2015-03-15- 如果我们要在Android应用APP中加载html5页面,我们可以使用WebView,本文我们分享两个WebView加载html5页面实例应用。 实例一:WebView加载html5实现炫酷引导页面大多...2016-09-20
- 翻板抽奖的实现流程:前端页面提供6个方块,用数字1-6依次表示6个不同的方块,当抽奖者点击6个方块中的某一块时,方块翻转到背面,显示抽奖中奖信息。看似简单的一个操作过程,却包含着WEB技术的很多知识面,所以本文的读者应该熟...2015-10-21
- 深入理解Android中View和ViewGroup从组成架构上看,似乎ViewGroup在View之上,View需要继承ViewGroup,但实际上不是这样的。View是基类,ViewGroup是它的子类。本教程我们深...2016-09-20
- 下面我们来看一篇关于Android自定义WebView网络视频播放控件开发例子,这个文章写得非常的不错下面给各位共享一下吧。 因为业务需要,以下代码均以Youtube网站在线视...2016-10-02
- java开发的Android应用,性能一直是一个大问题,,或许是Java语言本身比较消耗内存。本文我们来谈谈Android 性能优化之MemoryFile文件读写。 Android匿名共享内存对外A...2016-09-20
SQLMAP结合Meterpreter实现注入渗透返回shell
sqlmap 是一个自动SQL 射入工具。它是可胜任执行一个广泛的数据库管理系统后端指印, 检索遥远的DBMS 数据库等,下面我们来看一个学习例子。 自己搭建一个PHP+MYSQ...2016-11-25- TextView默认是横着显示了,今天我们一起来看看Android设置TextView竖着显示如何来实现吧,今天我们就一起来看看操作细节,具体的如下所示。 在开发Android程序的时候,...2016-10-02
android.os.BinderProxy cannot be cast to com解决办法
本文章来给大家介绍关于android.os.BinderProxy cannot be cast to com解决办法,希望此文章对各位有帮助呀。 Android在绑定服务的时候出现java.lang.ClassCastExc...2016-09-20- 复制代码 代码如下: // 第一种写法 $da = date("w"); if( $da == "1" ){ echo "今天是星期一"; }else if( $da == "2" ){ echo "今天是星期二"; }else if( $da == "3" ){ echo "今天是星期三"; }else if( $da == "4"...2013-10-04
- 这篇文章主要介绍了Android 实现钉钉自动打卡功能的步骤,帮助大家更好的理解和学习使用Android,感兴趣的朋友可以了解下...2021-03-15