联想a65手机怎么获取ROOT权限

 更新时间:2016年9月20日 19:59  点击:1956
本文章来给大家介绍利用z4root工具快速来给你手机获取ROOT权限的操作方法,有需要了解的朋友可进入参考。

1,首页为手机安装驱动,如果你没有驱动软件可以在本站下载。(安装驱动后如果手机无法链接上电脑,请打开手机的USB调试,
步骤如下:设置——选择应用程序-——开发;)

2,2、手机关机;

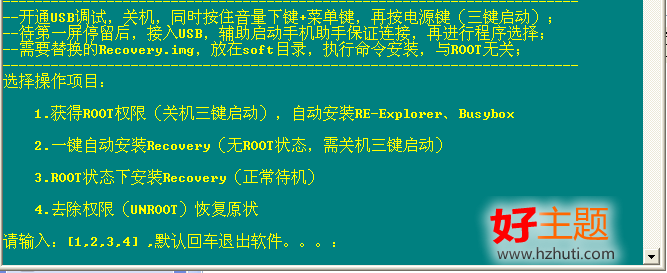
3、按住音量下键+菜单键(最左边)再按住电源键。开机后不要马上松手等待5-10秒,这时开机界面会停留在开机第一屏。

4、松手,插入USB线,进入你指定工具所在的硬盘位置双击打开附件解压后得到的ROOT工具A65-Tools-v2.exe;

 
5、选择 1 后按回车键,完成后会自动重启手机;

root后重启后查看手机菜单是否有“授权管理(superuser)”或“超级用户”,如果有,那恭喜你,ROOT成功了~~如果没有,请多试几次,我就试了三次才成功的

最近开始学Android开了,但是在我在Android手机无法调试时出现Device HT843KV11551 requires that applications explicitely declare themselves as debuggable in their manifest. Application \'com.test\' does not have the attribute debuggable set to TRUE in its manifest and cannot be debugged.了,下面我记录一下。

错误提示

Device 'HT843KV11551' requires that applications explicitely declare themselves as debuggable in their manifest.

Application 'com.test' does not have the attribute 'debuggable' set to TRUE in its manifest and cannot be debugged.

解决办法

Android.manifest 文件中添加Debug项目,在可视化界面选择application选项卡然后将Debugable的值设置为true

点击查看原图

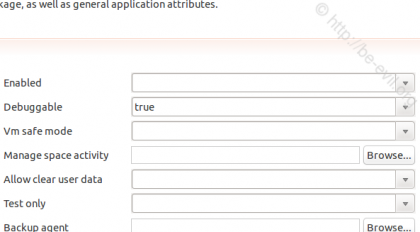
编辑源码的添加方式则是在<application 字段中增加一个属性:android:debuggable="true"

在Android中要让一个程序的界面始终保持一个方向,不随手机方向转动而变化的办法: 只要在AndroidManifest.xml里面配置一下就可以了,小编来给大家介绍一款Android禁止横屏竖屏切换程序代码,有需要了解的同学可参考

在AndroidManifest.xml的activity(需要禁止转向的activity)配置中加入android:screenOrientation="landscape"属性即可(landscape是横向,portrait是竖屏)。例如:

 代码如下 复制代码

<?xml version="1.0" encoding="utf-8"?>
<manifest xmlns:android="http://schemas.android.com/apk/res/android"
      package="com.ray.linkit"
      android:versionCode="1"
      android:versionName="1.0">
    <application android:icon="@drawable/icon" android:label="@string/app_name">
        <activity android:name=".Main"
                  android:label="@string/app_name"
                  android:screenOrientation="portrait">
            <intent-filter>
                <action android:name="android.intent.action.MAIN" />
                <category android:name="android.intent.category.LAUNCHER" />
            </intent-filter>
        </activity>
                <activity android:name=".GamePlay"
                android:screenOrientation="portrait"></activity>
                <activity android:name=".OptionView"
                android:screenOrientation="portrait"></activity>
    </application>
    <uses-sdk android:minSdkVersion="3" />
</manifest>

另外,android中每次屏幕方向切换时都会重启Activity,所以应该在Activity销毁前保存当前活动的状态,在Activity再次Create的时候载入配置,那样,进行中的游戏就不会自动重启了!

要避免在转屏时重启activity,可以通过在androidmanifest.xml文件中重新定义方向(给每个activity加上android:configChanges=”keyboardHidden|orientation”属性),并根据Activity的重写onConfigurationChanged(Configuration newConfig)方法来控制,这样在转屏时就不会重启activity了,而是会去调用onConfigurationChanged(Configuration newConfig)这个回调方法。例如

 代码如下 复制代码

if(newConfig.orientation==Configuration.ORIENTATION_LANDSCAPE){
  //横屏
  setContentView(R.layout.file_list_landscape);
}else{
  //竖屏
   setContentView(R.layout.file_list);
}

需要注意的是如果你的横竖屏布局不一样,那么使用onConfigurationChanged会导致切换之后布局没有变化,所以该设置慎用为好。
.

本文章来给大家介绍Android中Bitmap和Drawable用法详解,有需要了解的同学可进入参考。

一、相关概念
1、Drawable就是一个可画的对象,其可能是一张位图(BitmapDrawable),也可能是一个图形(ShapeDrawable),还有可能是一个图层(LayerDrawable),我们根据画图的需求,创建相应的可画对象2、Canvas画布,绘图的目的区域,用于绘图3、Bitmap位图,用于图的处理4、Matrix矩阵二、Bitmap
1、从资源中获取Bitmap

Resources res = getResources();
Bitmap bmp = BitmapFactory.decodeResource(res, R.drawable.icon);

2、Bitmap → byte[]

 代码如下 复制代码

public byte[] Bitmap2Bytes(Bitmap bm) {
    ByteArrayOutputStream baos = new ByteArrayOutputStream();
    bm.compress(Bitmap.CompressFormat.PNG, 100, baos);
    return baos.toByteArray();
}

3、byte[] → Bitmap

 代码如下 复制代码

public Bitmap Bytes2Bimap(byte[] b) {
    if (b.length != 0) {
        return BitmapFactory.decodeByteArray(b, 0, b.length);
    } else {
        return null;
    }
}

Bitmap缩放

 代码如下 复制代码

public static Bitmap zoomBitmap(Bitmap bitmap, int width, int height) {
    int w = bitmap.getWidth();
    int h = bitmap.getHeight();
    Matrix matrix = new Matrix();
    float scaleWidth = ((float) width / w);
    float scaleHeight = ((float) height / h);
    matrix.postScale(scaleWidth, scaleHeight);
    Bitmap newbmp = Bitmap.createBitmap(bitmap, 0, 0, w, h, matrix, true);
    return newbmp;
}

5、将Drawable转化为Bitmap

 代码如下 复制代码

public static Bitmap drawableToBitmap(Drawable drawable) {
        // 取 drawable 的长宽
        int w = drawable.getIntrinsicWidth();
        int h = drawable.getIntrinsicHeight();
        // 取 drawable 的颜色格式
        Bitmap.Config config = drawable.getOpacity() != PixelFormat.OPAQUE ? Bitmap.Config.ARGB_8888
                : Bitmap.Config.RGB_565;
        // 建立对应 bitmap
        Bitmap bitmap = Bitmap.createBitmap(w, h, config);
        // 建立对应 bitmap 的画布
        Canvas canvas = new Canvas(bitmap);
        drawable.setBounds(0, 0, w, h);
        // 把 drawable 内容画到画布中
        drawable.draw(canvas);
        return bitmap;
    }


public static Bitmap getRoundedCornerBitmap(Bitmap bitmap, float roundPx) {
    int w = bitmap.getWidth();
    int h = bitmap.getHeight();
    Bitmap output = Bitmap.createBitmap(w, h, Config.ARGB_8888);
    Canvas canvas = new Canvas(output);
    final int color = 0xff424242;
    final Paint paint = new Paint();
    final Rect rect = new Rect(0, 0, w, h);
    final RectF rectF = new RectF(rect);
    paint.setAntiAlias(true);
    canvas.drawARGB(0, 0, 0, 0);
    paint.setColor(color);
    canvas.drawRoundRect(rectF, roundPx, roundPx, paint);
    paint.setXfermode(new PorterDuffXfermode(Mode.SRC_IN));
    canvas.drawBitmap(bitmap, rect, rect, paint);
    return output;
}


6、获得圆角图片

 代码如下 复制代码

public static Bitmap createReflectionImageWithOrigin(Bitmap bitmap) {
    final int reflectionGap = 4;
    int w = bitmap.getWidth();
    int h = bitmap.getHeight();
    Matrix matrix = new Matrix();
    matrix.preScale(1, -1);
    Bitmap reflectionImage = Bitmap.createBitmap(bitmap, 0, h / 2, w,
            h / 2, matrix, false);
    Bitmap bitmapWithReflection = Bitmap.createBitmap(w, (h + h / 2),
            Config.ARGB_8888);
    Canvas canvas = new Canvas(bitmapWithReflection);
    canvas.drawBitmap(bitmap, 0, 0, null);
    Paint deafalutPaint = new Paint();
    canvas.drawRect(0, h, w, h + reflectionGap, deafalutPaint);
    canvas.drawBitmap(reflectionImage, 0, h + reflectionGap, null);
    Paint paint = new Paint();
    LinearGradient shader = new LinearGradient(0, bitmap.getHeight(), 0,
            bitmapWithReflection.getHeight() + reflectionGap, 0x70ffffff,
            0x00ffffff, TileMode.CLAMP);
    paint.setShader(shader);
    // Set the Transfer mode to be porter duff and destination in
    paint.setXfermode(new PorterDuffXfermode(Mode.DST_IN));
    // Draw a rectangle using the paint with our linear gradient
    canvas.drawRect(0, h, w, bitmapWithReflection.getHeight()
            + reflectionGap, paint);
    return bitmapWithReflection;
}

三、Drawable

 代码如下 复制代码

Bitmap bm=xxx; //xxx根据你的情况获取
BitmapDrawable bd= new BitmapDrawable(getResource(), bm);
因为BtimapDrawable是Drawable的子类,最终直接使用bd对象即可。

2、Drawable缩放

 代码如下 复制代码

public static Drawable zoomDrawable(Drawable drawable, int w, int h) {
    int width = drawable.getIntrinsicWidth();
    int height = drawable.getIntrinsicHeight();
    // drawable转换成bitmap
    Bitmap oldbmp = drawableToBitmap(drawable);
    // 创建操作图片用的Matrix对象
    Matrix matrix = new Matrix();
    // 计算缩放比例
    float sx = ((float) w / width);
    float sy = ((float) h / height);
    // 设置缩放比例
    matrix.postScale(sx, sy);
    // 建立新的bitmap,其内容是对原bitmap的缩放后的图
    Bitmap newbmp = Bitmap.createBitmap(oldbmp, 0, 0, width, height,
            matrix, true);
    return new BitmapDrawable(newbmp);
}

本文章来给大家介绍Android RelativeLayout 属性用法详解,有需要了解RelativeLayout 属性的同学可进入参考参考。

// 相对于给定ID控件

 代码如下 复制代码

android:layout_above 将该控件的底部置于给定ID的控件之上;

android:layout_below 将该控件的底部置于给定ID的控件之下;

android:layout_toLeftOf    将该控件的右边缘与给定ID的控件左边缘对齐;

android:layout_toRightOf  将该控件的左边缘与给定ID的控件右边缘对齐;

android:layout_alignBaseline  将该控件的baseline与给定ID的baseline对齐;

android:layout_alignTop        将该控件的顶部边缘与给定ID的顶部边缘对齐;

android:layout_alignBottom   将该控件的底部边缘与给定ID的底部边缘对齐;

android:layout_alignLeft        将该控件的左边缘与给定ID的左边缘对齐;

android:layout_alignRight      将该控件的右边缘与给定ID的右边缘对齐;

// 相对于父组件

android:layout_alignParentTop      如果为true,将该控件的顶部与其父控件的顶部对齐;

android:layout_alignParentBottom 如果为true,将该控件的底部与其父控件的底部对齐;

android:layout_alignParentLeft      如果为true,将该控件的左部与其父控件的左部对齐;

android:layout_alignParentRight    如果为true,将该控件的右部与其父控件的右部对齐;

// 居中

android:layout_centerHorizontal 如果为true,将该控件的置于水平居中;

android:layout_centerVertical     如果为true,将该控件的置于垂直居中;

android:layout_centerInParent   如果为true,将该控件的置于父控件的中央;

// 外部间隔

android:layout_marginTop       上偏移的值;

android:layout_marginBottom  下偏移的值;

android:layout_marginLeft   左偏移的值;

android:layout_marginRight   右偏移的值;

RelativeLayout代码

 代码如下 复制代码

RelativeLayout relativeLayout = new RelativeLayout(context);
  Spinner spinner = new Spinner(context);
  edit_text_add_country = new AutoCompleteTextView(context);
  edit_text_add_stock = new EditText(this);
  RadioGroup containCountry = new RadioGroup(context);
 
 
  spinner.setId(1);
  edit_text_add_country.setId(2);
  edit_text_add_stock.setId(3);
  containCountry.setId(4);
 
  String[] mCountries = { "China" , "USA", "China2", "Comunicate"};
  List<String> allcountries = new ArrayList<String>();
  ArrayAdapter<String> aspnCountries;
 
  for (int i = 0; i < mCountries.length; i++) {
   allcountries.add(mCountries[i]);
  }
 
  aspnCountries = new ArrayAdapter<String>(this,
    android.R.layout.simple_spinner_item, allcountries);
  aspnCountries
    .setDropDownViewResource(android.R.layout.simple_spinner_dropdown_item);
  spinner.setAdapter(aspnCountries);
  edit_text_add_country.setAdapter(aspnCountries);
  edit_text_add_country.setHint("input country name");
  edit_text_add_stock.setHint("input stock name");
 
  RelativeLayout.LayoutParams param1, param2, param3;
  param1 = new RelativeLayout.LayoutParams(ViewGroup.LayoutParams.FILL_PARENT, ViewGroup.LayoutParams.WRAP_CONTENT);
  param2 = new RelativeLayout.LayoutParams(ViewGroup.LayoutParams.FILL_PARENT, ViewGroup.LayoutParams.WRAP_CONTENT);
  param2.addRule(RelativeLayout.BELOW, 1);
  param3 = new RelativeLayout.LayoutParams(ViewGroup.LayoutParams.FILL_PARENT, ViewGroup.LayoutParams.WRAP_CONTENT);
  param3.addRule(RelativeLayout.BELOW, 4);
  ViewGroup.LayoutParams param4, param5;
  param4 = new ViewGroup.LayoutParams(ViewGroup.LayoutParams.FILL_PARENT,ViewGroup.LayoutParams.WRAP_CONTENT);
  param5 = new ViewGroup.LayoutParams(ViewGroup.LayoutParams.FILL_PARENT,ViewGroup.LayoutParams.WRAP_CONTENT);
 
  containCountry.addView(spinner,param4);
  containCountry.addView(edit_text_add_country, param5);
 
  relativeLayout.addView(containCountry, param1);
  relativeLayout.addView(edit_text_add_stock, param3);
 
  builder.setView(relativeLayout);

看个实例

RelativeLayout代码实现及点击设置

 代码如下 复制代码

public class Main extends Activity {
  
    @Override
    public void onCreate(Bundle savedInstanceState) {
        super.onCreate(savedInstanceState);
        setContentView(R.layout.main);
      
        ArrayList<Person> personList = new ArrayList<Person>();
        personList.add(new Person("zwx","23"));
        personList.add(new Person("zwx1","24"));
        personList.add(new Person("zwx2","25"));
      
        LinearLayout ll = (LinearLayout)findViewById(R.id.LinearLayout01);


        for(Person person : personList){
         RelativeLayout rl = new RelativeLayout(this);
         RelativeLayout.LayoutParams  rll = new RelativeLayout.LayoutParams(LayoutParams.FILL_PARENT,LayoutParams.WRAP_CONTENT);
          rl.setLayoutParams(rll);


          TextView tv1 = new TextView(this);
          RelativeLayout.LayoutParams tv1_rl = new RelativeLayout.LayoutParams(LayoutParams.WRAP_CONTENT,LayoutParams.WRAP_CONTENT);
          tv1_rl.addRule(RelativeLayout.ALIGN_PARENT_LEFT);
          tv1.setText(person.getName());
          rl.addView(tv1, tv1_rl);
        
          TextView tv2 = new TextView(this);
          RelativeLayout.LayoutParams tv2_rl = new RelativeLayout.LayoutParams(LayoutParams.WRAP_CONTENT,LayoutParams.WRAP_CONTENT);
          tv2_rl.addRule(RelativeLayout.ALIGN_PARENT_RIGHT);
          tv2.setText(person.getAge());
          rl.addView(tv2, tv2_rl);


          ll.addView(rl);
          rl.setOnClickListener(new View.OnClickListener() {
    
                @Override
              public void onClick(View v) {
                   Toast.makeText(Main.this, "11", 5000).show();
                }
               }) ;
        }
    }
}


注意:不能在RelativeLayout容器本身和他的子元素之间产生循环依赖,比如说,不能将RelativeLayout的高设置成为WRAP_CONTENT的时候将子元素的高设置成为ALIGN_PARENT_BOTTOM。

[!--infotagslink--]

相关文章

  • 安卓手机app添加支付宝支付开发教程

    支付宝支付在国内算是大家了,我们到处都可以使用支付宝了,下文整理介绍的是在安卓app应用中使用支付宝进行支付的开发例子。 之前讲了一篇博客关与支付宝集成获取...2016-09-20
  • PHP成员变量获取对比(类成员变量)

    下面本文章来给大家介绍在php中成员变量的一些对比了,文章举了四个例子在这例子中分别对不同成员变量进行测试与获取操作,下面一起来看看。 有如下4个代码示例,你认...2016-11-25
  • PHP+Ajax手机发红包的程序例子

    PHP+Ajax有许多的功能都会用到它小编今天就有使用PHP+Ajax实现的一个微信登录功能了,下面我们来看一个PHP+Ajax手机发红包的程序例子,具体如下所示。 PHP发红包基本...2016-11-25
  • php 获取用户IP与IE信息程序

    php 获取用户IP与IE信息程序 function onlineip() { global $_SERVER; if(getenv('HTTP_CLIENT_IP')) { $onlineip = getenv('HTTP_CLIENT_IP');...2016-11-25
  • php获取一个文件夹的mtime的程序

    php获取一个文件夹的mtime的程序了,这个就是时间问题了,对于这个问题我们来看小编整理的几个例子,具体的操作例子如下所示。 php很容易获取到一个文件夹的mtime,可以...2016-11-25
  • 破解安卓手机上的九宫格锁方法步骤

    很多用安卓智能手机的朋友是用九宫格锁屏,网上也有暴力删除手机图形锁的方法,不过我们可以用程序来破解。本文只提供技术学习,不能干坏事 安卓手机的图形锁(九宫格)...2016-09-20
  • 如何获取网站icon有哪些可行的方法

    获取网站icon,常用最简单的方法就是通过website/favicon.ico来获取,不过由于很多网站都是在页面里面设置favicon,所以此方法很多情况都不可用。 更好的办法是通过google提供的服务来实现:http://www.google.com/s2/favi...2014-06-07
  • 华为手机怎么恢复已卸载的应用?华为手机恢复应用教程

    华为手机怎么恢复已卸载的应用?有时候我们在使用华为手机的时候,想知道卸载的应用怎么恢复,这篇文章主要介绍了华为手机恢复应用教程,需要的朋友可以参考下...2020-06-29
  • 华为手机怎么开启双时钟? 华为添加双时钟的技巧

    华为手机怎么开启双时钟?华为手机是可以设置双时钟的,如果来回在两个有时差的地方工作,是可以设置双时钟显示,下面我们就来看看华为添加双时钟的技巧,需要的朋友可以参考下...2020-12-08
  • jquery如何获取元素的滚动条高度等实现代码

    主要功能:获取浏览器显示区域(可视区域)的高度 : $(window).height(); 获取浏览器显示区域(可视区域)的宽度 :$(window).width(); 获取页面的文档高度 $(document).height(); 获取页面的文档宽度 :$(document).width();...2015-10-21
  • 安卓手机wifi打不开修复教程,安卓手机wifi打不开解决方法

    手机wifi打不开?让小编来告诉你如何解决。还不知道的朋友快来看看。 手机wifi是现在生活中最常用的手机功能,但是遇到手机wifi打不开的情况该怎么办呢?如果手机wifi...2016-12-21
  • jquery获取div距离窗口和父级dv的距离示例

    jquery中jquery.offset().top / left用于获取div距离窗口的距离,jquery.position().top / left 用于获取距离父级div的距离(必须是绝对定位的div)。 (1)先介绍jquery.offset().top / left css: 复制代码 代码如下: *{ mar...2013-10-13
  • Jquery 获取指定标签的对象及属性的设置与移除

    1、先讲讲JQuery的概念,JQuery首先是由一个 America 的叫什么 John Resig的人创建的,后来又很多的JS高手也加入了这个团队。其实 JQuery是一个JavaScript的类库,这个类库集合了很多功能方法,利用类库你可以用简单的一些代...2014-05-31
  • C#获取字符串后几位数的方法

    这篇文章主要介绍了C#获取字符串后几位数的方法,实例分析了C#操作字符串的技巧,具有一定参考借鉴价值,需要的朋友可以参考下...2020-06-25
  • jquery获取tagName再进行判断

    如果是为了取到tagName后再进行判断,那直接用下面的代码会更方便: $(element).is('input') 如果是要取到标签用作到别的地方,可以使用一下代码: $(element)[0].tagName 或: $(element).get(0).tagName...2014-05-31
  • DOM XPATH获取img src值的query

    复制代码 代码如下:$nodes = @$xpath->query("//*[@id='main_pr']/img/@src");$prurl = $nodes->item(0)->nodeValue;...2013-10-04
  • PHP 如何获取二维数组中某个key的集合

    本文为代码分享,也是在工作中看到一些“大牛”的代码,做做分享。 具体是这样的,如下一个二维数组,是从库中读取出来的。 代码清单: 复制代码 代码如下: $user = array( 0 => array( 'id' => 1, 'name' => '张三', 'ema...2014-06-07
  • php获取汉字拼音首字母的方法

    现实中我们经常看到这样的说明,排名不分先后,按姓名首字母进行排序。这是中国人大多数使用的排序方法。那么在php程序中该如何操作呢?下面就分享一下在php程序中获取汉字拼音的首字母的方法,在网上搜到的大多数是有问题的...2015-10-23
  • 浅谈关于如何检测iOS14本地网络权限的一些思路

    这篇文章主要介绍了浅谈关于如何检测iOS14本地网络权限的一些思路,文中通过示例代码介绍的非常详细,对大家的学习或者工作具有一定的参考学习价值,需要的朋友们下面随着小编来一起学习学习吧...2020-12-08
  • 使用C#获取系统特殊文件夹路径的解决方法

    本篇文章是对使用C#获取系统特殊文件夹路径的解决方法进行了详细的分析介绍,需要的朋友参考下...2020-06-25