使用ListView实现网上订餐首页
更新时间:2021年1月2日 21:51 点击:2085
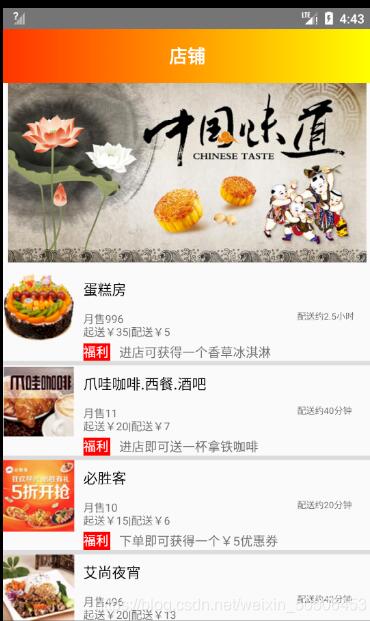
本文实例为大家分享了ListView实现网上订餐首页的具体代码,供大家参考,具体内容如下
效果图
布局文件
android:layout_width="match_parent"
android:layout_height="match_parent"
android:orientation="vertical"
tools:context=".SimpleAdapterActivity">
<include layout="@layout/title"/>
 <ImageView
    android:layout_width="match_parent"
    android:layout_height="200dp"
    android:src="@drawable/chinaweidao"/>
  <ListView
    android:dividerHeight="5dp"
    android:id="@+id/lv_listview"
    android:layout_marginTop="10dp"
    android:layout_width="match_parent"
    android:layout_height="wrap_content" />
</LinearLayout>
android:layout_width="match_parent"
  android:layout_height="100dp"
  android:layout_margin="10dp">
  <ImageView
    android:id="@+id/food_image"
    android:layout_width="80dp"
    android:layout_height="80dp"/>
  <LinearLayout
    android:orientation="vertical"
    android:layout_width="0dp"
    android:layout_height="match_parent"
    android:layout_weight="3">
    <TextView
      android:id="@+id/food_name"
      android:layout_width="match_parent"
      android:layout_height="0dp"
      android:layout_weight="1"
      android:layout_marginLeft="10dp"
      android:text="标题"
      android:textSize="16sp"
      android:gravity="center_vertical"
      android:textColor="#000000"/>
    <TextView
      android:id="@+id/food_content"
      android:layout_width="match_parent"
      android:layout_height="0dp"
      android:layout_weight="1"
      android:layout_marginLeft="10dp"
      android:text="内容"
      android:textSize="12sp"
      android:gravity="center_vertical"/>
    <LinearLayout
      android:layout_width="wrap_content"
      android:layout_height="wrap_content">
      <include layout="@layout/welfarestyle"/>
      <TextView
        android:id="@+id/tv_welfare"
        android:layout_marginLeft="10dp"
        android:layout_width="match_parent"
        android:layout_height="match_parent"
        android:gravity="center_vertical"/>
    </LinearLayout>


  </LinearLayout>
  <LinearLayout
    android:layout_width="0dp"
    android:layout_height="match_parent"
    android:layout_weight="1">
    <TextView
      android:id="@+id/tv_time"
      android:layout_width="wrap_content"
      android:layout_height="match_parent"
      android:text="时间"
      android:textSize="10sp"
      android:gravity="center_vertical"/>

</LinearLayout>
title.xml
android:layout_width="match_parent"
android:layout_height="wrap_content"
android:background="@drawable/title_style">
<TextView
    android:layout_width="match_parent"
    android:layout_height="match_parent"
    android:text="店铺"
    android:textColor="#ffffff"
    android:textSize="20sp"
    android:textStyle="bold"
    android:gravity="center"/>
设置福利图标的样式
android:layout_width="match_parent"
android:layout_height="match_parent">
<TextView
    android:layout_marginLeft="10dp"
    android:layout_width="30dp"
    android:layout_height="20dp"
    android:text="福利"
    android:textColor="#fff"
    android:background="@drawable/welfare"/>
点击listview后跳转的页面布局
android:layout_width="match_parent"
android:layout_height="400dp"
xmlns:tools="http://schemas.android.com/tools"
android:orientation="vertical"
android:layout_margin="5dp"
tools:context=".FirstActivity">
<TextView
    android:layout_width="match_parent"
    android:layout_height="wrap_content"
    android:text="菜单"
    android:layout_margin="10dp"
    android:textSize="20dp"
    android:textColor="#000000"/>
<ListView
    android:layout_margin="8dp"
    android:id="@+id/lv_food"
    android:layout_width="match_parent"
    android:layout_height="match_parent"/>
android:layout_width="match_parent"
android:layout_height="100dp"
android:layout_margin="10dp">
<ImageView
    android:id="@+id/first_image"
    android:layout_width="80dp"
    android:layout_height="80dp"/>
  <LinearLayout
    android:orientation="vertical"
    android:layout_width="0dp"
    android:layout_height="match_parent"
    android:layout_weight="3">
    <TextView
      android:id="@+id/first_name"
      android:layout_width="match_parent"
      android:layout_height="0dp"
      android:layout_weight="1"
      android:layout_marginLeft="10dp"
      android:text="标题"
      android:textSize="16sp"
      android:gravity="center_vertical"
      android:textColor="#000000"/>
    <TextView
      android:id="@+id/first_ingredient"
      android:layout_width="match_parent"
      android:layout_height="0dp"
      android:layout_weight="1"
      android:layout_marginLeft="10dp"
      android:text="内容"
      android:textSize="12sp"
      android:textColor="#000000"
      android:gravity="center_vertical"/>
    <LinearLayout
      android:layout_width="wrap_content"
      android:layout_height="wrap_content">/>
      <TextView
        android:id="@+id/tv_money"
        android:layout_marginLeft="10dp"
        android:layout_width="match_parent"
        android:layout_height="match_parent"
        android:gravity="center_vertical"
        android:text="价格"/>
</LinearLayout>

</LinearLayout>
<LinearLayout
    android:layout_width="0dp"
    android:layout_height="match_parent"
    android:layout_weight="1.5">
    <Button
      android:id="@+id/first_btn_join"
      android:layout_width="wrap_content"
      android:layout_height="wrap_content"
      android:text="加入购物车"
      android:background="@android:drawable/btn_default"
      android:layout_gravity="center_vertical" />

</LinearLayout>
java文件
public class SimpleAdapterActivity extends AppCompatActivity {
  private ListView listView;
  private List<Map<String,Object>> data = new ArrayList<>();

  @Override
  protected void onCreate(Bundle savedInstanceState) {
    super.onCreate(savedInstanceState);
    setContentView(R.layout.activity_list_view);
//    ActionBar actionBar = getSupportActionBar();
    if (actionBar!= null){
      actionBar.hide();
    }
    initView();
  }
  public void initView(){
    listView = findViewById(R.id.lv_listview);
    Map<String, Object> map = new HashMap<String, Object>();
    map.put("icon", R.drawable.shop1);
    map.put("name", "蛋糕房");
    map.put("content", "月售996\n起送¥35|配送¥5");
    map.put("welfare","进店可获得一个香草冰淇淋");
    map.put("time","配送约2.5小时");
    data.add(map);
    map = new HashMap<String, Object>();
    map.put("icon", R.drawable.shop2);
    map.put("name", "爪哇咖啡.西餐.酒吧");
    map.put("content", "月售11\n起送¥20|配送¥7");
    map.put("welfare","进店即可送一杯拿铁咖啡");
    map.put("time","配送约40分钟");
    data.add(map);
    map = new HashMap<String, Object>();
    map.put("icon", R.drawable.shop3);
    map.put("name", "必胜客");
    map.put("content", "月售10\n起送¥15|配送¥6");
    map.put("welfare","下单即可获得一个¥5优惠券");
    map.put("time","配送约20分钟");
    data.add(map);
    map = new HashMap<String, Object>();
    map.put("icon", R.drawable.shop4);
    map.put("name", "艾尚夜宵");
    map.put("content", "月售496\n起送¥20|配送¥13");
    map.put("welfare","下单即可获得一个¥15优惠券");
    map.put("time","配送约42分钟");
    data.add(map);
    map = new HashMap<String, Object>();
    map.put("icon", R.drawable.shop5);
    map.put("name", "上岛咖啡");
    map.put("content", "月售800\n起送¥30|配送¥10");
    map.put("welfare","下单即可获得一个¥30优惠券");
    map.put("time","配送约30分钟");
    data.add(map);

    SimpleAdapter adapter = new SimpleAdapter(this,
        data,R.layout.listview_item,new String[]{"icon","name","content","welfare","time"},
        new int []{R.id.food_image,R.id.food_name,R.id.food_content,R.id.tv_welfare,R.id.tv_time});
    //设置listview的适配器,这里使用SimpleAdapter;
    listView.setAdapter(adapter);
    listView.setOnItemClickListener(new AdapterView.OnItemClickListener() {
      @Override
      public void onItemClick(AdapterView<?> adapterView, View view, int i, long l) {
        Map map = data.get(i);
        /* Toast.makeText(SimpleAdapterActivity.this, "你点击了"+map.get("name")+map.get("content"), Toast.LENGTH_SHORT).show();*/
        Intent intent = new Intent(SimpleAdapterActivity.this,FirstActivity.class);
        startActivity(intent);
      }
    });
  }
}
public class FirstActivity extends AppCompatActivity {
  private Button btnjoin;
  private ListView listView;
  private List<Map<String,Object>> data = new ArrayList<>();

  @Override
  protected void onCreate(Bundle savedInstanceState) {
    super.onCreate(savedInstanceState);
    setContentView(R.layout.activity_first);
    btnjoin = findViewById(R.id.first_btn_join);
    initView();
  }
  public void initView(){
    listView = findViewById(R.id.lv_food);
    Map<String, Object> map = new HashMap<String, Object>();
    map.put("icon", R.drawable.food1);
    map.put("name", "招牌丰收硕果12寸");
    map.put("ingredient", "水果、奶油、面包、鸡蛋");
    map.put("money","¥198");
    map.put("btn","加入购物车");
    data.add(map);
    map = new HashMap<String, Object>();
    map.put("icon", R.drawable.food2);
    map.put("name", "玫瑰花创意蛋糕");
    map.put("ingredient", "玫瑰花、奶油、鸡蛋");
    map.put("money","¥148");
    map.put("btn","加入购物车");
    data.add(map);
    map = new HashMap<String, Object>();
    map.put("icon", R.drawable.food3);
    map.put("name", "布朗熊与可妮");
    map.put("ingredient", "奶油、巧克力、果粒夹层");
    map.put("money","¥98");
    map.put("btn","加入购物车");
    data.add(map);

    SimpleAdapter adapter = new SimpleAdapter(this,
        data,R.layout.activity_first_list,new String[]{"icon","name","ingredient","money","btn"},
        new int []{R.id.first_image,R.id.first_name,R.id.first_ingredient,R.id.tv_money,R.id.first_btn_join});
    //设置listview的适配器,这里使用SimpleAdapter;
    listView.setAdapter(adapter);

 }
}
以上就是本文的全部内容,希望对大家的学习有所帮助,也希望大家多多支持猪先飞。
上一篇: Android实现无限循环滚动
下一篇: viewpager实现自动循环轮播图
相关文章
- 这篇文章主要介绍了C#实现带进度条的ListView 的相关资料,需要的朋友可以参考下...2020-06-25
- 下面小编就为大家带来一篇C#获取鼠标在listview右键点击单元格的内容方法。小编觉得挺不错的,现在就分享给大家,也给大家做个参考。一起跟随小编过来看看吧...2020-06-25
C#实现读取DataSet数据并显示在ListView控件中的方法
这篇文章主要介绍了C#实现读取DataSet数据并显示在ListView控件中的方法,涉及C#操作DataSet及ListView控件的相关技巧,具有一定参考借鉴价值,需要的朋友可以参考下...2020-06-25- 这篇文章主要介绍了C#中WPF ListView绑定数据的实例详解的相关资料,希望通过本文能帮助到大家,让大家理解掌握这部分内容,需要的朋友可以参考下...2020-06-25
- 这篇文章主要介绍了C# WPF ListView控件的实例详解的相关资料,希望通过本能帮助到大家,让大家掌握这部分内容,需要的朋友可以参考下...2020-06-25
- 首先 你需要添加引用Microsoft Excel 11.0 Object Library...2020-06-25
C# listview添加combobox到单元格的实现代码
从别处转来的,自己进行了一些小的修改,还不错,你自己先拖一个ListView1和一个ComboBox1,需要的朋友可以参考下...2020-06-25安卓开发使用定制的ArrayAdapter制作ListView的Items
下面我们来看一篇关于使用定制的ArrayAdapter制作ListView的Items的例子,希望这个例子能够给各位同学带来帮助的哦。 背景介绍 对于现实世界中的商业移动应用...2016-09-20- 下面我们来看一篇关于ListView移动到指定位置的例子吧,希望文章能够给各位朋友带来帮助,具体的如下介绍. 关于ListView移动到指定位置有两种方法 listview.setSel...2016-11-01
- ListView没有Item的双击事件,只能通过变通的方法得到,以下是我的变通方法...2020-06-25
- 想实现一个功能,这个功能挺简单,就是当不是管理员用户登入的时候,那这个 删除 按钮就被隐藏掉;当是管理员用户的时候,就重新显示出来...2021-09-22
ASP.NET笔记之 ListView 与 DropDownList的使用
本篇文章小编为大家介绍,ASP.NET笔记之 ListView 与 DropDownList的使用。需要的朋友参考下...2021-09-22C# ListView 点击表头对数据进行排序功能的实现代码
这篇文章主要介绍了C# ListView 点击表头对数据进行排序功能的实现代码,需要的朋友可以参考下...2020-06-25将选择的图片显示在listview中,并显示filename,path和type的简单实例
这篇文章介绍了将选择的图片显示在listview中,并显示filename,path和type的简单实例,有需要的朋友可以参考一下...2021-09-22读写XML文件的内容并将其显示在ListView控件上的方法
下面小编就为大家带来一篇读写XML文件的内容并将其显示在ListView控件上的方法。小编觉得挺不错的,现在就分享给大家,也给大家做个参考。一起跟随小编过来看看吧...2020-06-25- 这篇文章主要介绍了WPF的ListView控件自定义布局的方法,结合实例形式分析了WPF中ListView控件的布局方法,需要的朋友可以参考下...2020-06-25
- 这篇文章主要介绍了C#使用listView增删操作的实现方法,实例分析了C#中使用listView控件进行动态添加、选中删除等操作的技巧,具有一定的参考借鉴价值,需要的朋友可以参考下...2020-06-25
listview控件实现点击列表头进行listview排序示例分享
这篇文章主要介绍了listview控件实现点击列表头进行listview排序示例分享,需要的朋友可以参考下...2020-06-25- ListView在安卓开发不用到的非常的多了我们在这里来为各位整理一篇关于android: ListView的简单用法吧,具体如下. 当你在android中看到一个 列表时, 它基本就是个L...2016-11-22
- 列表作为最常用的控件之一,还是有必要好好学习的,本章以一个初学者的角度来学习 ListView,ListView的属性,以及BaseAdapter简单定义,至于ListView优化这些, 我们一步步来...2021-10-09