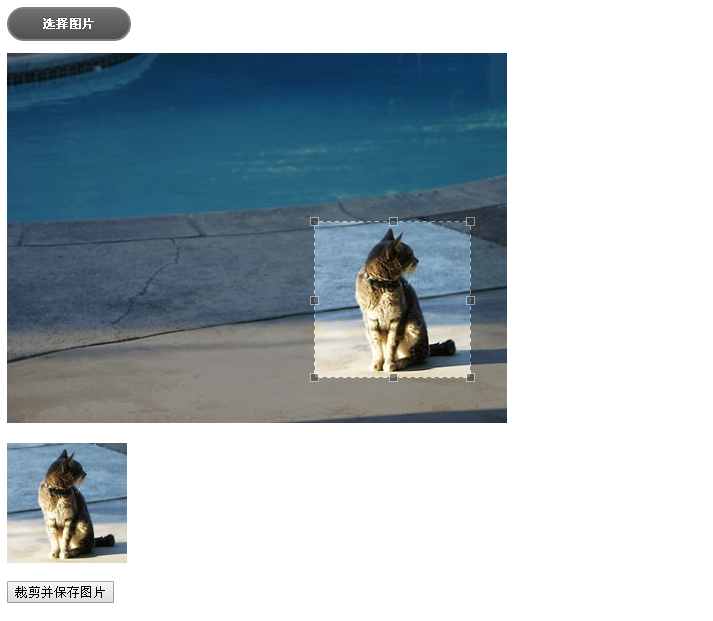
基于asp.net实现图片在线上传并在线裁剪功能
更新时间:2021年9月22日 10:05 点击:2108
1、说明
接上一篇文章asp.net uploadify实现多附件上传功能完成后,又突然用到头像上传并在线裁剪。在网上找个众多例子都没有符合要求的,有一篇文章写的不错,Asp.Net平台下的图片在线裁剪功能的实现代码(源码打包),大家可以看下
2、组成
首先说明一下代码实现所用到的技术,仅供参考:
开发工具:vs2010
目标框架:.NET Framework3.5
jcrop:Jcrop.js v0.9.12
Uploadify:uploadify-v3.1
Jquery:jquery-1.9.0.js
最后我会将整个Demo上传,如果同学们的电脑上有开发环境可直接打开项目解决方案运行。
3、代码
Default.aspx(测试页面)

<%@ Page Language="C#" AutoEventWireup="true" CodeBehind="Default.aspx.cs" Inherits="ImgJcrop._Default" %>
<!DOCTYPE html PUBLIC "-//W3C//DTD XHTML 1.0 Transitional//EN" "http://www.w3.org/TR/xhtml1/DTD/xhtml1-transitional.dtd">
<html xmlns="http://www.w3.org/1999/xhtml">
<head runat="server">
  <title>在线裁剪</title>
  <link href="Scripts/jcrop/jquery.Jcrop.css" rel="stylesheet" type="text/css" />
  <link href="Scripts/uploadify-v3.1/uploadify.css" rel="stylesheet" type="text/css" />
  <script src="Scripts/jquery.1.9.0.min.js" type="text/javascript"></script>
  <script src="Scripts/jcrop/jquery.Jcrop.js" type="text/javascript"></script>
  <script src="Scripts/uploadify-v3.1/jquery.uploadify-3.1.js" type="text/javascript"></script>
  <script type="text/javascript">
    $(function () {
      var jcrop_api, boundx, boundy;
      $("#file_upload").uploadify({
        "auto": true,
        "buttonText": "选择图片",
        "swf": "Scripts/uploadify-v3.1/uploadify.swf",
        "uploader": "App_Handler/Uploadify.ashx?action=upload",
        "fileTypeExts": "*.jpg; *.jpeg; *.gif; *.png; *.bmp",
        "fileTypeDesc": "支持的格式:",
        "multi": false,
        "removeCompleted": false,
        "onUploadStart": function (file) {
          $("#file_upload-queue").hide();
        },
        "onUploadSuccess": function (file, data, response) {
          var row = eval("[" + data + "]");
          if (row[0]["status"] == 0) {
            $("#cutimg").html("<img id=\"imgOriginal\" name=\"imgOriginal\" /><div style=\"overflow: hidden; margin-top: 20px;\"><div style=\"width: 120px; height: 120px; overflow: hidden;\"><img id=\"imgPreview\" /></div><br /><input type=\"button\" id=\"btnImgCut\" onclick=\"cutSaveImg()\" value=\"裁剪并保存图片\" /></div>");
            $("#cutimg img").each(function () { $(this).attr("src", row[0]["message"]); });
            $("#hidImgUrl").val(row[0]["message"]);
            $('#imgOriginal').Jcrop({
              onChange: updatePreview,
              onSelect: updatePreview,
              aspectRatio: 1,
              //maxSize: [120, 120],
              setSelect: [0, 0, 120, 120]
            }, function () {
              var bounds = this.getBounds();
              boundx = bounds[0];
              boundy = bounds[1];
              jcrop_api = this;
            });
          } else {
            alert(row[0]["message"]);
          }
        }
      });

      function updatePreview(c) {

        if (parseInt(c.w) > 0) {
          var rx = 120 / c.w;
          var ry = 120 / c.h;

          $("#imgPreview").css({
            width: Math.round(rx * boundx) + "px",
            height: Math.round(ry * boundy) + "px",
            marginLeft: "-" + Math.round(rx * c.x) + "px",
            marginTop: "-" + Math.round(ry * c.y) + "px"
          });
        }
        $("#hidXone").val(c.x);
        $("#hidYone").val(c.y);
        $("#hidXtwo").val(c.hidXtwo);
        $("#hidYtwo").val(c.hidYtwo);
        $("#hidImgWidth").val(c.w);
        $("#hidImgHeight").val(c.h);
      };
    });

    function cutSaveImg() {
      $.ajax({
        type: "post",
        url: "App_Handler/Uploadify.ashx?action=cutsaveimg",
        data: { strImgUrl: $("#imgOriginal")[0].src, hidXone: $("#hidXone").val(), hidYone: $("#hidYone").val(), hidImgWidth: $("#hidImgWidth").val(), hidImgHeight: $("#hidImgHeight").val() },
        dataType: "html",
        success: function (data) {
          var row = eval("[" + data + "]");
          if (row[0]["status"] == 0) { }
          alert(row[0]["message"]);
        }
      });
    }
  </script>
</head>
<body>
  <form id="form1" runat="server">
  <div>
    <input type="file" id="file_upload" name="file_upload" />
  </div>
  <div id="cutimg">
  </div>
  <asp:HiddenField ID="hidXone" runat="server" />
  <asp:HiddenField ID="hidYone" runat="server" />
  <asp:HiddenField ID="hidXtwo" runat="server" />
  <asp:HiddenField ID="hidYtwo" runat="server" />
  <asp:HiddenField ID="hidImgWidth" runat="server" />
  <asp:HiddenField ID="hidImgHeight" runat="server" />
  <asp:HiddenField ID="hidImgUrl" runat="server" />
  </form>
</body>
</html>
Uploadify.ashx(一般处理程序)
<%@ WebHandler Language="C#" Class="UploadifyUpload" %>
using System;
using System.Collections;
using System.Data;
using System.Web;
using System.Linq;
using System.Web.Services;
using System.Web.Services.Protocols;
using System.Web.SessionState;
using System.IO;
using System.Collections.Generic;
using System.Web.UI.WebControls;
using System.Text;
using System.Drawing;
using System.Drawing.Imaging;
public class UploadifyUpload : IHttpHandler, IRequiresSessionState
{
  public void ProcessRequest(HttpContext context)
  {
    context.Response.ContentType = "text/plain";
    context.Response.Charset = "utf-8";

    string action = context.Request["action"];
    switch (action)
    {
      case "upload":
        //上传图片
        upload(context);
        break;
      case "cutsaveimg":
        //裁剪并保存
        cutsaveimg(context);
        break;
    }
    context.Response.End();
  }
  /// <summary>
  /// 上传图片
  /// </summary>
  /// <param name="context"></param>
  private void upload(HttpContext context)
  {
    HttpPostedFile postedFile = context.Request.Files["Filedata"];
    if (postedFile != null)
    {
      string fileName, fileExtension;
      int fileSize;
      fileName = postedFile.FileName;
      fileSize = postedFile.ContentLength;
      if (fileName != "")
      {
        fileExtension = postedFile.FileName.Substring(postedFile.FileName.LastIndexOf('.'));
        string strPath = context.Server.MapPath("/") + "\\App_File\\Upload\\";//设置文件的路径
        string strFileName = "upload" + DateTime.Now.ToString("yyyyMMddHHmmss") + fileExtension;
        string strFileUrl = strPath + strFileName;//保存文件路径
        if (!Directory.Exists(strPath))
        {
          Directory.CreateDirectory(strPath);
        }
        postedFile.SaveAs(strFileUrl);//先保存源文件
        context.Response.Write("{\"status\":0,\"message\":\"/App_File/Upload/" + strFileName + "\"}");
      }
      else
      {
        context.Response.Write("{\"status\":1,\"message\":\"上传失败!\"}");
      }
    }
    else
    {
      context.Response.Write("{\"status\":1,\"message\":\"上传失败!\"}");
    }
  }
  /// <summary>
  /// 裁剪并保存图片
  /// </summary>
  /// <param name="context"></param>
  private void cutsaveimg(HttpContext context)
  {
    string strImgUrl = context.Request["strImgUrl"];
    string strXone = context.Request["hidXone"];
    string strYone = context.Request["hidYone"];
    string strImgWidth = context.Request["hidImgWidth"];
    string strImgHeight = context.Request["hidImgHeight"];
    string[] urls = strImgUrl.Split('/');
    string str_url = urls.Last();
    try
    {
      string strOldFiel = context.Server.MapPath("~/App_File/Upload/");
      string strNewFiel = context.Server.MapPath("~/App_File/Cut/");
      string strOldUrl = Path.Combine(strOldFiel, str_url);
      string strNewUrl = Path.Combine(strNewFiel, "cut" + DateTime.Now.ToString("yyyyMMddHHmmss") + "." + str_url.Split('.')[1]);
      if (!Directory.Exists(strNewFiel))
      {
        Directory.CreateDirectory(strNewFiel);
      }
      int intStartX = int.Parse(strXone);
      int intStartY = int.Parse(strYone);
      int intWidth = int.Parse(strImgWidth);
      int intHeight = int.Parse(strImgHeight);
      CutGeneratedImage(intStartX, intStartY, intWidth, intHeight, strOldUrl, strNewUrl);
      context.Response.Write("{\"status\":0,\"message\":\"裁剪成功并保存!\"}");
    }
    catch
    {
      context.Response.Write("{\"status\":1,\"message\":\"裁剪失败!\"}");
    }
  }
  /// <summary>
  /// 裁剪图片
  /// </summary>
  /// <param name="intWidth">要缩小裁剪图片宽度</param>
  /// <param name="intHeight">要缩小裁剪图片长度</param>
  /// <param name="strOldImgUrl">要处理图片路径</param>
  /// <param name="strNewImgUrl">处理完毕图片路径</param>
  public void CutGeneratedImage(int intStartX, int intStartY, int intWidth, int intHeight, string strOldImgUrl, string strNewImgUrl)
  {
    //上传标准图大小
    int intStandardWidth = 120;
    int intStandardHeight = 120;

    int intReduceWidth = 0; // 缩小的宽度
    int intReduceHeight = 0; // 缩小的高度
    int intCutOutWidth = 0; // 裁剪的宽度
    int intCutOutHeight = 0; // 裁剪的高度
    int level = 100; //缩略图的质量 1-100的范围
    //获得缩小,裁剪大小
    if (intStandardHeight * intWidth / intStandardWidth > intHeight)
    {
      intReduceWidth = intWidth;
      intReduceHeight = intStandardHeight * intWidth / intStandardWidth;
      intCutOutWidth = intWidth;
      intCutOutHeight = intHeight;
    }
    else if (intStandardHeight * intWidth / intStandardWidth < intHeight)
    {
      intReduceWidth = intStandardWidth * intHeight / intStandardHeight;
      intReduceHeight = intHeight;
      intCutOutWidth = intWidth;
      intCutOutHeight = intHeight;
    }
    else
    {
      intReduceWidth = intWidth;
      intReduceHeight = intHeight;
      intCutOutWidth = intWidth;
      intCutOutHeight = intHeight;
    }
    //通过连接创建Image对象
    //System.Drawing.Image oldimage = System.Drawing.Image.FromFile(strOldImgUrl);
    //oldimage.Save(Server.MapPath("tepm.jpg"));
    //oldimage.Dispose();
    //缩小图片
    Bitmap bm = new Bitmap(strOldImgUrl);
    //处理JPG质量的函数
    ImageCodecInfo[] codecs = ImageCodecInfo.GetImageEncoders();
    ImageCodecInfo ici = null;
    foreach (ImageCodecInfo codec in codecs)
    {
      if (codec.MimeType == "image/jpeg")
      {
        ici = codec;
        break;
      }
    }
    EncoderParameters ep = new EncoderParameters();
    ep.Param[0] = new EncoderParameter(System.Drawing.Imaging.Encoder.Quality, (long)level);
    //裁剪图片
    Rectangle cloneRect = new Rectangle(intStartX, intStartY, intCutOutWidth, intCutOutHeight);
    PixelFormat format = bm.PixelFormat;
    Bitmap cloneBitmap = bm.Clone(cloneRect, format);
    //保存图片
    cloneBitmap.Save(strNewImgUrl, ici, ep);
    bm.Dispose();
  }
  public bool IsReusable
  {
    get
    {
      return false;
    }
  }
}

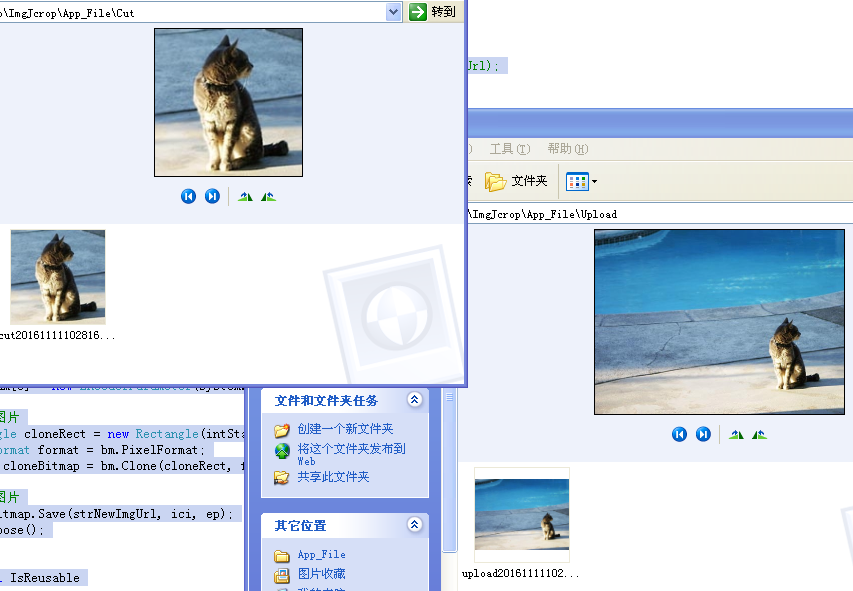
4、最后奉上Demo
ImgJcrop
以上就是本文的全部内容,希望本文的内容对大家的学习或者工作能带来一定的帮助,如果有疑问大家可以留言交流,同时也希望多多支持猪先飞!
相关文章
- 这篇文章主要为大家详细介绍了ASP.NET购物车的实现过程,文中示例代码介绍的非常详细,具有一定的参考价值,感兴趣的小伙伴们可以参考一下...2021-09-22
使用PHP+JavaScript将HTML页面转换为图片的实例分享
这篇文章主要介绍了使用PHP+JavaScript将HTML元素转换为图片的实例分享,文后结果的截图只能体现出替换的字体,也不能说将静态页面转为图片可以加快加载,只是这种做法比较interesting XD需要的朋友可以参考下...2016-04-19- 这篇文章主要介绍了C#从数据库读取图片并保存的方法,帮助大家更好的理解和使用c#,感兴趣的朋友可以了解下...2021-01-16
- 今天小编在这里就来给各位Photoshop的这一款软件的使用者们来说说把古装美女图片转为细腻的工笔画效果的制作教程,各位想知道方法的使用者们,那么下面就快来跟着小编一...2016-09-14
- 这篇文章主要介绍了Python 图片转数组,二进制互转操作,具有很好的参考价值,希望对大家有所帮助。一起跟随小编过来看看吧...2021-03-09
- php如何实现抓取网页图片,相较于手动的粘贴复制,使用小程序要方便快捷多了,喜欢编程的人总会喜欢制作一些简单有用的小软件,最近就参考了网上一个php抓取图片代码,封装了一个php远程抓取图片的类,测试了一下,效果还不错分享...2015-10-30
- 在开发过程中,使用Visual Studio的断点调试功能可以很方便帮我们调试发现程序存在的错误,同样Visual Studio也支持对SQL Server里面的存储过程进行调试,下面就让我们看看具体的调试方法。...2021-09-22
- 这篇文章主要为大家详细介绍了iOS如何将图片裁剪成圆形,文中示例代码介绍的非常详细,具有一定的参考价值,感兴趣的小伙伴们可以参考一下...2020-06-30
jquery左右滚动焦点图banner图片鼠标经过显示上下页按钮
jquery左右滚动焦点图banner图片鼠标经过显示上下页按钮...2013-10-13- 下面小编就为大家带来一篇利用JS实现点击按钮后图片自动切换的简单方法。小编觉得挺不错的,现在就分享给大家,也给大家做个参考。一起跟随小编过来看看吧...2016-10-25
- 本文章来人大家介绍一个php文件上传类的使用方法,期望此实例对各位php入门者会有不小帮助哦。 简介 Class.upload.php是用于管理上传文件的php文件上传类, 它可以帮...2016-11-25
- 这篇文章主要为大家详细介绍了js实现上传图片及时预览的相关资料,具有一定的参考价值,感兴趣的朋友可以参考一下...2016-05-09
- Photoshop的这一款软件小编相信很多的人都已经是使用过了吧,那么今天小编在这里就给大家带来了用Photoshop软件制作枪战电影海报的教程,想知道制作步骤的玩家们,那么下面...2016-09-14
- 又码了一个周末的代码,这次在做一些关于文件上传的东西。(PHP UPLOAD)小有收获项目是一个BT种子列表,用户有权限上传自己的种子,然后配合BT TRACK服务器把种子的信息写出来...2016-11-25
- 本文实例讲述了jQuery实现文件上传进度条效果的代码。分享给大家供大家参考。具体如下: 运行效果截图如下:具体代码如下:<!DOCTYPE html><html><head><meta charset="utf-8"><title>upload</title><link rel="stylesheet...2015-11-24
- 本篇文章主要说明的是与php文件上传的相关配置的知识点。PHP文件上传功能配置主要涉及php.ini配置文件中的upload_tmp_dir、upload_max_filesize、post_max_size等选项,下面一一说明。打开php.ini配置文件找到File Upl...2015-10-21
- EXCEL数据上传到SQL SERVER中的方法需要注意到三点!注意点一:要把EXCEL数据上传到SQL SERVER中必须提前把EXCEL传到服务器上.做法: 在ASP.NET环境中,添加一个FileUpload上传控件后台代码的E.X: 复制代码 代码如下: if...2013-09-23
- 图片剪裁是常用的方法,那么如何通过4坐标剪裁图片,本文就详细的来介绍一下,感兴趣的小伙伴们可以参考一下...2021-06-04
- 共享一段使用PHP下载CSS文件中的图片的代码 复制代码 代码如下: <?php //note 设置PHP超时时间 set_time_limit(0); //note 取得样式文件内容 $styleFileContent = file_get_contents('images/style.css'); //not...2013-10-04
- DVWA (Dam Vulnerable Web Application)DVWA是用PHP+Mysql编写的一套用于常规WEB漏洞教学和检测的WEB脆弱性测试程序。包含了SQL注入、XSS、盲注等常见的一些安全漏洞...2016-11-25