C++ opencv实现车道线识别
本文实例为大家分享了C++ opencv实现车道线识别的具体代码,供大家参考,具体内容如下
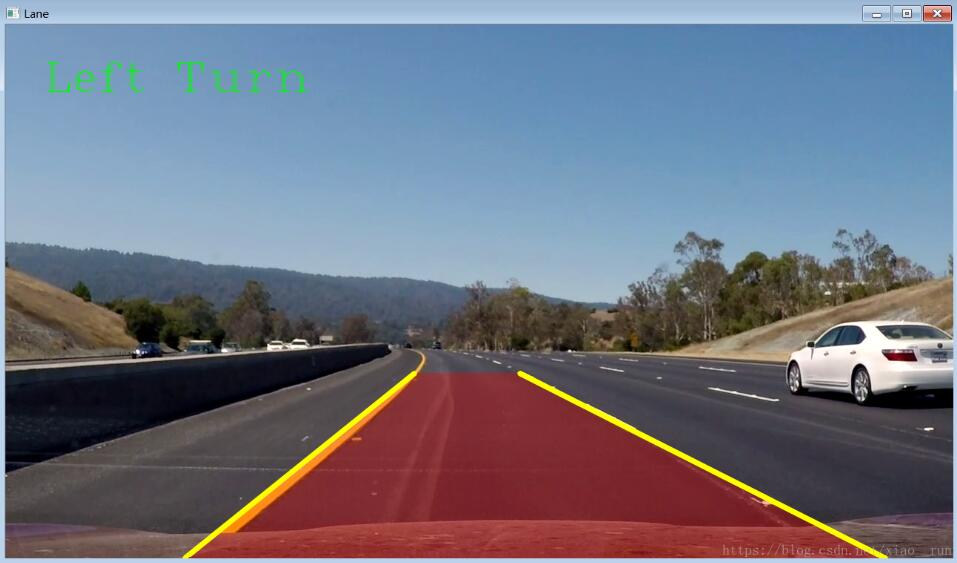
先上图
1、

2、
(一)目前国内外广泛使用的车道线检测方法主要分为两大类:
(1) 基于道路特征的车道线检测;
(2) 基于道路模型的车道线检测。
基于道路特征的车道线检测作为主流检测方法之一,主要是利用车道线与道路环境的物理特征差异进行后续图像的分割与处理,从而突出车道线特征,以实现车道线的检测。该方法复杂度较低,实时性较高,但容易受到道路环境干扰。
基于道路模型的车道线检测主要是基于不同的二维或三维道路图像模型(如直线型、抛物线型、样条曲线型、组合模型等) ,采用相应方法确定各模型参数,然后进行车道线拟合。该方法对特定道路的检测具有较高的准确度,但局限性强、运算量大、实时性较差。
(二)在这我介绍一种车道线检测方法,效果在高速上还可以,对于破损道路,光照变化太大等道路效果不佳,后续继续改进(直方图均衡以及多特征融合等等),这里有个基础版本的接口,大致步骤如下
(1)图像灰度化
(2)图像高斯滤波
(3)边缘检测
(4)获取掩膜,获取感兴趣区域
(5)霍夫变换检测直线
(6)将检测到的车道线分类,设置阈值,以图像中线分为左右两边的车道线,存入一个vector
(7)回归两条直线,即左右分别两个点,且求出斜率方程
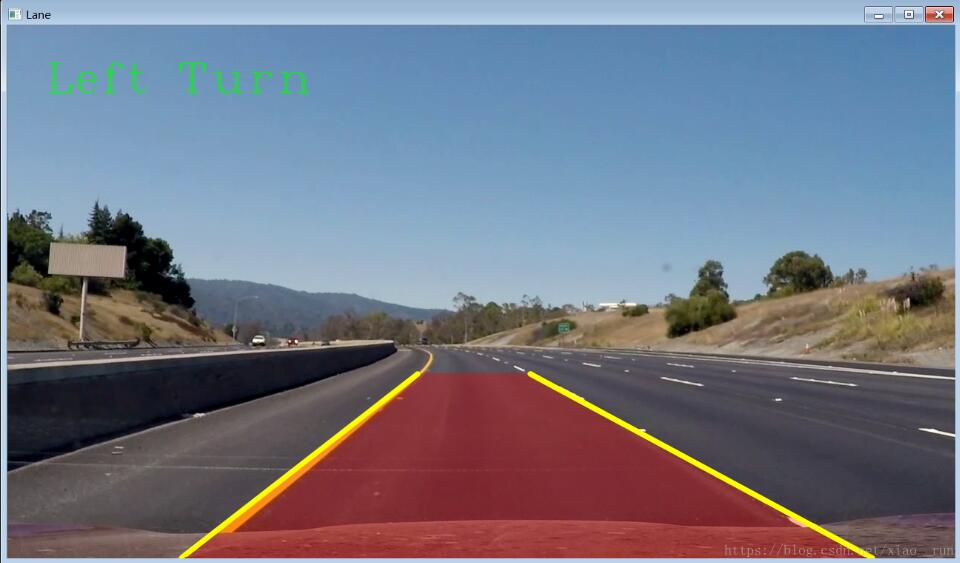
(8)确定车道线的转弯与否
下面我贴出代码
(1)头文件(LaneDetector.h)
class LaneDetector
{
private:
 double img_size;
 double img_center;
 bool left_flag = false; // Tells us if there's left boundary of lane detected
 bool right_flag = false; // Tells us if there's right boundary of lane detected
 cv::Point right_b; // Members of both line equations of the lane boundaries:
 double right_m; // y = m*x + b
 cv::Point left_b; //
 double left_m; //

public:
 cv::Mat deNoise(cv::Mat inputImage); // Apply Gaussian blurring to the input Image
 cv::Mat edgeDetector(cv::Mat img_noise); // Filter the image to obtain only edges
 cv::Mat mask(cv::Mat img_edges); // Mask the edges image to only care about ROI
 std::vector<cv::Vec4i> houghLines(cv::Mat img_mask); // Detect Hough lines in masked edges image
 std::vector<std::vector<cv::Vec4i> > lineSeparation(std::vector<cv::Vec4i> lines, cv::Mat img_edges); // Sprt detected lines by their slope into right and left lines
 std::vector<cv::Point> regression(std::vector<std::vector<cv::Vec4i> > left_right_lines, cv::Mat inputImage); // Get only one line for each side of the lane
 std::string predictTurn(); // Determine if the lane is turning or not by calculating the position of the vanishing point
 int plotLane(cv::Mat inputImage, std::vector<cv::Point> lane, std::string turn); // Plot the resultant lane and turn prediction in the frame.
};
源文件LaneDetector.cpp
*@file LaneDetector.cpp
*@author Miguel Maestre Trueba
*@brief Definition of all the function that form part of the LaneDetector class.
*@brief The class will take RGB images as inputs and will output the same RGB image but
*@brief with the plot of the detected lanes and the turn prediction.
*/
#include <string>
#include <vector>
#include <opencv2/opencv.hpp>
#include "LaneDetector.h"

// IMAGE BLURRING
/**
*@brief Apply gaussian filter to the input image to denoise it
*@param inputImage is the frame of a video in which the
*@param lane is going to be detected
*@return Blurred and denoised image
*/
cv::Mat LaneDetector::deNoise(cv::Mat inputImage) {
 cv::Mat output;

 cv::GaussianBlur(inputImage, output, cv::Size(3, 3), 0, 0);

 return output;
}

// EDGE DETECTION
/**
*@brief Detect all the edges in the blurred frame by filtering the image
*@param img_noise is the previously blurred frame
*@return Binary image with only the edges represented in white
*/
cv::Mat LaneDetector::edgeDetector(cv::Mat img_noise) {
 cv::Mat output;
 cv::Mat kernel;
 cv::Point anchor;

 // Convert image from RGB to gray
 cv::cvtColor(img_noise, output, cv::COLOR_RGB2GRAY);
 // Binarize gray image
 cv::threshold(output, output, 140, 255, cv::THRESH_BINARY);

 // Create the kernel [-1 0 1]
 // This kernel is based on the one found in the
 // Lane Departure Warning System by Mathworks
 anchor = cv::Point(-1, -1);
 kernel = cv::Mat(1, 3, CV_32F);
 kernel.at<float>(0, 0) = -1;
 kernel.at<float>(0, 1) = 0;
 kernel.at<float>(0, 2) = 1;

 // Filter the binary image to obtain the edges
 cv::filter2D(output, output, -1, kernel, anchor, 0, cv::BORDER_DEFAULT);
 cv::imshow("output", output);
 return output;
}

// MASK THE EDGE IMAGE
/**
*@brief Mask the image so that only the edges that form part of the lane are detected
*@param img_edges is the edges image from the previous function
*@return Binary image with only the desired edges being represented
*/
cv::Mat LaneDetector::mask(cv::Mat img_edges) {
 cv::Mat output;
 cv::Mat mask = cv::Mat::zeros(img_edges.size(), img_edges.type());
 cv::Point pts[4] = {
 cv::Point(210, 720),
 cv::Point(550, 450),
 cv::Point(717, 450),
 cv::Point(1280, 720)
 };

 // Create a binary polygon mask
 cv::fillConvexPoly(mask, pts, 4, cv::Scalar(255, 0, 0));
 // Multiply the edges image and the mask to get the output
 cv::bitwise_and(img_edges, mask, output);

 return output;
}

// HOUGH LINES
/**
*@brief Obtain all the line segments in the masked images which are going to be part of the lane boundaries
*@param img_mask is the masked binary image from the previous function
*@return Vector that contains all the detected lines in the image
*/
std::vector<cv::Vec4i> LaneDetector::houghLines(cv::Mat img_mask) {
 std::vector<cv::Vec4i> line;

 // rho and theta are selected by trial and error
 HoughLinesP(img_mask, line, 1, CV_PI / 180, 20, 20, 30);

 return line;
}

// SORT RIGHT AND LEFT LINES
/**
*@brief Sort all the detected Hough lines by slope.
*@brief The lines are classified into right or left depending
*@brief on the sign of their slope and their approximate location
*@param lines is the vector that contains all the detected lines
*@param img_edges is used for determining the image center
*@return The output is a vector(2) that contains all the classified lines
*/
std::vector<std::vector<cv::Vec4i> > LaneDetector::lineSeparation(std::vector<cv::Vec4i> lines, cv::Mat img_edges) {
 std::vector<std::vector<cv::Vec4i> > output(2);
 size_t j = 0;
 cv::Point ini;
 cv::Point fini;
 double slope_thresh = 0.3;
 std::vector<double> slopes;
 std::vector<cv::Vec4i> selected_lines;
 std::vector<cv::Vec4i> right_lines, left_lines;

 // Calculate the slope of all the detected lines
 for (auto i : lines) {
 ini = cv::Point(i[0], i[1]);
 fini = cv::Point(i[2], i[3]);

 // Basic algebra: slope = (y1 - y0)/(x1 - x0)
 double slope = (static_cast<double>(fini.y) - static_cast<double>(ini.y)) / (static_cast<double>(fini.x) - static_cast<double>(ini.x) + 0.00001);

 // If the slope is too horizontal, discard the line
 // If not, save them and their respective slope
 if (std::abs(slope) > slope_thresh) {
 slopes.push_back(slope);
 selected_lines.push_back(i);
 }
 }

 // Split the lines into right and left lines
 img_center = static_cast<double>((img_edges.cols / 2));
 while (j < selected_lines.size()) {
 ini = cv::Point(selected_lines[j][0], selected_lines[j][1]);
 fini = cv::Point(selected_lines[j][2], selected_lines[j][3]);

 // Condition to classify line as left side or right side
 if (slopes[j] > 0 && fini.x > img_center && ini.x > img_center) {
 right_lines.push_back(selected_lines[j]);
 right_flag = true;
 }
 else if (slopes[j] < 0 && fini.x < img_center && ini.x < img_center) {
 left_lines.push_back(selected_lines[j]);
 left_flag = true;
 }
 j++;
 }

 output[0] = right_lines;
 output[1] = left_lines;

 return output;
}

// REGRESSION FOR LEFT AND RIGHT LINES
/**
*@brief Regression takes all the classified line segments initial and final points and fits a new lines out of them using the method of least squares.
*@brief This is done for both sides, left and right.
*@param left_right_lines is the output of the lineSeparation function
*@param inputImage is used to select where do the lines will end
*@return output contains the initial and final points of both lane boundary lines
*/
std::vector<cv::Point> LaneDetector::regression(std::vector<std::vector<cv::Vec4i> > left_right_lines, cv::Mat inputImage) {
 std::vector<cv::Point> output(4);
 cv::Point ini;
 cv::Point fini;
 cv::Point ini2;
 cv::Point fini2;
 cv::Vec4d right_line;
 cv::Vec4d left_line;
 std::vector<cv::Point> right_pts;
 std::vector<cv::Point> left_pts;

 // If right lines are being detected, fit a line using all the init and final points of the lines
 if (right_flag == true) {
 for (auto i : left_right_lines[0]) {
 ini = cv::Point(i[0], i[1]);
 fini = cv::Point(i[2], i[3]);

 right_pts.push_back(ini);
 right_pts.push_back(fini);
 }

 if (right_pts.size() > 0) {
 // The right line is formed here
 cv::fitLine(right_pts, right_line, CV_DIST_L2, 0, 0.01, 0.01);
 right_m = right_line[1] / right_line[0];
 right_b = cv::Point(right_line[2], right_line[3]);
 }
 }

 // If left lines are being detected, fit a line using all the init and final points of the lines
 if (left_flag == true) {
 for (auto j : left_right_lines[1]) {
 ini2 = cv::Point(j[0], j[1]);
 fini2 = cv::Point(j[2], j[3]);

 left_pts.push_back(ini2);
 left_pts.push_back(fini2);
 }

 if (left_pts.size() > 0) {
 // The left line is formed here
 cv::fitLine(left_pts, left_line, CV_DIST_L2, 0, 0.01, 0.01);
 left_m = left_line[1] / left_line[0];
 left_b = cv::Point(left_line[2], left_line[3]);
 }
 }

 // One the slope and offset points have been obtained, apply the line equation to obtain the line points
 int ini_y = inputImage.rows;
 int fin_y = 470;

 double right_ini_x = ((ini_y - right_b.y) / right_m) + right_b.x;
 double right_fin_x = ((fin_y - right_b.y) / right_m) + right_b.x;

 double left_ini_x = ((ini_y - left_b.y) / left_m) + left_b.x;
 double left_fin_x = ((fin_y - left_b.y) / left_m) + left_b.x;

 output[0] = cv::Point(right_ini_x, ini_y);
 output[1] = cv::Point(right_fin_x, fin_y);
 output[2] = cv::Point(left_ini_x, ini_y);
 output[3] = cv::Point(left_fin_x, fin_y);

 return output;
}

// TURN PREDICTION
/**
*@brief Predict if the lane is turning left, right or if it is going straight
*@brief It is done by seeing where the vanishing point is with respect to the center of the image
*@return String that says if there is left or right turn or if the road is straight
*/
std::string LaneDetector::predictTurn() {
 std::string output;
 double vanish_x;
 double thr_vp = 10;

 // The vanishing point is the point where both lane boundary lines intersect
 vanish_x = static_cast<double>(((right_m*right_b.x) - (left_m*left_b.x) - right_b.y + left_b.y) / (right_m - left_m));

 // The vanishing points location determines where is the road turning
 if (vanish_x < (img_center - thr_vp))
 output = "Left Turn";
 else if (vanish_x >(img_center + thr_vp))
 output = "Right Turn";
 else if (vanish_x >= (img_center - thr_vp) && vanish_x <= (img_center + thr_vp))
 output = "Straight";

 return output;
}

// PLOT RESULTS
/**
*@brief This function plots both sides of the lane, the turn prediction message and a transparent polygon that covers the area inside the lane boundaries
*@param inputImage is the original captured frame
*@param lane is the vector containing the information of both lines
*@param turn is the output string containing the turn information
*@return The function returns a 0
*/
int LaneDetector::plotLane(cv::Mat inputImage, std::vector<cv::Point> lane, std::string turn) {
 std::vector<cv::Point> poly_points;
 cv::Mat output;

 // Create the transparent polygon for a better visualization of the lane
 inputImage.copyTo(output);
 poly_points.push_back(lane[2]);
 poly_points.push_back(lane[0]);
 poly_points.push_back(lane[1]);
 poly_points.push_back(lane[3]);
 cv::fillConvexPoly(output, poly_points, cv::Scalar(0, 0, 255), CV_AA, 0);
 cv::addWeighted(output, 0.3, inputImage, 1.0 - 0.3, 0, inputImage);

 // Plot both lines of the lane boundary
 cv::line(inputImage, lane[0], lane[1], cv::Scalar(0, 255, 255), 5, CV_AA);
 cv::line(inputImage, lane[2], lane[3], cv::Scalar(0, 255, 255), 5, CV_AA);

 // Plot the turn message
 cv::putText(inputImage, turn, cv::Point(50, 90), cv::FONT_HERSHEY_COMPLEX_SMALL, 3, cvScalar(0, 255, 0), 1, CV_AA);

 // Show the final output image
 cv::namedWindow("Lane", CV_WINDOW_AUTOSIZE);
 cv::imshow("Lane", inputImage);
 return 0;
}
main函数
#include <iostream>
#include <string>
#include <vector>
#include <opencv2/opencv.hpp>
#include "LaneDetector.h"
//#include "LaneDetector.cpp"

/**
*@brief Function main that runs the main algorithm of the lane detection.
*@brief It will read a video of a car in the highway and it will output the
*@brief same video but with the plotted detected lane
*@param argv[] is a string to the full path of the demo video
*@return flag_plot tells if the demo has sucessfully finished
*/
int main() {

 // The input argument is the location of the video
 cv::VideoCapture cap("challenge_video.mp4");
 if (!cap.isOpened())
 return -1;

 LaneDetector lanedetector; // Create the class object
 cv::Mat frame;
 cv::Mat img_denoise;
 cv::Mat img_edges;
 cv::Mat img_mask;
 cv::Mat img_lines;
 std::vector<cv::Vec4i> lines;
 std::vector<std::vector<cv::Vec4i> > left_right_lines;
 std::vector<cv::Point> lane;
 std::string turn;
 int flag_plot = -1;
 int i = 0;

 // Main algorithm starts. Iterate through every frame of the video
 while (i < 540) {
 // Capture frame
 if (!cap.read(frame))
 break;

 // Denoise the image using a Gaussian filter
 img_denoise = lanedetector.deNoise(frame);

 // Detect edges in the image
 img_edges = lanedetector.edgeDetector(img_denoise);

 // Mask the image so that we only get the ROI
 img_mask = lanedetector.mask(img_edges);

 // Obtain Hough lines in the cropped image
 lines = lanedetector.houghLines(img_mask);

 if (!lines.empty())
 {
 // Separate lines into left and right lines
 left_right_lines = lanedetector.lineSeparation(lines, img_edges);

 // Apply regression to obtain only one line for each side of the lane
 lane = lanedetector.regression(left_right_lines, frame);

 // Predict the turn by determining the vanishing point of the the lines
 turn = lanedetector.predictTurn();

 // Plot lane detection
 flag_plot = lanedetector.plotLane(frame, lane, turn);

 i += 1;
 cv::waitKey(25);
 }
 else {
 flag_plot = -1;
 }
 }
 return flag_plot;
}
最后再晒一张结果图吧
以上就是本文的全部内容,希望对大家的学习有所帮助,也希望大家多多支持猪先飞。
相关文章
- 这篇文章主要介绍了python-opencv-画外接矩形框的实例代码,代码简单易懂,对大家的学习或工作具有一定的参考借鉴价值,需要的朋友可以参考下...2021-09-04
- 图片剪裁是常用的方法,那么如何通过4坐标剪裁图片,本文就详细的来介绍一下,感兴趣的小伙伴们可以参考一下...2021-06-04
- 这篇文章主要介绍了OpenCV如何去除图片中的阴影的实现,文中通过示例代码介绍的非常详细,对大家的学习或者工作具有一定的参考学习价值,需要的朋友们下面随着小编来一起学习学习吧...2021-03-29
- 这篇文章主要介绍了解决使用OpenCV中的imread()内存报错问题,具有很好的参考价值,希望对大家有所帮助。一起跟随小编过来看看吧...2021-03-16
- 这篇文章主要介绍了python OpenCV的相关资料,帮助大家更好的理解和学习使用python的opencv,感兴趣的朋友可以了解下...2021-03-31
- 这篇文章主要介绍了使用OpenCV去除面积较小的连通域,具有很好的参考价值,希望对大家有所帮助。一起跟随小编过来看看吧...2020-07-05
详解pycharm的python包opencv(cv2)无代码提示问题的解决
这篇文章主要介绍了详解pycharm的python包opencv(cv2)无代码提示问题的解决,文中通过示例代码介绍的非常详细,对大家的学习或者工作具有一定的参考学习价值,需要的朋友们下面随着小编来一起学习学习吧...2021-01-29在C#中使用OpenCV(使用OpenCVSharp)的实现
这篇文章主要介绍了在C#中使用OpenCV(使用OpenCVSharp)的实现,文中通过示例代码介绍的非常详细,对大家的学习或者工作具有一定的参考学习价值,需要的朋友们下面随着小编来一起学习学习吧...2020-11-15- 这篇文章主要为大家详细介绍了C++ opencv实现车道线识别,文中示例代码介绍的非常详细,具有一定的参考价值,感兴趣的小伙伴们可以参考一下...2021-02-20
- 这篇文章主要为大家详细介绍了Opencv LBPH人脸识别算法的相关资料,具有一定的参考价值,感兴趣的小伙伴们可以参考一下...2020-04-25
详解opencv中画圆circle函数和椭圆ellipse函数
这篇文章主要介绍了opencv中画圆circle函数和椭圆ellipse函数,本文通过实例代码给大家介绍的非常详细,具有一定的参考借鉴价值,需要的朋友可以参考下...2020-05-09python中的opencv和PIL(pillow)转化操作
这篇文章主要介绍了python中的opencv和PIL(pillow)转化操作,具有很好的参考价值,希望对大家有所帮助。一起跟随小编过来看看吧...2021-03-16- 这篇文章主要介绍了python基于opencv检测程序运行效率,文中通过示例代码介绍的非常详细,对大家的学习或者工作具有一定的参考学习价值,需要的朋友可以参考下...2020-05-09
浅谈OpenCV中的新函数connectedComponentsWithStats用法
这篇文章主要介绍了浅谈OpenCV中的新函数connectedComponentsWithStats用法,具有很好的参考价值,希望对大家有所帮助。一起跟随小编过来看看吧...2020-07-05- 这篇文章主要介绍了python 实现性别识别的示例,帮助大家更好的理解和使用python,感兴趣的朋友可以了解下...2020-11-22
- 这篇文章主要为大家详细介绍了Opencv实现绿幕视频背景替换功能,具有一定的参考价值,感兴趣的小伙伴们可以参考一下...2020-04-25
- 这篇文章主要介绍了python基于OpenCV模板匹配识别图片中的数字,帮助大家更好的理解和学习使用python,感兴趣的朋友可以了解下...2021-03-31
- 这篇文章主要介绍了使用opencv识别图像红色区域,并输出红色区域中心点坐标,具有很好的参考价值,希望对大家有所帮助。一起跟随小编过来看看吧...2020-06-03
Python编程OpenCV和Numpy图像处理库实现图片去水印
这篇文章主要介绍了Python编程中如何实现图片去水印本文采用了OpenCV和Numpy的图像处理的方法来实现,文中附含详细示例代码,有需要的朋友可以借鉴参考下...2021-09-26- 这篇文章主要介绍了Opencv python 图片生成视频的方法示例,文中通过示例代码介绍的非常详细,对大家的学习或者工作具有一定的参考学习价值,需要的朋友们下面随着小编来一起学习学习吧...2020-11-18