10分钟彻底搞懂微信小程序单页面应用路由
单页面应用特征
「假设:」 在一个 web 页面中,有1个按钮,点击可跳转到站内其他页面。
「多页面应用:」 点击按钮,会从新加载一个html资源,刷新整个页面;
「单页面应用:」 点击按钮,没有新的html请求,只发生局部刷新,能营造出一种接近原生的体验,如丝般顺滑。
SPA 单页面应用为什么可以几乎无刷新呢?因为它的SP——single-page。在第一次进入应用时,即返回了唯一的html页面和它的公共静态资源,后续的所谓“跳转”,都不再从服务端拿html文件,只是DOM的替换操作,是模(jia)拟(zhuang)的。
那么js又是怎么捕捉到组件切换的时机,并且无刷新变更浏览器url呢?靠hash和HTML5History。
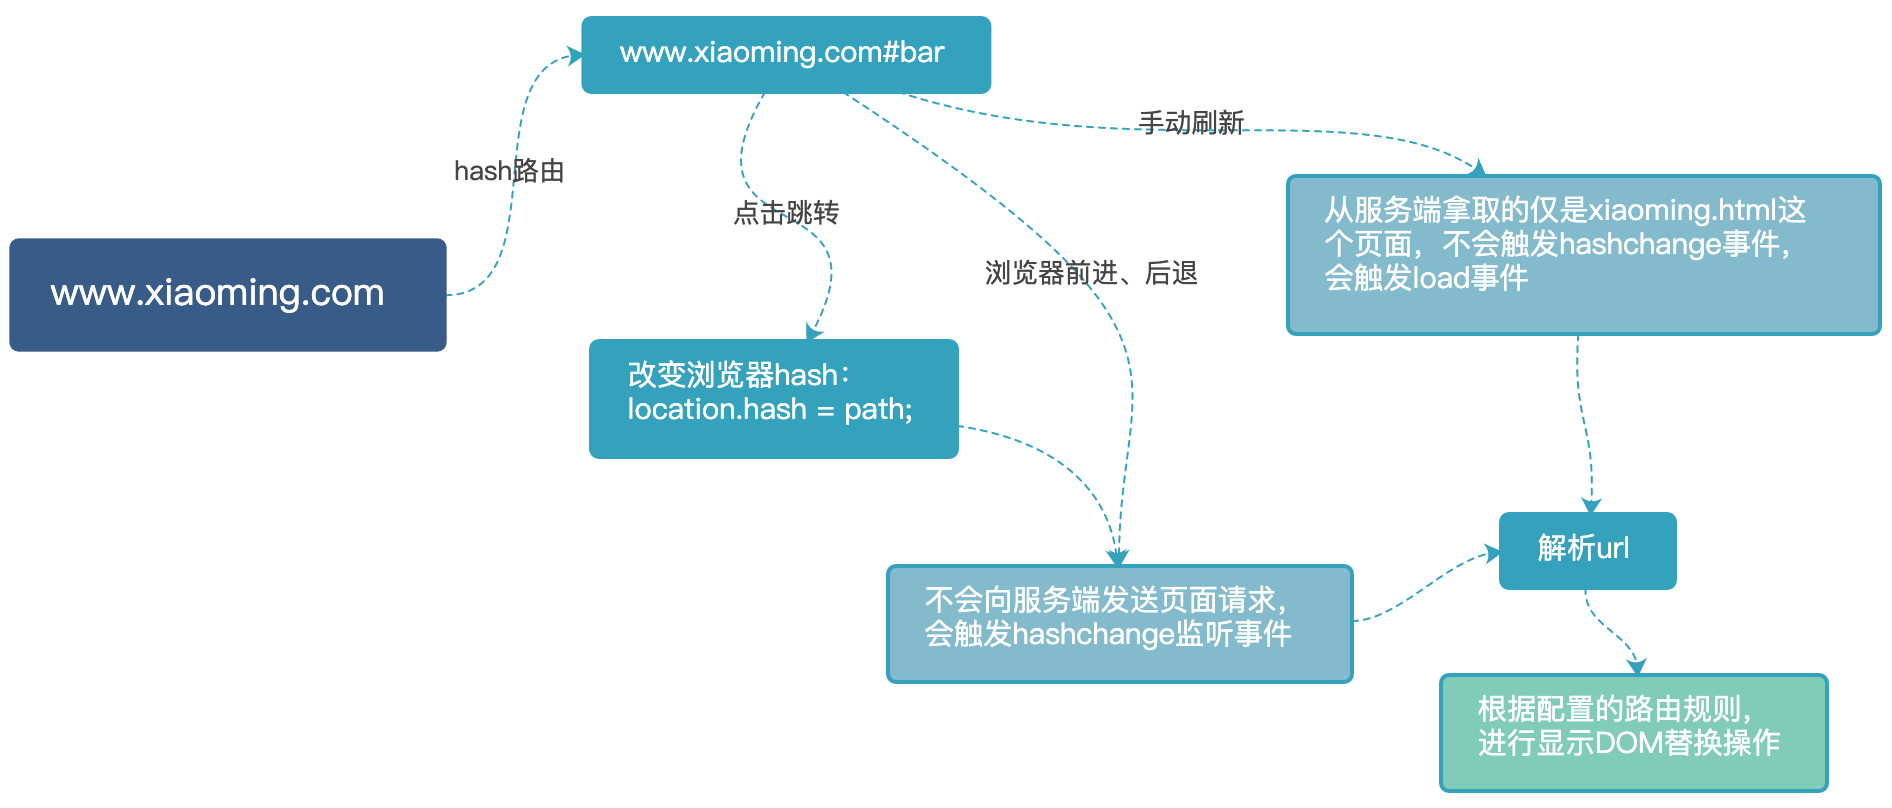
hash 路由
特征
- 类似www.xiaoming.html#bar 就是哈希路由,当 # 后面的哈希值发生变化时,不会向服务器请求数据,可以通过 hashchange 事件来监听到 URL 的变化,从而进行DOM操作来模拟页面跳转
- 不需要服务端配合
- 对 SEO 不友好
原理
hash
HTML5History 路由
特征
- History 模式是 HTML5 新推出的功能,比之 hash 路由的方式直观,长成类似这个样子www.xiaoming.html/bar ,模拟页面跳转是通过 history.pushState(state, title, url) 来更新浏览器路由,路由变化时监听 popstate 事件来操作DOM
- 需要后端配合,进行重定向
- 对 SEO 相对友好
原理

HTML5History
vue-router 源码解读
以 Vue 的路由vue-router为例,我们一起来撸一把它的源码。
Tips:因为,本篇的重点在于讲解单页面路由的两种模式,所以,下面只列举了一些关键代码,主要讲解:
- 注册插件
- VueRouter的构造函数,区分路由模式
- 全局注册组件
- hash / HTML5History模式的 push 和监听方法
- transitionTo 方法
注册插件
首先,作为一个插件,要有暴露一个install方法的自觉,给Vue爸爸去 use。
源码的install.js文件中,定义了注册安装插件的方法install,给每个组件的钩子函数混入方法,并在beforeCreate钩子执行时初始化路由:
Vue.mixin({
 beforeCreate () {
 if (isDef(this.$options.router)) {
 this._routerRoot = this
 this._router = this.$options.router
 this._router.init(this)
 Vue.util.defineReactive(this, '_route', this._router.history.current)
 } else {
 this._routerRoot = (this.$parent && this.$parent._routerRoot) || this
 }
 registerInstance(this, this)
 },
 // 全文中以...来表示省略的方法
 ...
});
区分mode
然后,我们从index.js找到整个插件的基类 VueRouter,不难看出,它是在constructor中,根据不同mode 采用不同路由实例的。
...
import {install} from './install';
import {HashHistory} from './history/hash';
import {HTML5History} from './history/html5';
...
export default class VueRouter {
 static install: () => void;
 constructor (options: RouterOptions = {}) {
 if (this.fallback) {
 mode = 'hash'
 }
 if (!inBrowser) {
 mode = 'abstract'
 }
 this.mode = mode

 switch (mode) {
 case 'history':
 this.history = new HTML5History(this, options.base)
 break
 case 'hash':
 this.history = new HashHistory(this, options.base, this.fallback)
 break
 case 'abstract':
 this.history = new AbstractHistory(this, options.base)
 break
 default:
 if (process.env.NODE_ENV !== 'production') {
 assert(false, `invalid mode: ${mode}`)
 }
 }
 }
}
全局注册router-link组件
这个时候,我们也许会问:使用 vue-router 时, 常见的<router-link/>、 <router-view/>又是在哪里引入的呢?
回到install.js文件,它引入并全局注册了 router-view、router-link组件:
import View from './components/view';
import Link from './components/link';
...
Vue.component('RouterView', View);
Vue.component('RouterLink', Link);
在 ./components/link.js 中,<router-link/>组件上默认绑定了click事件,点击触发handler方法进行相应的路由操作。
const handler = e => {
 if (guardEvent(e)) {
 if (this.replace) {
 router.replace(location, noop)
 } else {
 router.push(location, noop)
 }
 }
};
就像最开始提到的,VueRouter构造函数中对不同mode初始化了不同模式的 History 实例,因而router.replace、router.push的方式也不尽相同。接下来,我们分别扒拉下这两个模式的源码。
hash模式
history/hash.js 文件中,定义了HashHistory 类,这货继承自 history/base.js 的 History 基类。
它的prototype上定义了push方法:在支持 HTML5History 模式的浏览器环境中(supportsPushState为 true),调用history.pushState来改变浏览器地址;其他浏览器环境中,则会直接用location.hash = path 来替换成新的 hash 地址。
其实,最开始读到这里是有些疑问的,既然已经是 hash 模式为何还要判断supportsPushState?原来,是为了支持scrollBehavior,history.pushState可以传参key过去,这样每个url历史都有一个key,用 key 保存了每个路由的位置信息。
同时,原型上绑定的setupListeners 方法,负责监听 hash 变更的时机:在支持 HTML5History 模式的浏览器环境中,监听popstate事件;而其他浏览器中,则监听hashchange。监听到变化后,触发handleRoutingEvent 方法,调用父类的transitionTo跳转逻辑,进行 DOM 的替换操作。
import { pushState, replaceState, supportsPushState } from '../util/push-state'
...
export class HashHistory extends History {
 setupListeners () {
 ...
 const handleRoutingEvent = () => {
 const current = this.current
 if (!ensureSlash()) {
  return
 }
 // transitionTo调用的父类History下的跳转方法,跳转后路径会进行hash化
 this.transitionTo(getHash(), route => {
  if (supportsScroll) {
  handleScroll(this.router, route, current, true)
  }
  if (!supportsPushState) {
  replaceHash(route.fullPath)
  }
 })
 }
 const eventType = supportsPushState ? 'popstate' : 'hashchange'
 window.addEventListener(
 eventType,
 handleRoutingEvent
 )
 this.listeners.push(() => {
 window.removeEventListener(eventType, handleRoutingEvent)
 })
 }

 push (location: RawLocation, onComplete?: Function, onAbort?: Function) {
 const { current: fromRoute } = this
 this.transitionTo(
 location,
 route => {
 pushHash(route.fullPath)
 handleScroll(this.router, route, fromRoute, false)
 onComplete && onComplete(route)
 },
 onAbort
 )
 }
}
...

// 处理传入path成hash形式的URL
function getUrl (path) {
 const href = window.location.href
 const i = href.indexOf('#')
 const base = i >= 0 ? href.slice(0, i) : href
 return `${base}#${path}`
}
...

// 替换hash
function pushHash (path) {
 if (supportsPushState) {
 pushState(getUrl(path))
 } else {
 window.location.hash = path
 }
}

// util/push-state.js文件中的方法
export const supportsPushState =
 inBrowser &&
 (function () {
 const ua = window.navigator.userAgent

 if (
 (ua.indexOf('Android 2.') !== -1 || ua.indexOf('Android 4.0') !== -1) &&
 ua.indexOf('Mobile Safari') !== -1 &&
 ua.indexOf('Chrome') === -1 &&
 ua.indexOf('Windows Phone') === -1
 ) {
 return false
 }
 return window.history && typeof window.history.pushState === 'function'
 })()
HTML5History模式
类似的,HTML5History 类定义在 history/html5.js 中。
定义push原型方法,调用history.pusheState修改浏览器的路径。
与此同时,原型setupListeners 方法对popstate进行了事件监听,适时做 DOM 替换。
import {pushState, replaceState, supportsPushState} from '../util/push-state';
...
export class HTML5History extends History {

 setupListeners () {

 const handleRoutingEvent = () => {
 const current = this.current;
 const location = getLocation(this.base);
 if (this.current === START && location === this._startLocation) {
 return
 }

 this.transitionTo(location, route => {
 if (supportsScroll) {
 handleScroll(router, route, current, true)
 }
 })
 }
 window.addEventListener('popstate', handleRoutingEvent)
 this.listeners.push(() => {
 window.removeEventListener('popstate', handleRoutingEvent)
 })
 }
 push (location: RawLocation, onComplete?: Function, onAbort?: Function) {
 const { current: fromRoute } = this
 this.transitionTo(location, route => {
 pushState(cleanPath(this.base + route.fullPath))
 handleScroll(this.router, route, fromRoute, false)
 onComplete && onComplete(route)
 }, onAbort)
 }
}

...

// util/push-state.js文件中的方法
export function pushState (url?: string, replace?: boolean) {
 saveScrollPosition()
 const history = window.history
 try {
 if (replace) {
 const stateCopy = extend({}, history.state)
 stateCopy.key = getStateKey()
 history.replaceState(stateCopy, '', url)
 } else {
 history.pushState({ key: setStateKey(genStateKey()) }, '', url)
 }
 } catch (e) {
 window.location[replace ? 'replace' : 'assign'](url)
 }
}
transitionTo 处理路由变更逻辑
上面提到的两种路由模式,都在监听时触发了this.transitionTo,这到底是个啥呢?它其实是定义在 history/base.js 基类上的原型方法,用来处理路由的变更逻辑。
先通过const route = this.router.match(location, this.current)对传入的值与当前值进行对比,返回相应的路由对象;接着判断新路由是否与当前路由相同,相同的话直接返回;不相同,则在this.confirmTransition中执行回调更新路由对象,并对视图相关DOM进行替换操作。
export class History {
 ...
 transitionTo (
 location: RawLocation,
 onComplete?: Function,
 onAbort?: Function
 ) {
 const route = this.router.match(location, this.current)
 this.confirmTransition(
 route,
 () => {
 const prev = this.current
 this.updateRoute(route)
 onComplete && onComplete(route)
 this.ensureURL()
 this.router.afterHooks.forEach(hook => {
  hook && hook(route, prev)
 })

 if (!this.ready) {
  this.ready = true
  this.readyCbs.forEach(cb => {
  cb(route)
  })
 }
 },
 err => {
 if (onAbort) {
  onAbort(err)
 }
 if (err && !this.ready) {
  this.ready = true
  // https://github.com/vuejs/vue-router/issues/3225
  if (!isRouterError(err, NavigationFailureType.redirected)) {
  this.readyErrorCbs.forEach(cb => {
  cb(err)
  })
  } else {
  this.readyCbs.forEach(cb => {
  cb(route)
  })
  }
 }
 }
 )
 }
 ...
}
最后
好啦,以上就是单页面路由的一些小知识,希望我们能一起从入门到永不放弃~~
到此这篇关于10分钟彻底搞懂微信小程序单页面应用路由的文章就介绍到这了,更多相关小程序单页面应用路由内容请搜索猪先飞以前的文章或继续浏览下面的相关文章希望大家以后多多支持猪先飞!
相关文章
- 这篇文章主要介绍了vue 实现动态路由的方法,文中示例代码非常详细,帮助大家更好的理解和学习,感兴趣的朋友可以了解下...2020-07-06
- 这篇文章主要介绍了微信小程序 页面传值详解的相关资料,需要的朋友可以参考下...2017-03-13
- 这篇文章主要介绍了uniapp微信小程序:key失效的解决方法,文中通过示例代码介绍的非常详细,对大家的学习或者工作具有一定的参考学习价值,需要的朋友们下面随着小编来一起学习学习吧...2021-01-20
- 本文实例讲述了PHP常用的小程序代码段。分享给大家供大家参考,具体如下:1.计算两个时间的相差几天$startdate=strtotime("2009-12-09");$enddate=strtotime("2009-12-05");上面的php时间日期函数strtotime已经把字符串...2015-11-24
- 这篇文章主要为大家详细介绍了微信小程序自定义tabbar组件,文中示例代码介绍的非常详细,具有一定的参考价值,感兴趣的小伙伴们可以参考一下...2021-03-14
- 这篇文章主要介绍了微信小程序 网络请求(GET请求)详解的相关资料,需要的朋友可以参考下...2016-11-22
解决vue动态路由异步加载import组件,加载不到module的问题
这篇文章主要介绍了解决vue动态路由异步加载import组件,加载不到module的问题,具有很好的参考价值,希望对大家有所帮助。一起跟随小编过来看看吧...2020-07-27- 这篇文章主要给大家介绍了关于微信小程序如何获取图片宽度与高度的相关资料,文中通过示例代码介绍的非常详细,对大家的学习或者工作具有一定的参考学习价值,需要的朋友们下面随着小编来一起学习学习吧...2021-03-10
- 这篇文章主要介绍了微信小程序 二维码生成工具 weapp-qrcode详解,教大家如何在项目中引入weapp-qrcode.js文件,通过实例代码给大家介绍的非常详细,需要的朋友可以参考下...2021-10-23
- 这篇文章主要介绍了Python爬取微信小程序通用方法代码实例详解,文中通过示例代码介绍的非常详细,对大家的学习或者工作具有一定的参考学习价值,需要的朋友可以参考下...2020-09-29
- 这篇文章主要介绍了微信小程序(应用号)开发新闻客户端实例的相关资料,需要的朋友可以参考下...2016-10-25
- 这篇文章主要介绍了微信小程序手势操作之单触摸点与多触摸点的相关资料,需要的朋友可以参考下...2017-03-13
- 这篇文章主要为大家详细介绍了微信小程序实现canvas分享朋友圈海报,文中示例代码介绍的非常详细,具有一定的参考价值,感兴趣的小伙伴们可以参考一下...2020-06-21
- 本文主要介绍了手把手教你uniapp和小程序分包,文中通过示例代码介绍的非常详细,具有一定的参考价值,感兴趣的小伙伴们可以参考一下...2021-09-02
- 这篇文章主要介绍了微信小程序 页面跳转传递值几种方法详解的相关资料,需要的朋友可以参考下...2017-01-16
- 这篇文章主要为大家详细介绍了微信小程序实现点击导航条切换页面,文中示例代码介绍的非常详细,具有一定的参考价值,感兴趣的小伙伴们可以参考一下...2020-11-19
- 这篇文章主要介绍了解决vue-router路由拦截造成死循环问题,具有很好的参考价值,希望对大家有所帮助。一起跟随小编过来看看吧...2020-08-05
- 微信小程序目前的火热程度相信不用多言,最近利用空余时间用小程序实现了个动态的登录页效果,所以下面这篇文章主要给大家介绍了利用微信小程序实现登录页云层漂浮动画效果的相关资料,需要的朋友可以参考借鉴,下面来一起看看吧。...2017-05-09
- 这篇文章主要为大家详细介绍了微信小程序实现选择地址省市区三级联动,文中示例代码介绍的非常详细,具有一定的参考价值,感兴趣的小伙伴们可以参考一下...2020-06-21
- 这篇文章主要给大家介绍了关于vue.js Router中嵌套路由的相关资料,所谓嵌套路由就是路由里面嵌套他的子路由,文章通过示例代码介绍的非常详细,需要的朋友可以参考下...2021-06-27