yii+phpqrcode生成二维码实例
以前我们讲过一些关于用phpqrcode生成二维码的文章,下面我们先列出来
php利用PHP QR Code生成二维码(带logo)
PHP生成二维码(使用PHP QR Code二维码生成类库)
利用phpqrcode生成二维码实例代码
超简单PHP生成二维码实例
下面我们来讲讲yii整合phpqrcode生成二维码的实例。
1,先到官网下载包 http://phpqrcode.sourceforge.net/
下载官网提供的类库后,只需要使用phpqrcode.php就可以生成二维码了,当然您的PHP环境必须开启支持GD2。
phpqrcode.php提供了一个关键的png()方法,其中
参数$text表示生成二位的的信息文本;
参数$outfile表示是否输出二维码图片 文件,默认否;
参数$level表示容错率,也就是有被覆盖的区域还能识别,分别是 L(QR_ECLEVEL_L,7%),M(QR_ECLEVEL_M,15%),Q(QR_ECLEVEL_Q,25%),H(QR_ECLEVEL_H,30%);
参数$size表示生成图片大小,默认是3;参数$margin表示二维码周围边框空白区域间距值;
参数$saveandprint表示是否保存二维码并显示。
2,下载后把解压后的phpqrcode文件夹放到extensions文件夹下,如下图:

3,引入类 phpqrcode
Yii::$enableIncludePath = false;
Yii::import ('application.extensions.phpqrcode.phpqrcode', 1 );
下面是完整的生成二维码的方法
public function actionQrcode(){
        $this->breadcrumbs=array_merge($this->breadcrumbs,array(
                '生成二维码'
        ));
        $qrcode_path='';
        $file_tmp_name='';
        $errors=array();
        if(!empty($_POST)){
            $content = trim($_POST['content']); //二维码内容
            $contentSize=$this->getStringLength($content);
            if($contentSize>290){
                $errors[]='字数过长,不能多于150个字符!';
            }
            Yii::$enableIncludePath = false;
            Yii::import ('application.extensions.phpqrcode.phpqrcode', 1 );
            if(isset($_FILES['upimage']['tmp_name']) && $_FILES['upimage']['tmp_name'] && is_uploaded_file($_FILES['upimage']['tmp_name'])){
                if($_FILES['upimage']['size']>512000){
                    $errors[]="你上传的文件过大,最大不能超过500K。";
                }
                $file_tmp_name=$_FILES['upimage']['tmp_name'];
                $fileext = array("image/pjpeg","image/jpeg","image/gif","image/x-png","image/png");
                if(!in_array($_FILES['upimage']['type'],$fileext)){
                    $errors[]="你上传的文件格式不正确,仅支持 png, jpg, gif格式。";
                }
            }
            $tpgs=$_POST['tpgs'];//图片格式
            $bas_path=dirname ( Yii::app ()->BasePath );
            $qrcode_bas_path=$bas_path.'/upload/qrcode/';
            if(!is_dir($qrcode_bas_path)){
                mkdir($qrcode_bas_path, 0777, true);
            }
            $uniqid_rand=date("Ymdhis").uniqid(). rand(1,1000);
            $qrcode_path=$qrcode_bas_path.$uniqid_rand. "_1.".$tpgs;
            $qrcode_path_new=$qrcode_bas_path.$uniqid_rand."_2.".$tpgs;
            if(Helper::getOS()=='Linux'){

                $mv = move_uploaded_file($file_tmp_name, $qrcode_path);
            }else{
                //解决windows下中文文件名乱码的问题
                $save_path = Helper::safeEncoding($qrcode_path,'GB2312');
                if(!$save_path){
                    $errors[]='上传失败,请重试!';
                }
                $mv = move_uploaded_file($file_tmp_name, $qrcode_path);
            }
            if(empty($errors)){
                $errorCorrectionLevel = $_POST['errorCorrectionLevel'];//容错级别
                $matrixPointSize = $_POST['matrixPointSize'];//生成图片大小
                $matrixMarginSize = $_POST['matrixMarginSize'];//边距大小
                //生成二维码图片
                QRcode::png($content,$qrcode_path_new, $errorCorrectionLevel, $matrixPointSize, $matrixMarginSize);
                $QR = $qrcode_path_new;//已经生成的原始二维码图
                $logo = $qrcode_path;//准备好的logo图片
                if (file_exists($logo)) {
                    $QR = imagecreatefromstring(file_get_contents($QR));
                    $logo = imagecreatefromstring(file_get_contents($logo));
                    $QR_width = imagesx($QR);//二维码图片宽度
                    $QR_height = imagesy($QR);//二维码图片高度
                    $logo_width = imagesx($logo);//logo图片宽度
                    $logo_height = imagesy($logo);//logo图片高度
                    $logo_qr_width = $QR_width / 5;
                    $scale = $logo_width/$logo_qr_width;
                    $logo_qr_height = $logo_height/$scale;
                    $from_width = ($QR_width - $logo_qr_width) / 2;
                    //重新组合图片并调整大小
                    imagecopyresampled($QR, $logo, $from_width, $from_width, 0, 0, $logo_qr_width,
                    $logo_qr_height, $logo_width, $logo_height);
                    //输出图片
//                  header("Content-type: image/png");
                    imagepng($QR,$qrcode_path);
                    imagedestroy($QR);
                }else{
                    $qrcode_path=$qrcode_path_new;
                }
                $qrcode_path=str_replace($bas_path,'', $qrcode_path);
            }else{
                $qrcode_path='';
            }
        }
        $data=array('data'=>array('errors'=>$errors,'qrcode_path'=>$qrcode_path));
        $this->render ( 'qrcode',$data);
    }
前台的上传界面:
<?php
$vars = get_defined_vars ();
$data = $vars ['data'];
$content=Yii::app ()->request->hostInfo;
$matrixPointSize=6;
$matrixMarginSize=2;
$errorCorrectionLevel='M';
$tpgs='gif';
if(!empty($_POST)){
    $content=$_POST['content'];
    $matrixPointSize=$_POST['matrixPointSize'];
    $matrixMarginSize=$_POST['matrixMarginSize'];
    $errorCorrectionLevel=$_POST['errorCorrectionLevel'];
    $tpgs=$_POST['tpgs'];
}

$arrayCorrectionLevel=array('L'=>'L - Low (7%)','M'=>'M - Medium (15%)','Q'=>'Q - Quartile (25%)','H'=>'H - High (30%)');
$arrayTpgs=array('gif'=>'gif格式','png'=>'png格式','jpg格式');
?>
<div class="col-md-12">
    <div class="form-horizontal panel panel-default margin-t-10 b-img">
        <div class="panel-heading">
            <div class="pull-left">
                <span class="g-bg glyphicon glyphicon-wrench margin-r-2"
                    aria-hidden="true"></span>在线生成二维码
            </div>
            <div class="clearfix"></div>
        </div>
<?php
$form = $this->beginWidget ( 'CActiveForm', array (
        'id' => 'qrcode-form',
        'htmlOptions' => array (
                'id' => 'view_table',
                'class' => 'add-form padding-10',
                'enctype' => 'multipart/form-data'
        ),
        'enableAjaxValidation' => false
) );
?>
    <div class="form-group">
            <label class="col-lg-2 control-label">尺寸大小</label>
            <div class="col-lg-3">
                <select class="form-control" id="matrixPointSize"
                    name="matrixPointSize">
                    <?php for ($i=1;$i<21;$i++):?>
                        <option value="<?php echo $i;?>" <?php echo $i==$matrixPointSize?'selected':'';?>><?php echo $i;?></option>
                    <?php endfor;?>
                    </select>
            </div>
        </div>
        <div class="form-group">
            <label class="col-lg-2 control-label">边距大小</label>
            <div class="col-lg-3">
                <select class="form-control" id="matrixMarginSize"
                    name="matrixMarginSize">
                    <?php for ($i=0;$i<21;$i++):?>
                        <option value="<?php echo $i;?>" <?php echo $i==$matrixMarginSize?'selected':'';?>><?php echo $i;?></option>
                    <?php endfor;?>
                </select>
            </div>
        </div>
        <div class="form-group">
            <label class="col-lg-2 control-label">容错级别</label>
            <div class="col-lg-3">
            <?php echo CHtml::dropDownList('errorCorrectionLevel',$errorCorrectionLevel, $arrayCorrectionLevel,array('class'=>'form-control'));?>
            </div>
        </div>
        <div class="form-group">
            <label class="col-lg-2 control-label">保存格式</label>
            <div class="col-lg-3">
            <?php echo CHtml::dropDownList('tpgs',$tpgs, $arrayTpgs,array('class'=>'form-control'));?>
            </div>
        </div>
        <div class="form-group">
            <label class="col-lg-2 control-label">二维码内容</label>
            <div class="col-lg-5">
                <?php echo CHtml::textField('content',$content,array('class'=>'form-control','maxlength'=>150));?>
            </div>
        </div>
        <div class="form-group">
            <label class="col-lg-2 control-label">二维码logo图片</label>
            <div class="col-lg-5">
                <div class="col-md-6">
                        <input id="upimage" type="file" name="upimage" class="hidden">
                        <input id="tmp_file" class="form-control" type="text" value="gif,png,jpg">
                    </div>
                <div class="col-md-6"><a class="btn btn-default" onclick="$('input[id=upimage]').click();">选择文件</a></div>
            </div>
        </div>
        <div class="list_back">
            <input type="submit" value="生成二维码" class="btn btn-success">
        </div>
    </div>
<?php $this->endWidget(); ?>
    <div class="panel panel-default margin-t-10 b-img">
        <div class="panel-heading">
            <span class="g-bg glyphicon glyphicon-wrench margin-r-2" aria-hidden="true"></span>二维码
        </div>
        <div class="panel-body">
        <?php if(empty($_POST)):?>
        <?php echo CHtml::image('/static/tool/qrcode/qrcode.gif','二维码');?>
        <?php endif;?>
        <?php if(!empty($data['errors'])):?>
            <label class="col-lg-2 text-right">生成失败</label>
            <div class="col-lg-5">
            <?php foreach ($data['errors'] as $e):?>
            <?php echo $e;?><br>
            <?php endforeach;?>
            </div>
        <?php endif;?>
        <?php if(!empty($data['qrcode_path'])):?>
            <?php echo CHtml::image($data['qrcode_path'],'二维码');?>
            <a class="btn btn-success color-f" href="<?php echo $data['qrcode_path'];?>" target="_blank"><span aria-hidden="true" class="glyphicon glyphicon-download-alt margin-r-2"></span>右键另存为二维码</a>
        <?php endif;?>
        </div>
    </div>
<?php $this->renderPartial('/component/duoshuo_common');?>
</div>
如图:

在PHP中,serialize和json两种方式对一个对象或数组进行序列化或反序列化有什么区别呢?
假设一个对象和一个数组:
$web = new stdClass;
$web->site = 'tantengvip';
$web->owner = 'tuntun';
$web->age = 5;
和
$web = array();
$web['site'] = 'tantengvip';
$web['owner'] = 'tuntun';
$web['age'] = 5;
对它们分别用serialize函数和unserialize函数进行序列化和反序列化,看看打印结果分别是什么,如下:
使用serialize方式:
var_dump(serialize($web));
var_dump(unserialize(serialize($web)));
var_dump(json_encode($web));
var_dump(json_decode(json_encode($web)));
结果:
string 'O:8:"stdClass":3:{s:4:"site";s:10:"tantengvip";s:5:"owner";s:6:"tuntun";s:3:"age";i:5;}' (length=87)
object(stdClass)[127]
public 'site' => string 'tantengvip' (length=10)
public 'owner' => string 'tuntun' (length=6)
public 'age' => int 5
string '{"site":"tantengvip","owner":"tuntun","age":5}' (length=46)
object(stdClass)[127]
public 'site' => string 'tantengvip' (length=10)
public 'owner' => string 'tuntun' (length=6)
public 'age' => int 5
使用json方式:
var_dump(serialize($web));
var_dump(unserialize(serialize($web)));
var_dump(json_encode($web));
var_dump(json_decode(json_encode($web),true));
结果
string 'a:3:{s:4:"site";s:10:"tantengvip";s:5:"owner";s:6:"tuntun";s:3:"age";i:5;}' (length=74)
array (size=3)
'site' => string 'tantengvip' (length=10)
'owner' => string 'tuntun' (length=6)
'age' => int 5
string '{"site":"tantengvip","owner":"tuntun","age":5}' (length=46)
array (size=3)
'site' => string 'tantengvip' (length=10)
'owner' => string 'tuntun' (length=6)
'age' => int 5
我们发现,对于前面定义的这样一个对象或数组,用serialize和json进行序列化,反序列化回来的结果和原来是一样的,并没有什么区别,除了序列化的格式不同而已。
那么它们到底有何区别?以下文字总结很好,就不自己加以说明了,可以写代码验证。(链接)
使用json序列化和反序列化
优势:
变量序列化后依然可读
可以给其他系统使用,因为JSON格式是标准的
劣势:
只对UFT-8的数据有效,其他编码可能不能很好工作
只对stdClass类的示例有效
使用serialize方式序列化和反序列化
优势:
允许非UTF-8的变量
支持除了stdClass 示例外的其他实例
劣势:
编码后的文本对人来说是不可读的
无法被其他语言的系统引用
好,写个代码看看:
class Test
{
private $pri = 'pri';
public $class = 'Test';
public function __construct()
{
$this->class = 'Test construct';
$this->pri = 'pri construct';
}
}
$test = new Test();
var_dump(serialize($test));
var_dump(unserialize(serialize($test)));
var_dump(json_encode($test));
var_dump(json_decode(json_encode($test)));
结果:
PHP
string 'O:4:"Test":2:{s:9:"�Test�pri";s:13:"pri construct";s:5:"class";s:14:"Test construct";}' (length=86)
object(Test)[127]
private 'pri' => string 'pri construct' (length=13)
public 'class' => string 'Test construct' (length=14)
string '{"class":"Test construct"}' (length=26)
object(stdClass)[127]
public 'class' => string 'Test construct' (length=14)
我们发现,json序列化和反序列化丢失了类中的私有成员变量,而serialize序列化和反序列化只要是类的变量都可以,但是类的成员方法都无法进行序列化和反序列化。
在一般情况,还是使用json比较好,因为json是跨平台的通用格式,除了json,用xml也比较好。那在什么时候使用serialize方式呢?
在对一个类进行serialize反序列化的时候会默认调用魔术方法__wakeUp(),这样就使得对象能够重新建立起序列化时未能保留的各种状态。例如:数据库连接等。那就是另外一个问题了,这里不做深究了
php多维数组转一维数组我们用到最多的就是直接foreach了,但是如何使用php函数来实现呢,下面我们就一起来看看吧.php语言本身没有将多维数组转为一维数组的函数,但是我们可以自己写一个php函数来实现将多维转一维的功能。
运用了递归,简单粗暴,整个函数体9行代码就实现了该功能,php源码如下:
$multi = array(
array(
array(
'wo',
'shi'
),
'php'
),
'cheng',
array(
array(
'xu',
'yuan',
)
),
'!'
);
$multi = arrToOne($multi);
print_r($multi);
function arrToOne($multi) {
$arr = array();
foreach ($multi as $key => $val) {
if( is_array($val) ) {
$arr = array_merge($arr, arrToOne($val));
} else {
$arr[] = $val;
}
}
return $arr;
}
执行后的效果:
Array
(
[0] => wo
[1] => shi
[2] => php
[3] => cheng
[4] => xu
[5] => yuan
[6] => !
)
PHPExcel是一个强大的excel导出/导入插件,它甚至还可以导出pdf等,是个非常好用的php插件,php学习必不可少。那么如何使用它呢,下面是PHPExcel入门范例:
php源码参考:
<?php
require_once("PHPExcel/PHPExcel.php");
$excel = new PHPExcel(); //实例化PHPExcel类
//设置作者(非必要)
$excel->getProperties()->setCreator("Reson");
//以下是要导出的数据
$datas = array(
array(
0 => 'UID',
1 => '用户名',
2 => '性别'
),
array(
0 => '1',
1 => 'reson',
2 => '男'
),
array(
0 => '2',
1 => 'anyse',
2 => '女'
)
);
//开始导出。注意$i要从1开始,不能从0开始,原因如下:'A'.$i,当i=1即为A1(第一行,第一个格子)
$i = 1;
foreach($datas as $key => $val){
$excel->getActiveSheet()->setCellValue('A'.$i, $val['0']);
$excel->getActiveSheet()->setCellValue('B'.$i, $val['1']);
$excel->getActiveSheet()->setCellValue('C'.$i, $val['2']);
$i++;
}
$excel->getActiveSheet()->setTitle('php学习人员名单'); //含义见下图
$fileName = 'test';
header("Pragma: public");
header("Expires: 0");
header("Cache-Control:must-revalidate, post-check=0, pre-check=0");
header("Content-Type:application/force-download");
header("Content-Type:application/vnd.ms-execl");
header("Content-Type:application/octet-stream");
header("Content-Type:application/download");;
header('Content-Disposition: attachment;filename="'.$fileName.'.xls"');
header("Content-Transfer-Encoding:binary");
$objWriter = PHPExcel_IOFactory::createWriter($excel, 'Excel5');
$objWriter->save('php://output');
?>
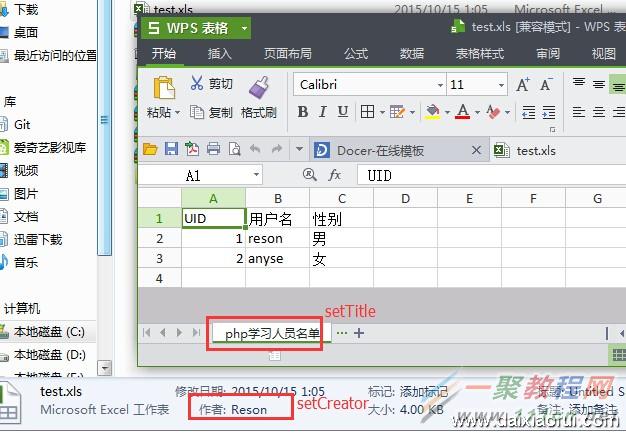
出后就是这个样子了,是不是非常好用呢
在WordPress中很多地方使用stdClass来定义一个对象(而通常是用数组的方式),然后使用get_object_vars来把定义的对象『转换』成数组。
如下代码所示:
PHP
$tanteng = new stdClass();
$tanteng->name = 'tanteng';
$tanteng->email = 'xxx@qq.com';
$info = get_object_vars($tanteng);
print_r($info);exit;
输出:
Array ( [name] => tanteng [email] => xxx@qq.com )
get_object_vars的作用是返回由对象属性组成的关联数组。它的效果跟这样定义数组其实是一样的:
PHP
$tanteng = array();
$tanteng['name'] = 'tanteng';
$tanteng['email'] = 'xxx@qq.com';
可以这样理解:stdClass是一个内置类,它没有成员变量,也没有成员方法的一个类。new一个stdClass就是实例化了一个『空』对象,它本身没什么意义,但是用stdClass定义有什么好处呢?
如下代码:
PHP
$user = new stdClass();
$user->name = 'gouki';
$user->hehe = 'hehe';
$myUser = $user;
$myUser->name = 'flypig';
print_r($user);
print_r($myUser);
print_r($user);
这里$myUser被赋值$user,但其实并没有新开辟一块内存存储变量,$myUser还是指的stdClass这个对象,通过$myUser改变属性页就改变了$user的属性,并不是新建一个副本,如果程序中有许多这样的操作,使用stdClass的方式可以节省内存开销。
运行结果:
PHP
stdClass Object
(
[name] => flypig
[hehe] => hehe
)
stdClass Object
(
[name] => flypig
[hehe] => hehe
)
stdClass Object
(
[name] => flypig
[hehe] => hehe
)
从结果可以看出,改变$myUser的属性确实改变了$user声明的stdClass属性。而如果$user是一个数组,赋值给$myUser,那就拷贝了一个副本给$myUser,这样增大系统开销。
当然,你也可以反过来,把一个数组转换为对象:
PHP
$hehe['he1'] = 'he1';
$hehe['he2'] = 'he2';
$hh = (object) $hehe;
print_r($hh);
打印结果:
stdClass Object ( [he1] => he1 [he2] => he2 )
相关文章
- 最近做了个扫描二维码得到vcard的项目,遇到一个问题,有一部分生成完的二维码,用android系统手机扫描后得到的vcard中的中文姓名是乱码,经过比对发现,这部分vcard中ORG这个...2016-11-25
- 本文介绍两种使用 php 生成二维码的方法。 (1)利用google生成二维码的开放接口,代码如下: /** * google api 二维码生成【QRcode可以存储最多4296个字母数字类型的任意文本,具体可以查看二维码数据格式】 * @param strin...2015-10-21
- 这篇文章主要介绍了Java生成随机姓名、性别和年龄的实现示例,文中通过示例代码介绍的非常详细,对大家的学习或者工作具有一定的参考学习价值,需要的朋友们下面随着小编来一起学习学习吧...2020-10-01
- 这篇文章主要介绍了C#生成随机数功能,涉及C#数学运算与字符串操作相关技巧,具有一定参考借鉴价值,需要的朋友可以参考下...2020-06-25
- 这篇文章主要介绍了微信小程序 二维码生成工具 weapp-qrcode详解,教大家如何在项目中引入weapp-qrcode.js文件,通过实例代码给大家介绍的非常详细,需要的朋友可以参考下...2021-10-23
- 下面小编就为大家带来一篇jQuery为动态生成的select元素添加事件的方法。小编觉得挺不错的,现在就分享给大家,也给大家做个参考。一起跟随小编过来看看吧...2016-09-01
- 关于生成唯一数字ID的问题,是不是需要使用rand生成一个随机数,然后去数据库查询是否有这个数呢?感觉这样的话有点费时间,有没有其他方法呢?当然不是,其实有两种方法可以解决。 1. 如果你只用php而不用数据库的话,那时间戳+随...2015-11-24
- 经常制作开发不同的网站的后台,写过很多种不同的后台导航写法。 最终积累了这种最写法,算是最好的吧...2013-09-29
- js生成随机数主要用到了内置的Math对象的random()方法。用法如:Math.random()。它返回的是一个 0 ~ 1 之间的随机数。有了这么一个方法,那生成任意随机数就好理解了。比如实际中我们可能会有如下的需要: (1)生成一个 0 - 1...2015-10-21
- 验证码是一个现在WEB2.0中常见的一个功能了,像注册、登录又或者是留言页面,都需要注册码来验证当前操作者的合法性,我们会看到有些网站没有验证码,但那是更高级的验证了,...2016-11-25
- ZXing是一个开放源码的,用Java实现的多种格式的1D/2D条码图像处理库,它包含了联系到其他语言的端口。这篇文章主要给大家介绍了.NET C#利用ZXing生成、识别二维码/条形码的方法,文中给出了详细的示例代码,有需要的朋友们可以参考借鉴。...2020-06-25
- 复制代码 代码如下:function getTagStyle(){ $minFontSize=8; //最小字体大小,可根据需要自行更改 $maxFontSize=18; //最大字体大小,可根据需要自行更改 return 'font-size:'.($minFontSize+lcg_value()*(abs($maxFo...2013-10-04
- 这篇文章主要介绍了浅谈js二维码扫码登录是什么原理,文中通过示例代码介绍的非常详细,对大家的学习或者工作具有一定的参考学习价值,需要的朋友们下面随着小编来一起学习学习吧...2021-04-13
- QrCode.Net是一个使用C#编写的用于生成二维码图片的类库,使用它可以非常方便的为WinForm、WebForm、WPF、Silverlight和Windows Phone 7应用程序提供二维码编码输出功能。可以将二维码文件导出为eps格式...2020-06-25
- 在微信公众号平台开发者那里,在“账号管理”那里,有一项功能是“生成带参数的二维码”,通过这儿生成的二维码,只要通过微信扫一扫之后,会把事件自动推送到微...2016-05-19
- 解决办法:$str=”QB”.str_pad(($maxid[0]["max(id)"]+1),5,”0″,STR_PAD_LEFT ); 其中$maxid[0]["max(id)"]+1) 是利用max函数从数据库中找也ID最大的一个值, ID为主键,不会重复。 str_pad() 函数把字符串填充为指...2013-10-04
- 这篇文章主要介绍了C#生成Word文档代码示例,本文直接给出代码实例,需要的朋友可以参考下...2020-06-25
- 下面小编就为大家带来一篇JS生成某个范围的随机数【四种情况详解】。小编觉得挺不错的,现在分享给大家,也给大家做个参考,一起跟随小编过来看看吧...2016-04-22
基于Bootstrap的Metronic框架实现条码和二维码的生成及打印处理操作
这篇文章主要介绍了基于Bootstrap的Metronic框架实现条码和二维码的生成及打印处理操作的相关资料,非常不错,具有参考借鉴价值,需要的朋友可以参考下...2016-09-01- 这篇文章主要介绍了PHP简单实现生成txt文件到指定目录的方法,简单对比分析了PHP中fwrite及file_put_contents等函数的使用方法,需要的朋友可以参考下...2016-04-28