unity 如何使用LineRenderer 动态划线
我就废话不多说了,大家还是直接看代码吧~
private LineRenderer line1;
//画线
line1 = this.gameObject.AddComponent<LineRenderer>();
//只有设置了材质 setColor才有作用
line1.material = new Material(Shader.Find("Particles/Additive"));
line1.SetVertexCount(2);//设置两点
line1.SetColors(Color.yellow, Color.red); //设置直线颜色
line1.SetWidth(5f, 10f);//设置直线宽度
//设置指示线的起点和终点
line1.SetPosition(0, A.transform.position);
line1.SetPosition(1, B.transform.position);
Destroy(this.gameObject.GetComponent<LineRenderer>());
补充:Unity LineRenderer绘制物体行走路线
我是用的角色控制器(Character Controller)+LineRenderer做的
下面是代码
using System.Collections;
using System.Collections.Generic;
using UnityEngine;
public class PlayerTest : MonoBehaviour
{
    public GameObject clone;//这是个空物体  只添加了一个LineRenderer组件
    public float speed = 5;
    public float jumpSpeed = 10f;
    public float luodi = 15;
    private Vector3 movePos = Vector3.zero;
    public CharacterController controller;
    private LineRenderer line;
    Vector3[] path;
    private float time = 0;
    List<Vector3> pos=new List<Vector3> ();
    void Awake()
    {
              path = pos.ToArray();//初始化
              line = clone.GetComponent<LineRenderer>();//获得该物体上的LineRender组件
              line.SetColors(Color.blue, Color.red);//设置颜色
              line.SetWidth(0.2f, 0.1f);//设置宽度
    }
    void Update()
    {
        time += Time.deltaTime;
        if (time>0.1)//每0.1秒绘制一次
        {
            time = 0;
            pos.Add(transform.position);//添加当前坐标进链表
            path = pos.ToArray();//转成数组
        }
        if (controller.isGrounded)//判断人物是否落地
        {
            movePos = new Vector3(Input.GetAxis("Horizontal"), 0, Input.GetAxis("Vertical"));
            movePos = transform.TransformDirection(movePos);
            movePos *= speed;
            if (Input.GetButton("Jump")) {
                movePos.y = jumpSpeed;
              }
        }
        movePos.y -= luodi * Time.deltaTime;
        controller.Move(movePos * Time.deltaTime);
        if (path.Length!=0)//有数据时候再绘制
        {
            line.SetVertexCount(path.Length);//设置顶点数
            line.SetPositions(path);//设置顶点位置
        }
    }
}
补充:Unity组件 — LineRenderer动态添加碰撞
基础知识:
选中要添加组件的gameObject,在Inspector面板,点击“Add Component”按钮,选中LineRenderer组件,添加。
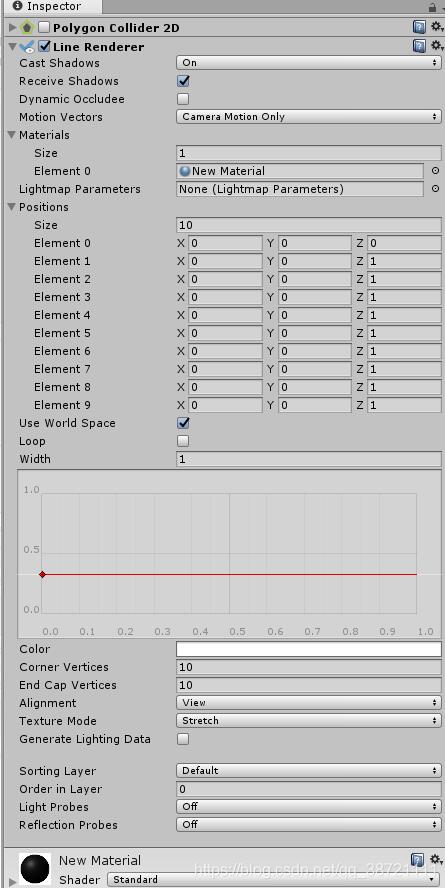
cast Shadows : 蒙上阴影
Receive Shadows : 是否接受阴影
Dynamic Occludee : 是否动态遮罩
Materials 中的属性:
size : 材质球的数量
Element : 具体的材质球
Positions 中的属性:
size : 位置的数量
Element : 具体的位置
Use World Space : 是否使用世界坐标系,还是使用相对坐标系
Width : 线条的宽度
Color : 线条的颜色,注:如果没有赋值材质,无论怎样改变Color的值,颜色都不会有改变。
Corner Vertices : 可形成线条的圆角效果
End Cap Vertices : 影响线条的两端的圆角效果。
注:当line Renderer拥有了材质,可以通过修改Color来改变颜色。当时当修改了Color后,line的颜色没有改变,应该是Material和Color属性结合不好。将Material修改为Sprites/Default,Color的颜色就可以成功的显示在line上面了。
动态添加碰撞器(Polygon Collider2D)
using System.Collections;
using System.Collections.Generic;
using UnityEngine;
public class MouseTrack : MonoBehaviour
{
    /// <summary>
    /// 获取LineRenderer组件
    /// </summary>
    [Header("获得LineRenderer组件")]
    public LineRenderer lineRenderer;
    //获得鼠标跟踪位置
    private Vector3[] mouseTrackPositions = new Vector3[20];
    private Vector3 headPosition;   //头位置
    private Vector3 lastPosition;   //尾位置
    private int positionCount = 0;  //位置计数
    [Header("设置多远距离记录一个位置")]
    public float distanceOfPositions = 0.01f;
    private bool firstMouseDown = false;    //第一次鼠标点击
    private bool mouseDown = false;     //鼠标点击
    PolygonCollider2D polygonCollider;   //添加多边形碰撞
    void Start()
    {
        polygonCollider = gameObject.GetComponent<PolygonCollider2D>();
    }
    void Update()
    {
        //鼠标点击的时候
        if (Input.GetMouseButtonDown(0))
        {
            polygonCollider.enabled = true;
            lineRenderer.positionCount = 20;
            firstMouseDown = true;
            mouseDown = true;
        }
        if (Input.GetMouseButtonUp(0))
        {
            mouseDown = false;

            //ClearColliderAndLineRenderer();
        }
        OnDrawLine();
        firstMouseDown = false;
    }
    //画线
    private void OnDrawLine()
    {
        if (firstMouseDown == true)
        {
            positionCount = 0;
            //头坐标
            headPosition = Camera.main.ScreenToViewportPoint(Input.mousePosition + new Vector3(0, 0, 11));
            lastPosition = headPosition;
        }
        if (mouseDown == true)
        {
            headPosition = Camera.main.ScreenToWorldPoint(Input.mousePosition + new Vector3(0, 0, 11));
            //判断头坐标到尾坐标的距离是否大于记录点位
            if (Vector3.Distance(headPosition, lastPosition) > distanceOfPositions)
            {
                //用于保存位置
                SavePosition(headPosition);
                positionCount++;
            }
            lastPosition = headPosition;
        }
        //设置线性渲染器的位置
        SetLineRendererPosition(mouseTrackPositions);
    }
    //保存位置
    private void SavePosition(Vector3 pos)
    {
        pos.z = 0;
        if (positionCount <= 19)
        {
            for (int i = positionCount; i < 20; i++)
            {
                mouseTrackPositions[i] = pos;
            }
        }
        else
        {
            for (int i = 0; i < 19; i++)
            {
                mouseTrackPositions[i] = mouseTrackPositions[i + 1];
            }
        }
        mouseTrackPositions[19] = pos;

        //创建碰撞路径
        List<Vector2> colliderPath = GetColliderPath(mouseTrackPositions);
        polygonCollider.SetPath(0, colliderPath.ToArray());
    }
    //计算碰撞体轮廓
    float colliderWidth;
    List<Vector2> pointList2 = new List<Vector2>();
    List<Vector2> GetColliderPath(Vector3[] pointList3)
    {
        //碰撞体宽度
        colliderWidth = lineRenderer.startWidth;
        //Vector3转Vector2
        pointList2.Clear();
        for (int i = 0; i < pointList3.Length; i++)
        {
            pointList2.Add(pointList3[i]);
        }
        //碰撞体轮廓点位
        List<Vector2> edgePointList = new List<Vector2>();
        //以LineRenderer的点位为中心, 沿法线方向与法线反方向各偏移一定距离, 形成一个闭合且不交叉的折线
        for (int j = 1; j < pointList2.Count; j++)
        {
            //当前点指向前一点的向量
            Vector2 distanceVector = pointList2[j - 1] - pointList2[j];
            //法线向量
            Vector3 crossVector = Vector3.Cross(distanceVector, Vector3.forward);
            //标准化, 单位向量
            Vector2 offectVector = crossVector.normalized;
            //沿法线方向与法线反方向各偏移一定距离
            Vector2 up = pointList2[j - 1] + 0.5f * colliderWidth * offectVector;
            Vector2 down = pointList2[j - 1] - 0.5f * colliderWidth * offectVector;
            //分别加到List的首位和末尾, 保证List中的点位可以围成一个闭合且不交叉的折线
            edgePointList.Insert(0, down);
            edgePointList.Add(up);
            //加入最后一点
            if (j == pointList2.Count - 1)
            {
                up = pointList2[j] + 0.5f * colliderWidth * offectVector;
                down = pointList2[j] - 0.5f * colliderWidth * offectVector;
                edgePointList.Insert(0, down);
                edgePointList.Add(up);
            }
        }
        //返回点位
        return edgePointList;
    }
    //设置线条渲染器位置
    private void SetLineRendererPosition(Vector3[] position)
    {
        lineRenderer.SetPositions(position);
    }
    //用于清除碰撞和线性渲染
    void ClearColliderAndLineRenderer()
    {
        if (polygonCollider)
        {
            polygonCollider.enabled = false;
        }
        lineRenderer.positionCount = 0;
    }
}
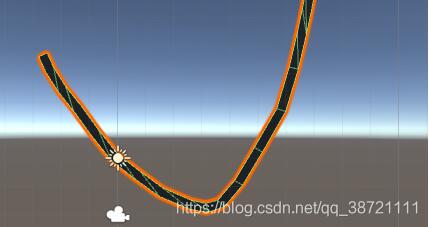
效果图:
以上为个人经验,希望能给大家一个参考,也希望大家多多支持猪先飞。如有错误或未考虑完全的地方,望不吝赐教。
相关文章
- 这篇文章主要介绍了Oracle使用like查询时对下划线的处理方法,本文给大家介绍的非常详细,对大家的学习或工作具有一定的参考借鉴价值,需要的朋友可以参考下...2021-03-16
- 这篇文章主要为大家详细介绍了Unity时间戳的使用方法,文中示例代码介绍的非常详细,具有一定的参考价值,感兴趣的小伙伴们可以参考一下...2020-06-25
- 这篇文章主要介绍了mybatis Map查询结果下划线转驼峰的实例,具有很好的参考价值,希望对大家有所帮助。一起跟随小编过来看看吧...2020-09-24
Unity中 ShaderGraph 实现旋涡传送门效果入门级教程(推荐)
通过Twirl 旋转节点对Gradient Noise 梯度噪声节点进行操作,就可得到一个旋转的旋涡效果。具体实现代码跟随小编一起通过本文学习下吧...2021-07-11- 本文主要介绍了4种延时执行的方法,主要包括Update计时器,Invoke,协程,DoTween,具有一定的参考价值,感兴趣的小伙伴们可以参考一下...2021-07-07
- 这篇文章主要为大家详细介绍了Unity shader实现遮罩效果,文中示例代码介绍的非常详细,具有一定的参考价值,感兴趣的小伙伴们可以参考一下...2020-06-25
- 这篇文章主要介绍了unity 判断鼠标是否在哪个UI上的两种实现方法,具有很好的参考价值,希望对大家有所帮助。一起跟随小编过来看看吧...2021-04-10
- 这篇文章主要为大家详细介绍了Unity实现换装系统,文中示例代码介绍的非常详细,具有一定的参考价值,感兴趣的小伙伴们可以参考一下...2021-04-11
- 这篇文章主要给大家介绍了关于利用unity代码C#封装为dll的相关资料,文中通过图文将实现的方法介绍的非常详细,对大家的学习或者工作具有一定的参考学习价值,需要的朋友们下面随着小编来一起学习学习吧...2020-06-25
- 这篇文章主要为大家详细介绍了Unity Shader实现径向模糊效果,文中示例代码介绍的非常详细,具有一定的参考价值,感兴趣的小伙伴们可以参考一下...2021-08-09
- 这篇文章主要介绍了unity 实现摄像机绕某点旋转一周,具有很好的参考价值,希望对大家有所帮助。一起跟随小编过来看看吧...2021-04-12
- 这篇文章主要为大家详细介绍了Unity实现截图功能,文中示例代码介绍的非常详细,具有一定的参考价值,感兴趣的小伙伴们可以参考一下...2020-06-25
- 这篇文章主要介绍了Go语言json编码驼峰转下划线、下划线转驼峰的实现,文中通过示例代码介绍的非常详细,对大家的学习或者工作具有一定的参考学习价值,需要的朋友们下面随着小编来一起学习学习吧...2020-06-09
- 这篇文章主要介绍了Unity中EventTrigger的几种使用操作,具有很好的参考价值,希望对大家有所帮助。一起跟随小编过来看看吧...2021-04-10
- 这篇文章主要为大家详细介绍了Unity Shader实现2D水流效果,文中示例代码介绍的非常详细,具有一定的参考价值,感兴趣的小伙伴们可以参考一下...2020-06-25
- 这篇文章主要介绍了Unity 按钮添加OnClick事件操作,具有很好的参考价值,希望对大家有所帮助。一起跟随小编过来看看吧...2021-04-10
- 这篇文章主要为大家详细介绍了Unity使用EzySlice实现模型多边形顺序切割,文中示例代码介绍的非常详细,具有一定的参考价值,感兴趣的小伙伴们可以参考一下...2020-11-03
- 这篇文章主要为大家详细介绍了Unity Shader实现描边OutLine效果,文中示例代码介绍的非常详细,具有一定的参考价值,感兴趣的小伙伴们可以参考一下...2020-06-25
- 这篇文章主要为大家详细介绍了Unity Shader实现裁切效果,文中示例代码介绍的非常详细,具有一定的参考价值,感兴趣的小伙伴们可以参考一下...2020-06-25
- 这篇文章主要为大家详细介绍了unity实现车方向盘转动效果,文中示例代码介绍的非常详细,具有一定的参考价值,感兴趣的小伙伴们可以参考一下...2020-06-25